Daihatsu 2001 Cuore L701 building a better 'safer' car

i run these on a 5.5" wide 13 and they’re really good
never done track work on them - but got stuck into them few times on road and like very much
fitment works perfectly with ~35mm lowered set up too (Y)

just wish they made them in ar-1 or a proper semi slick so i could race on them!!
185 / 60 is stupid to make fit!

1 Like

they don’t fit under all 14’s
but they will under the facelift GTvi
Which are the same as YRV turbo / same 14" wheel

After spending way to long on trying to get the old brake retaining clips back on, I recalled that the Sirion manual notes these as “Non-reusable parts” and after how bent out of shape they had become I would agree. I bought 2 new packs (2 per pack) of Areoflow - AF230-00 Stainless Steel Brake Retaining C-Clip from Race Car Engineering, Slacks Creek for $3.24 for pack of 2. I could give them a firm push with my thumb and they slid on and locked into place as expected. It was doing my head in but if they have the correct shape they slide on easily and now is sorted.


https://www.racecarengineering.com.au/

Front end is completed.
I don’t know why I decided to do such a project at the tail end of a Brisbane Summer, in winter we get 3-4 months of clear skies, no rain, 21C and low humidity and it would have been the perfect time for such a project.

2 Likes

All just a precursor to big winter plans?

1 Like

Winter will be time to do the neglected maintenance; air filter, gearbox fluid, etc, etc.

With just the front coilovers on (rear is still stock) I wound them up 70mm to spring base plate and it has lowered the front by ~4". I had to use a block of timber on the trolley jack and pump it about 4 times before it contacted the K-frame with the original suspension to get it high enough for the jack stands, once lowered with the new suspension I had to reef the jack out and the timber will not fit anymore. I will have to get something under each wheel next time so I can get the timber under again if I want to front on jack stands again.

2 Likes

What can go wrong will go wrong:

  • trolley jack does not achieve the height needed to get car on the jack stands, used a timber block to increase the height,
  • got the front up on the jack stands but after putting in the new front coilovers wound up 70mm to bottom of the coil plate, removing the jack stands and lowering the car could not slide the trolley out with the timber on and had to give it a bit of a reef to get it out from under the k-frame, trolley will still slide under but cannot use timber again in that manner, front seems to have lowered at least 4",
  • even with a Sidchrome flare nut spanner the front passenger fixed brake line flare nut spun, after the 3rd attempt I had to use the multi-grips locked on to break the seal to minimise any further possible damage to the nut, it wound in nice and snug with the flare nut spanner,
  • trying to reuse the brake line retaining clips was near impossible after they were all bent out of shape and they kept twisting and bending and were not going to go on, brand new AF230-00 C-Clip could readily be pushed on with a firm push with the thumb and locked into place,
  • trying to jack up the rear this morning at the correct point and even with a couple of pieces of timbre I was still at least 1" of getting the stands under, called some local timber yards today and Garde Timber gave me 3 fully machined hardwood blocks (Iron wood) 90 x 90 x 150mm to use http://gardetimber.com.au/
  • many said not to worry about plugging the brake line when changing the lines, thankfully I had bought a lawn mower 2 weeks ago and had cut that box up and was using it under the car because the brake line fully released what was in the line and the fill chamber, for the next line I did what they suggested on the net and used the bleed nipple cap the plug the line and reduce any leakage,
  • after the issues with the brake line retaining clips I called HEL and asked them if their hoses were a slightly larger diameter, they weren’t sure but in exceptional after sales service they sent me overnight replacement brake line retaining clips at no extra cost
7 Likes

Would you loctite the brake calipers? I doubt I will be changing them for a long time, could easily pull one bolt out at a time and apply it and then re-thread. if so, which product and what strength would you use?

Late Edit: I found a meaningful guide here;

1 Like

No to loctite. Not neccary if torqued correctly. How are most anaerobic (loctite) products bonds reversed/released? High heat. As such on brakes anaerobic will not hold with high temps anyway. Use high temp anti sieze. I like nickel anti sieze that is good to 1450c.

3 Likes

To be honest I didn’t buy a torque wrench due to another thread on OCAU and because of the high variance defined for the required torque in the manuals; 113 ± 22.5 N-m

It was suggested I just do ugga dugga for the job.

The reverse/release for the threadlockers was dependent on what composition and strength of the product bought, with the brake calipers it was advised to use the “Permatex - Medium Strength, Blue” which is designed to be undone again via manual tools but as you point out it arguably has an unsuitable temp range -54°to 149°C.

I did read that some threadlockers are anaerobic but I suppose that will be dependent on which one you choose.

All chemical thread lockers are anaerobic. Simply means that it sets in the absence of oxygen. Anything else would be classed as an adhesive. The benefit of the the torque wrench is in not overdoing it and having somewhat consistent results. I like beam wrenches and use Japanese made ones

I was going to buy this Warren & Brown 1/2" Screen Torque Wrench;
https://www.totaltools.com.au/96678-warren-screen-torque-wrench-334451
But when the variance for the torque was pointed out on the calipers and suspension it became hard to justify the expense. If it was more exacting then I wouldn’t have hesitated because I agree with the need for consistency.

I must have two dozen or more torque wrenches. In 3/4 drive I only have a cheapish one for my excavator (still $500). For 1/4 drive I have a Beta and a high end Tohnichi. In 3/8" I have all Tohnichi. My half inch are either Sidchrome from the 60-70s or Tohnichi. The latter are one of the best I have found. Not many I have are ratcheting and these type I don’t trust to much unless verified by a top brand. I’ve got a lot of beam type and for wheel nuts a beam type with clicker. I’ve also got a range of allen key brake away/clicker in 4mm, 5mm, 6mm and so forth which have preset torque for those sizes. Tohnichi have just about anything you need, can think of and things your never thought of https://www.tohnichi.com/

1 Like

I see all the talk of torque wrenches but no mention of ugadugga? :joy:

2 Likes

You missed;

Which I adopted. In reality, I put on a impact bar with a socket and used that to tighten.

If and when I ever need to do more concise work I will get a ‘known’ brand torque wrench, I saw Aldi had them for $19.99 at one stage but would never use anything that rubbish as it would give a false sense of having done the job properly.

W&B and Norbar are quality known brands and would be considered but as with any technical equipment ongoing calibration is critical and essential if you want to have confidence in it. Just to be clear I have worked in many different type of labs for years (from Molecular ecology (DNA when at Uni) to materials testing (soil structural)) and used a lot of different technical equipment, undertook our own internal assessments (calibration of equipment (scales to known sealed weights)) and or was there when we had the external experts come in for the yearly assessments. Hence I was about to buy the earlier noted W&B but when I saw variance of close to ± 20% ugga dugga did become the choice for now. When that variance becomes 5-10% I will get more concise equipment. Nowadays I do IT.

At the moment I am feeling a bit burnt as I bought a set of Sidchrome flare nut wrenches but out of the 4 flare nuts I have tried to remove so far (2 on front 4 at rear) after a good dose and soak of WD40 only one has actually come loose using it, 2 others have had to have the thread cracked using an old set of multi-grips and the 4th is in the most awkward spot and it spun once on the multi-grips so I went an bought a new and more concise pair yesterday for the job;

It became apparent I am going to have to lower the rear suspension strut to get access to that bugger on both sides. The flare nut spanners are now only good for tightening and to reduce any further potential wear.

I suppose the seals have been threaded for almost 20 years (2001 plates) but still I didn’t expect it to be that messy. It is so frustrating to get the car all jacked up on stands and then get halted by a flare nut, having only the one car and thus having to reconnect the hose, bleed the line, drop the car and then go and get a more suitable tool (my old multi-grips were very dodgy and hard to unlock etc). This sort of thing has really made the project become like a chore but the felling in the front end where the work has been completed yesterday was a reward as I went to get the tool.

2 Likes

I know there has been a bit of lag between posts/updates but what could go wrong bloody well did in any which way possible and this is the last time I will undertake these sort of projects anywhere near a QLD summer.

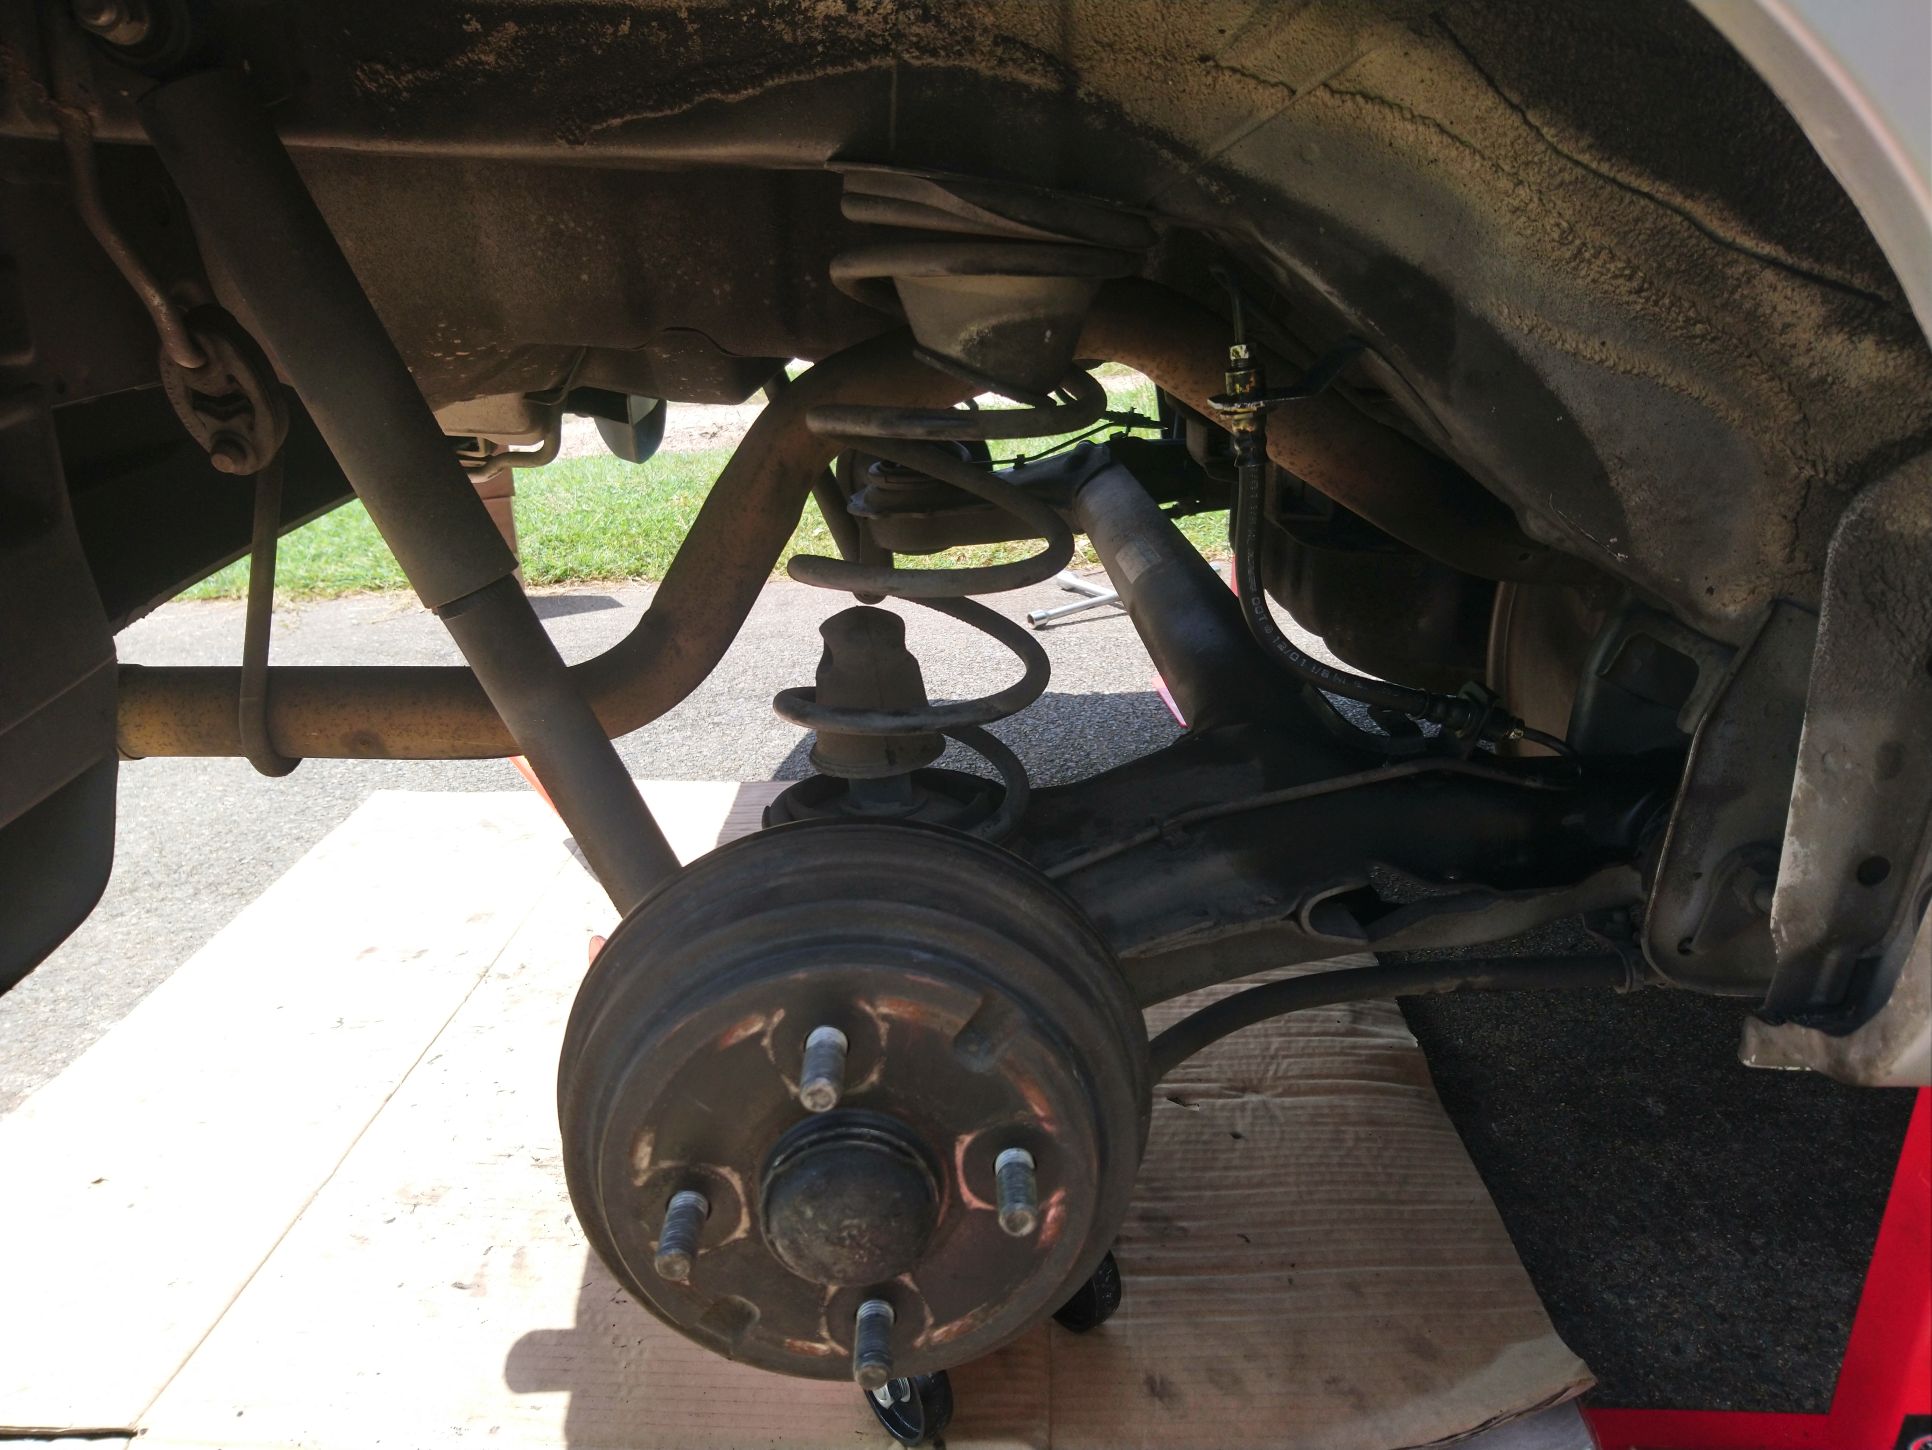
Old rear suspension assembly -


I tried doing that brake line but even with the new multi-grips I was having issues with that bottom flare nut so I had to put it in the ‘to hard basket’ for then as I really wanted to at least get the suspension done so I could get the wheel alignment and get a feel for that aspect of the project.

I mounted the rear suspension, spring upside down it turned out. The front was so straightforward even undertaking the whole front brake assembly. I thought the rear would be twice as easy but once I jacked the car up and started to have a look at everything it became quite confusing and there was zero paperwork with the suspension kit;

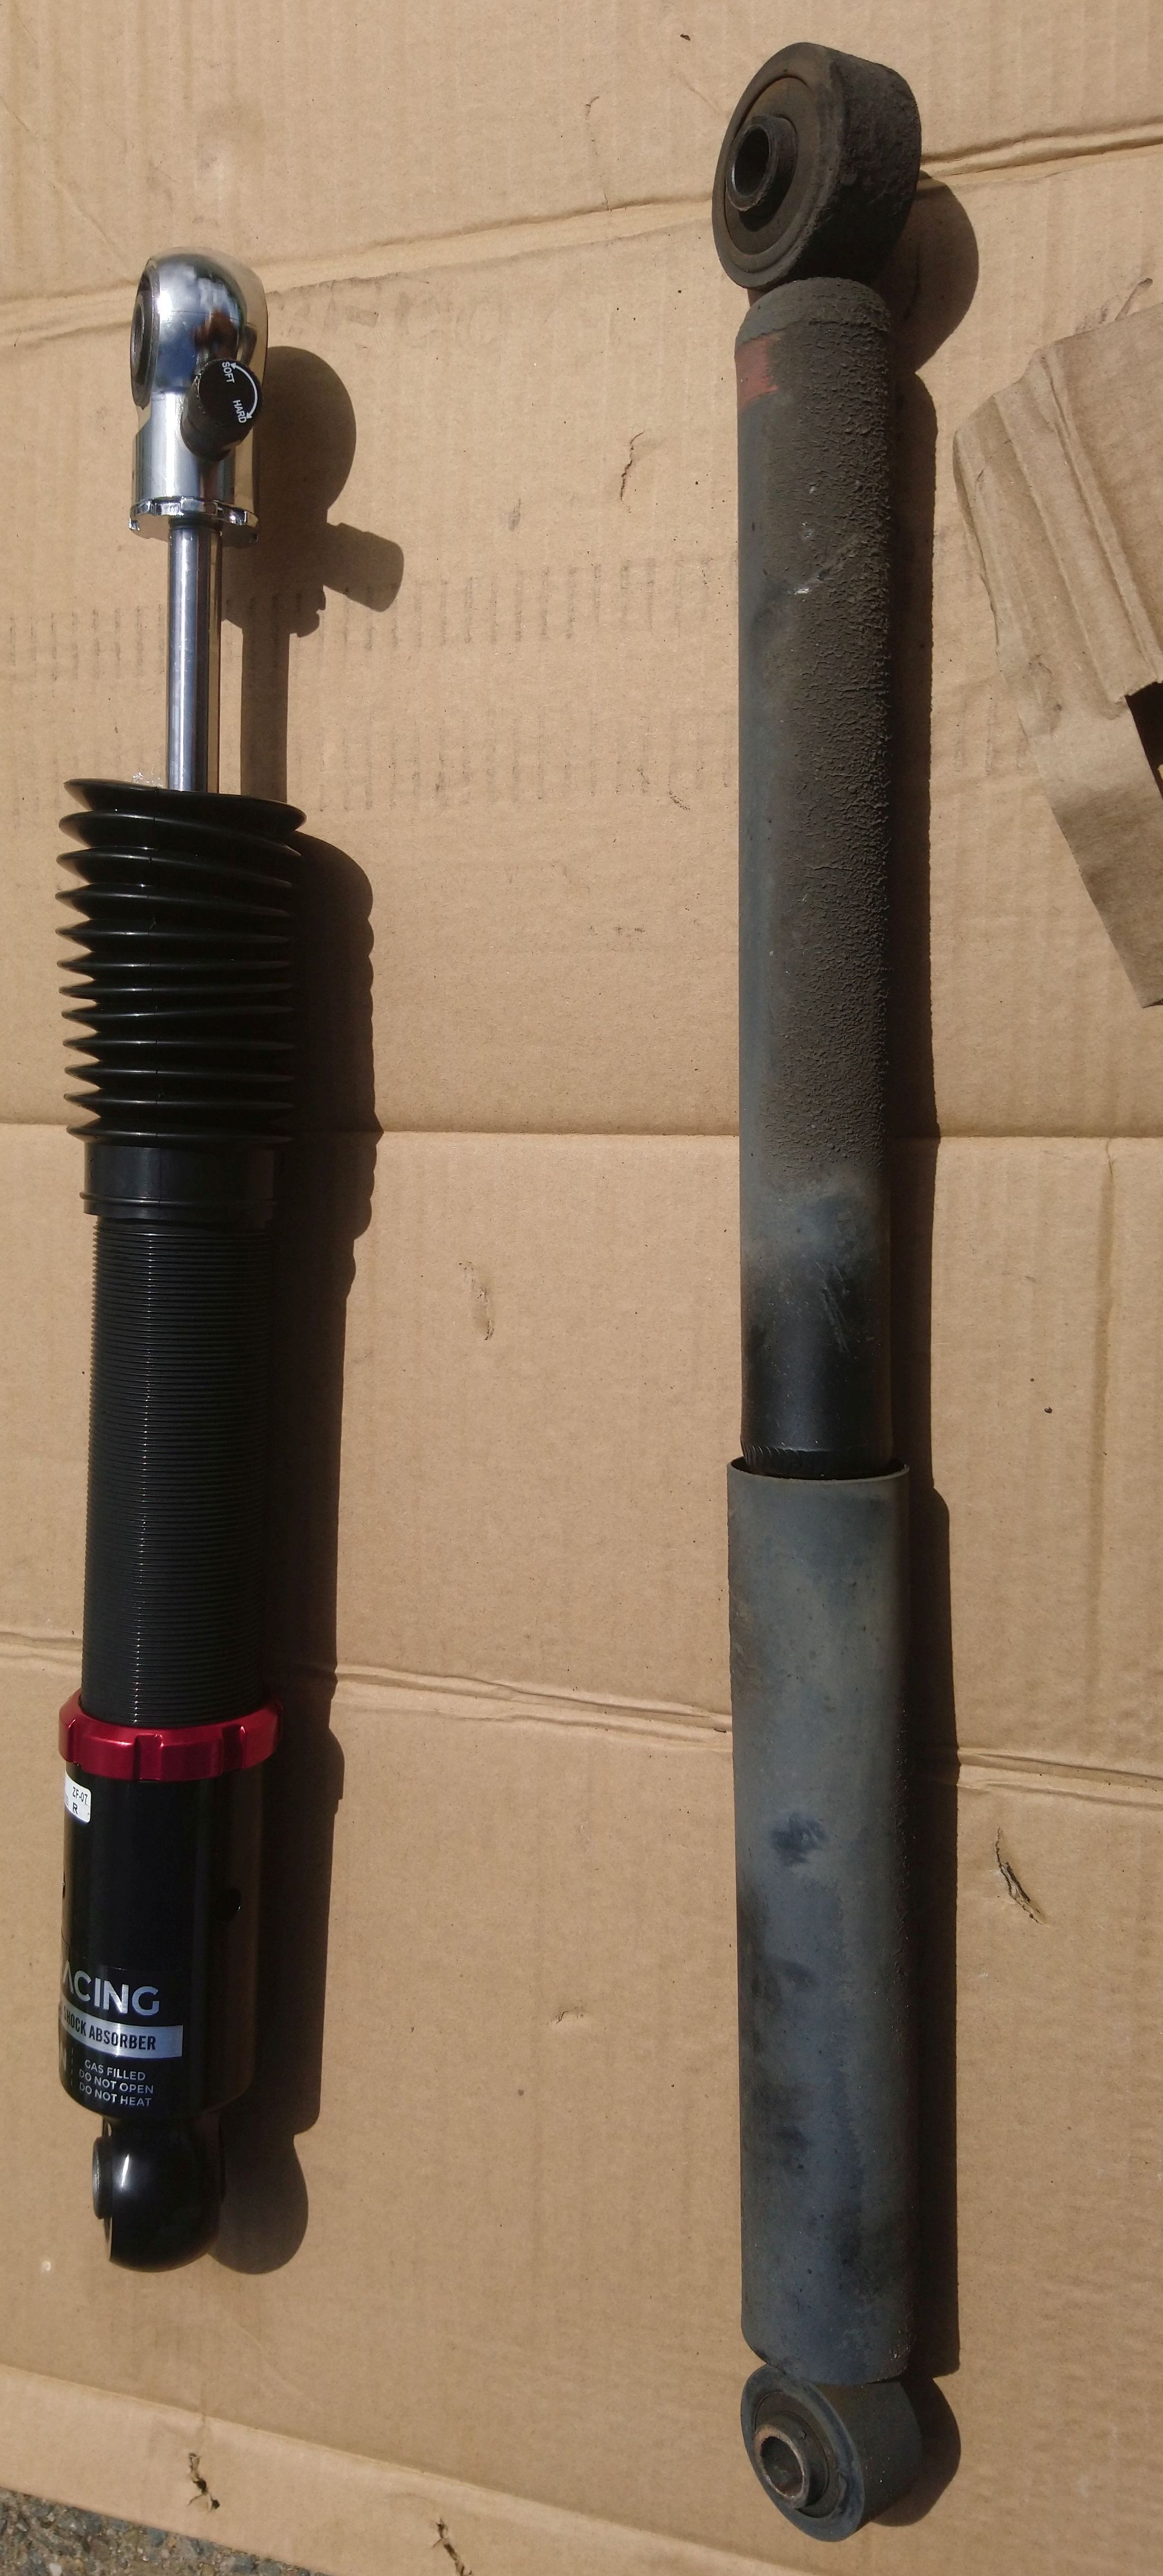
So by confusing I mean even when comparing the old strut vs new strut it was not entirely clear as to which end was up and I just had to assume the ‘dust boot’ had to be in a falling position (not falling away) and thus from the top, here it is upside down to the old strut;


That old strut was completely flogged and when I compressed it against the ground it had absolutely no resistance or recoil.

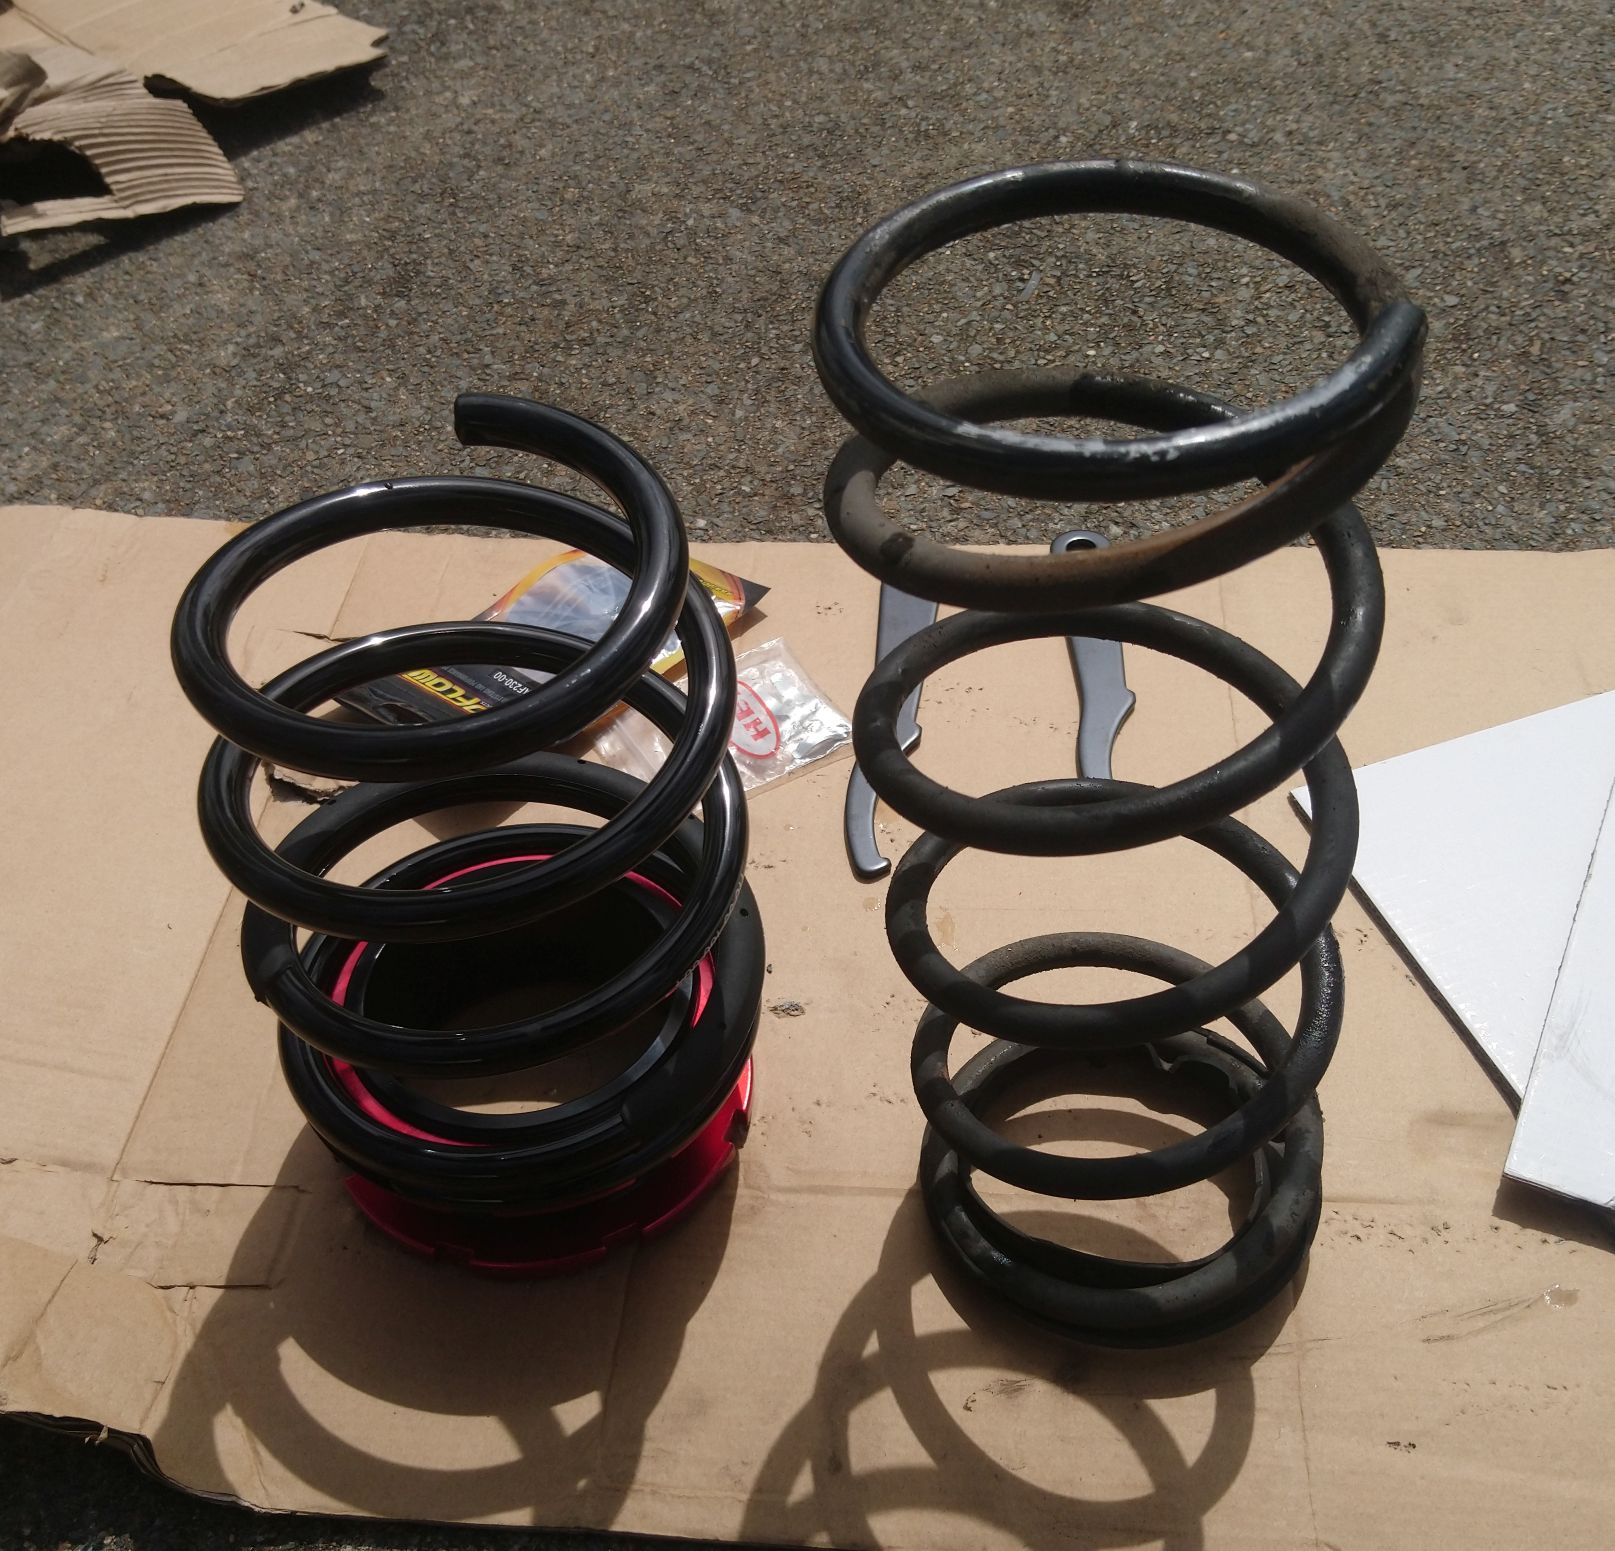
When reviewing the old coil vs the new made me originally mount it the way I did, upside down;

After I had undertaken the first set-up I went and saw @Mr_Gormsby suggested person for the wheel alignment;
http://www.accuratesuspension.com.au/ and I am glad I did I also asked him if he was any good with getting flare nuts off and he said yes. I bought the HEL brake lines and he said the connectors were wrong and they weren’t going to seat so I have to contact HEL on Monday. I had also asked him to review the rear springs as I was still confused and he informed me I had them on upside down. Either way driving home after he did the wheel alignment was awesome and the car was really hugging the road and giving a nice ride.

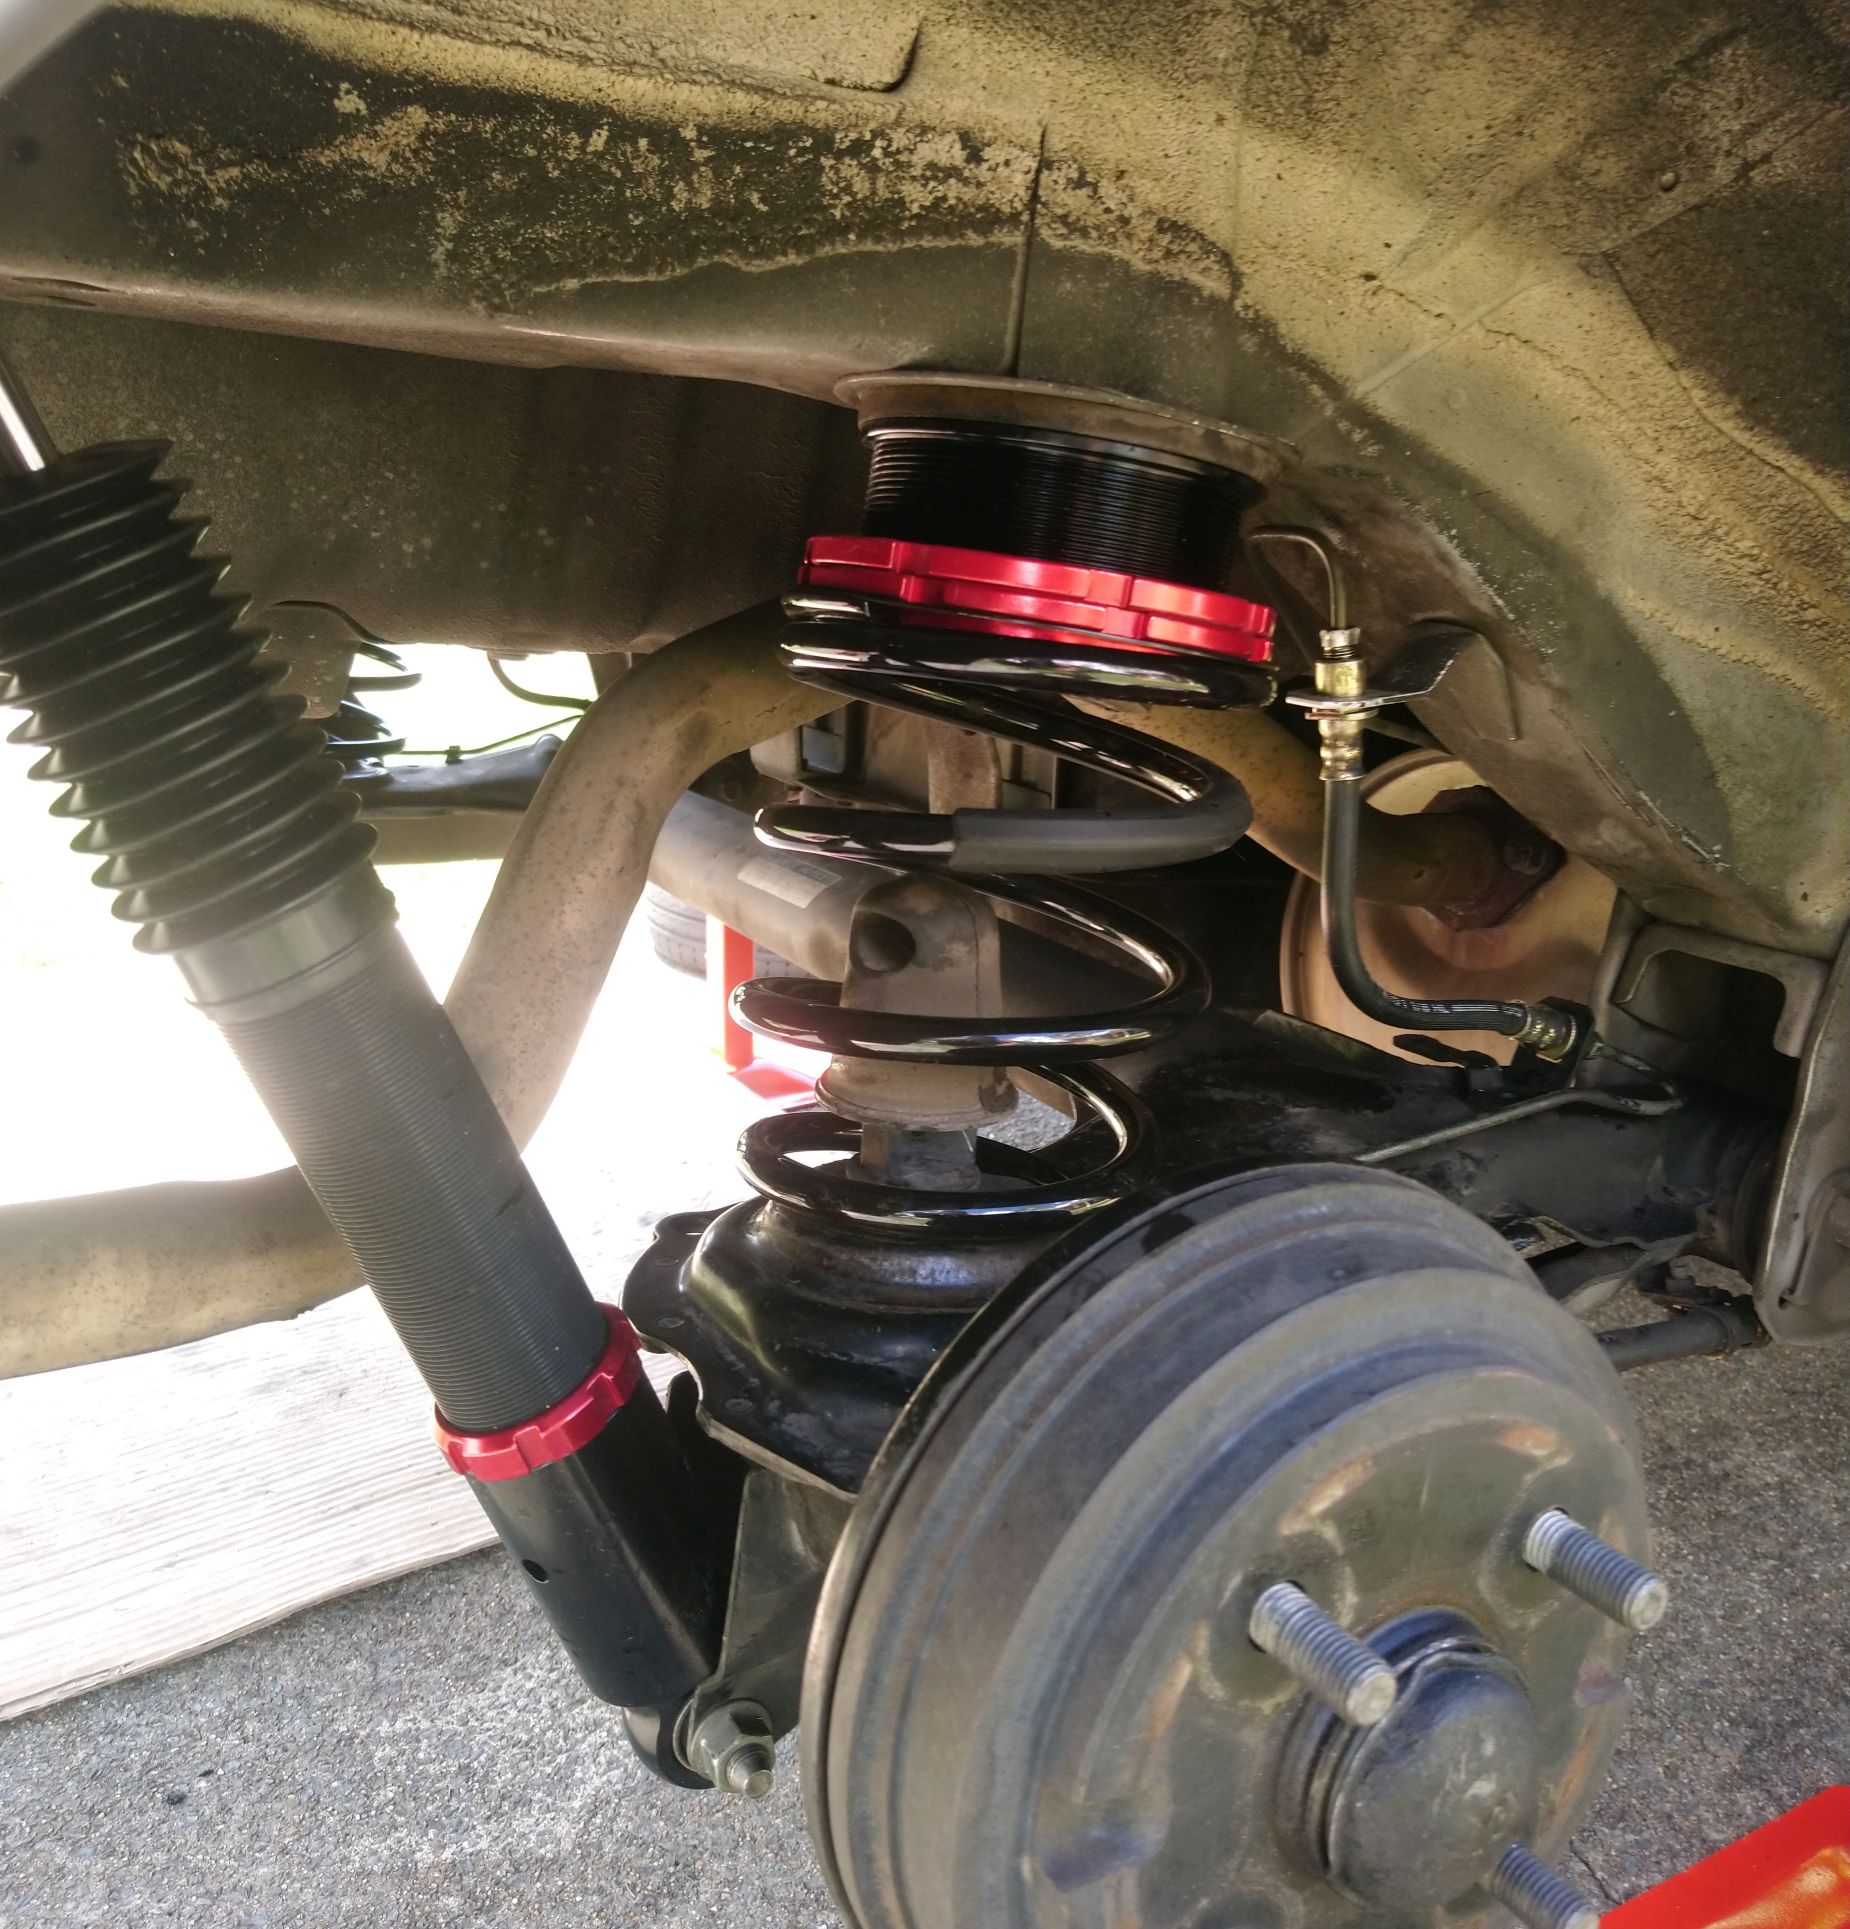
Here is the rear suspension in the correct position but there is quite a bit of noise;


At this initial stage I had dialed the front from hard 16, the rears from hard 14. The front is felling awesome and my wheel spins have lessened as @Mr_Gormsby suggested in an earlier post but they are still shit tyres. The rear is bouncy and making quite a bit of noise as the original coil lower rubbers were quite degraded and had not been put on, I will have to get a new set.

And just to make things really painful as I was jacking up the rear with a block of wood on the jack to remove the stands it slid to the side after I had one of the stands out, the other jack stand got pinned into the panel work beside the the mounting point. A nasty little pinch into the panel and means I will be getting a higher lifting jack…As many have noted it is a very straight unit with a very small amount of surface rust in the top luggage rail where the rubber isn’t present, so even a little pinch in the panel work hurts atm…

5 Likes

For those interested here is a pic of the old E-clip (as the manual calls them) vs new C-clips;

Utter madness to try and get those old bent out of shape units back on - the new ones slide home with a firm thumb push and lock into place and function as expected (a spring clip to stop the line moving back and forth).

2 Likes

I realise some of above would be viewed as a n00b having a go and I’m fine with that - put a PC in front of me and I’ll strip it down with my eyes closed. If I went back to a materials lab (soil) I’d have no issues with the equipment and meeting ISO standards.

I’d rather have a go and fail than to not try at all.

2 Likes

You are doing well. All of us are noobs at some point, I think you are further along than that. Had my own day of frustrations making new brake lines and having to pull all under the dash and pedal assembly out only to make an error with my main newly made line.

The coil spring rubbers are only there to suppress noise. If the back is a bit bouncy was that after or before you inverted the damper/shock? If the rear rate is way up compared to the front then slow them down/firm them up by clicking them up, way up. Go four or five from full firm. If it feel like the tail wants to come out speed it up a couple of clicks at a time from full firm.

For rounded nuts, including brake glare nuts, I have three diff sizes of these

Keep up the good work.

4 Likes

Anyone know where I might be able to get the rear coil (spring) lower rubber seat?

I asked the missus (who is Japanese) to do some translating and we searched for ‘ダイハツ スプリング シート ミラバン L700’ (Daihatsu Spring Seat Miravan L700) and then I started getting meaningful results on Japanese sites including the P/N.
P/N: L700 Mira lower spring seat: 48482-97201
P/N: L700 Mira upper spring seat: 48481-97201

I am now also searching for the full rear assembly parts list diagram which will be something like;
http://www.jp-carparts.com/toyota/partlist.php?maker=toyota&type=113110&cartype=18&fig=4804
as one of the rear spring bumpers was also looking cracked and I may as well do all the rubber.

You could use a generic rubber. Google search for “coil spring rubber insulator” and then add the diameter you are after.

1 Like