VDO oil pressure guage and switch?

Well, it looks like I can forget about adding any oil cooler, except maybe if I hook up one of the lines to this plug, if it isn’t covering any sort of relief valve:

That would leave one of the plate’s ports free for the second line and the other free for a threaded adapter suitable for a pressure guage or even for a T or Y fitting accomodating both the guage’s sender and a temperature sender.
Other than that, because both mount and pipe are in the way, I will only be able to mount this plate facing either left or right. In which case, mounting it left will keep the newly added devices away from Catalyst heat


Sandwich_O_L

1 Like

wow thats a really crappy fitment.
I belive that plug goes straight down to the oil pump. It maybe the factory oil return for turbo blocks and plugged for N/A.
If you have a look in an ed or ef engine manual you may be able to get a pic of the inside of the oil pump so you can see if I am correct.

1 Like

The pdf I’ve got is visually vague. Nevertheless, that plug plugs a gallery which is connected to the oil filter’s inlet. If I were to tap it for a coolant line, oil woul no longer get to the filter. I’m tempted, in any case, to unscrew that plug and then see what happens.
I didn’t think to replace that plug with some sort of equally-threaded bronze plug of which I could drill and tap it for accomodating a guage’s sender[quote=“evilhighway, post:20, topic:6764, full:true”]…It was just a cheap chinese one from ebay or ali express…[/quote]Mine is probably also one of those. I just don’t know it yet. The threads in that plate are cut pretty crude. Nothing I’ve ever seen done in any Japanese or any other quality castings

[quote=“Butch_Butcher, post:15, topic:6764”]…the fake plate is obviously delivered with metal plugs…[/quote]Well, the plate wasn’t “fake”. It simply provided provisions for connecting temperature and pressure-reading devices. Unfortunately, it’s no longer available. What is catalogued, though, is this following plate offered for Scion and Subaru engines. Judging by the images provided, it should fit our filters. What’s worrying, though, is this plate’s length. Especially, when I’m ready to add the Mishimoto plate on top of the one shown. If the block’s end is truly as narrow as it looks, there would at least be the advantage of turning this plate to where there wouldn’t be any interference with the engine’s mount.
I’ll take the gamble, today, and order it:

https://www.kaufland.de/product/512120998/?search_value=oil%20filter%20sandwich

I’ve finally got mine home. It was well packaged. So, the couple nicks it suffered must have happened sometime between the paint shop and packaging. This damage, however, will have no effect on this item’s function. My only worry is the internal paint finish. Externally, black is the best paint colour for heat dissipation. Ever wonder why motorcycle engines are often painted black? If this internal paint finish doesen’t erode, I’m fine with it. Even then, the paint isn’t metallic. Therefore, if anything, any eroding paint particles would probably serve as lubricant and the deposit into the pan. It’s quite large and heavy. For some reason, this may be necessary for the Subaru type engines it was designed for. They mount theirs on top of the block, instead of below. It must be pretty messy, performing filter changes on these.
Otherwise, the plate’s threads appear to be properly machined. Much better than those of the expensive plate that arrived months ago. The expensive plate’s threads didn’t look like they had been Japanese cut or even Western. I’m suspecting that those threads were cut somewhere on the other side of the Sea of Japan. Or perhaps, they were deliberately cut that way for sealing through hemp fibers, they way you buy water pipe at a hardware store where the external threads are roughed up for catching hemp fibers?
The Subaru plate’s o-ring was somewhat smaller in diameter than its appointed-to groove. I pulled on it a couple times and it now fits better. I last experienced falsely-dimensioned rubber, when I got my valve cover gasket

Sandwich_Subaru

Both ports tapped into this sandwich plate are threaded to accomodate my stock pressure switch. I can now, therefore, order a guage’s pressure sensor and possibly a guage’s thermometer, if there is enough clearance from other peripheral bits. In which case, I’ll have to temporarilly set an assembled cylinder head onto my block, so that I can at least confirm clearance between this new item and the catylist.
I should have switched my camera to mandatory flash, for this following image. I can go back and take a clearer shot, upon request to do so

This item’s bulk provides for greater total oil capacity, as well as acting like an oil cooler of sorts, simply because of its mass. I might end up with a total of 2.6 litres, if I don’t have this sandwich plate trimmed down for clearance, up from a total of 2.3 litres with filter included.
Having measured this plate’s depth, using not the best of slide rules, I came up with 19 mm which can be sacrificed from both plate and holding pipe, resembling that plate which was no longer available. I regret not having ordered it for a fraction of what this one cost :

Sandwich_19mm

Curious to see how both plates would work, I sandwiched the expensive plate between the new one and block:

The new plate’s length appears condemning, if mounted together with the expensive’s unless I either have the new one trimmed or am forced to convert to extractors and remote catylist :slightly_smiling_face:
What if I had expendable material machined down:

Then there’s the question of if this second orifice could be used, if its distance from the ED’s or even an EF’s block would provide enough clearance from the manifold:

The expensive plate attached:

Sandwich_M_Attach

Reversing plate order. Uncut, the Subaru plate will definitely not work with standard exhaust:

If the Subaru plate is left uncut, there might be a possibility of using one or both of the expensive plate’s orifices, the Subaru plate then serving solely as an extension?:

1 Like

I’ve just found out that Japanese engines use taoered 1/8 NPTF threads, meaning that I’ll have to screw in my oile pressure switch in its original place which is kind of disappointing, because that’s where I wanted to measure oil temperature, given that it’ll be somewhat cooler at the adapter plate.

Looking up that longer plate, it dosen’t specify which threads those ports are cut at. Because 10 mm and 1/8 NPFT threads are so close in pitch, I’m assuming that because the plate is round, only a tapered thread would provide a consequent seal. I clamped one of those allen plugs between the jaws of my slide rule and I can rock the plug back and forth, proving that the threads cut into that plate are indeed tapered. So, I’ll take a gamble with ordering both temperature and pressure senders 1/8th

I went and put my order in on Friday and was about to pay, through direct bank funds transfer, until I got to the last step where they offer you different options like PayPal and credit card payment. Then there was a possibility of transferring funds through Klarna which is a dodgy Swedish booking agency. Since I was desparate, I was willing to take a second chance of getting ripped-off like when they wouldn’t refund me for the camera that got stolen. Maybe to my luck, they wouldn’t allow me paying on all items through Klarna. So, then I mailed the company itself twice, after not getting an answer the first time. They have refused answering, after I offered to pay directly.

It should be of no wonder that Amazon is putting the others in a difficult position. Often times, it’s their own fault. Especially, since I was ready to drop a significant amount of cash on these clowns:

I ended up ordering all 1/8 tapered fitting bits and the somewhat more expensive full-sweep guages:

Now that this shop has ignored my order for over a resonable period of time, I now have no legal obligation to honor their shopping basket and can now go on purchsing from a serious company.

The research I’ve done to locate these bits took longer than it would have had to install them. I miss simply entering a parts store for buying these in person

I couldn’t help but post an instrument panel which can be manufactured at home, using available aftermarket guages void of the Lotus logo. It showed up at a regularly e-mailed auction house link:

1 Like

I finally found a site which accepts payment in advance, independent from Ebay’s tentacles. Both guages were less expensive than average. This meant doing without expensive adapter cables of which I could easilly fabricate myself:

1 Like

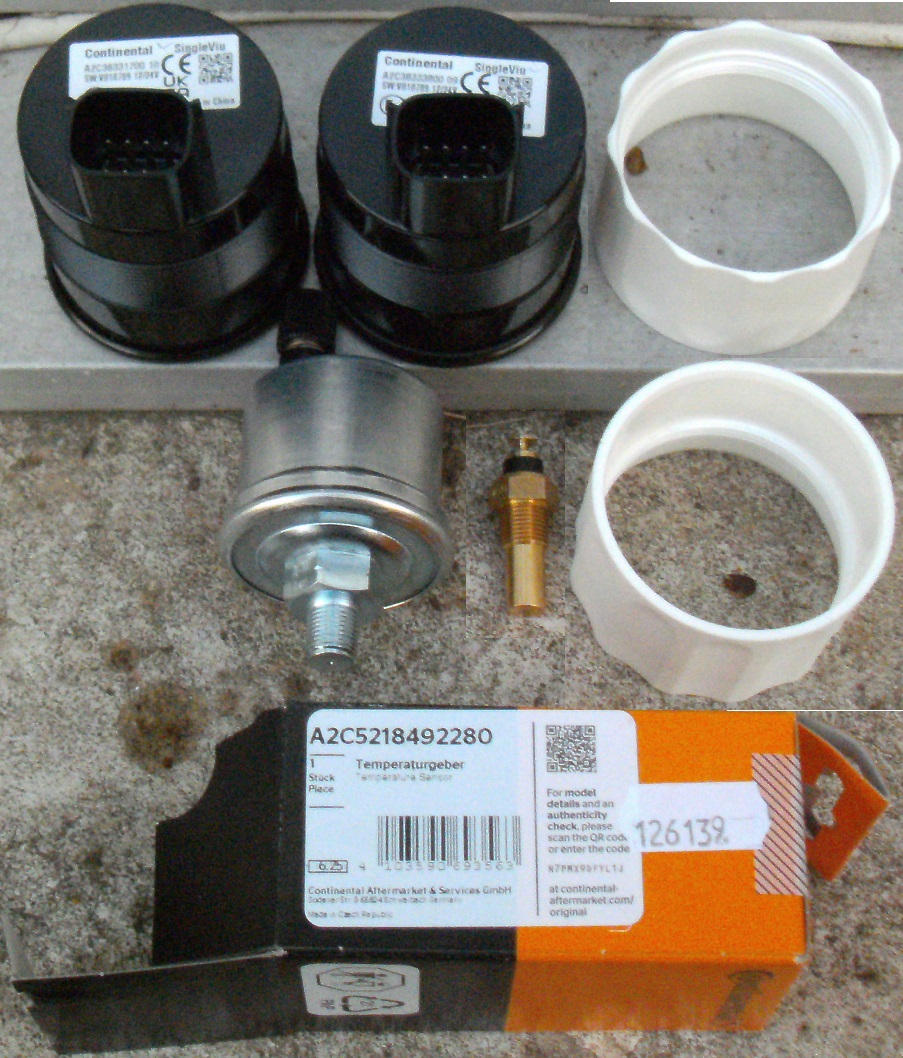
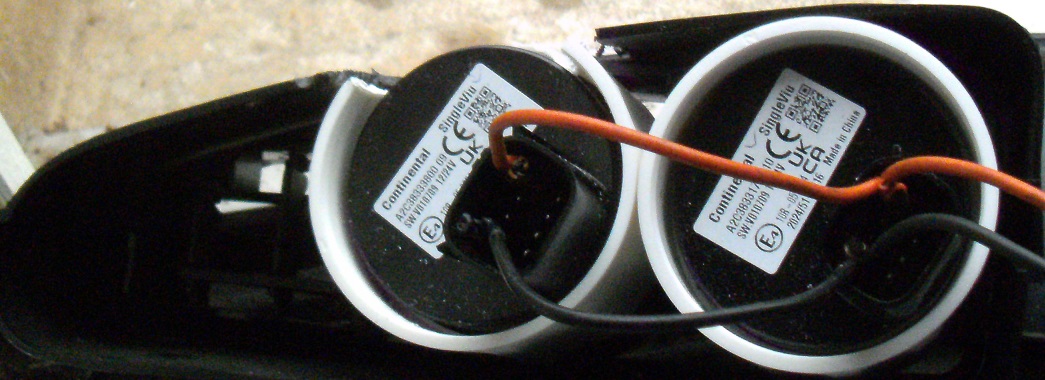
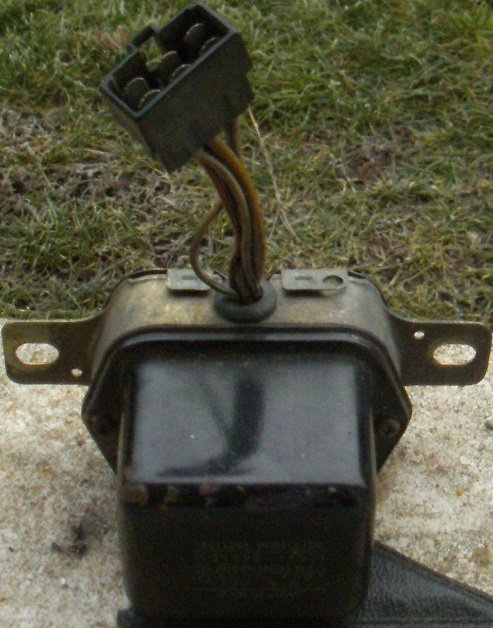
I finally took delivery. Both pressure and temperature sensors appear to be genuine non-counterfeits:

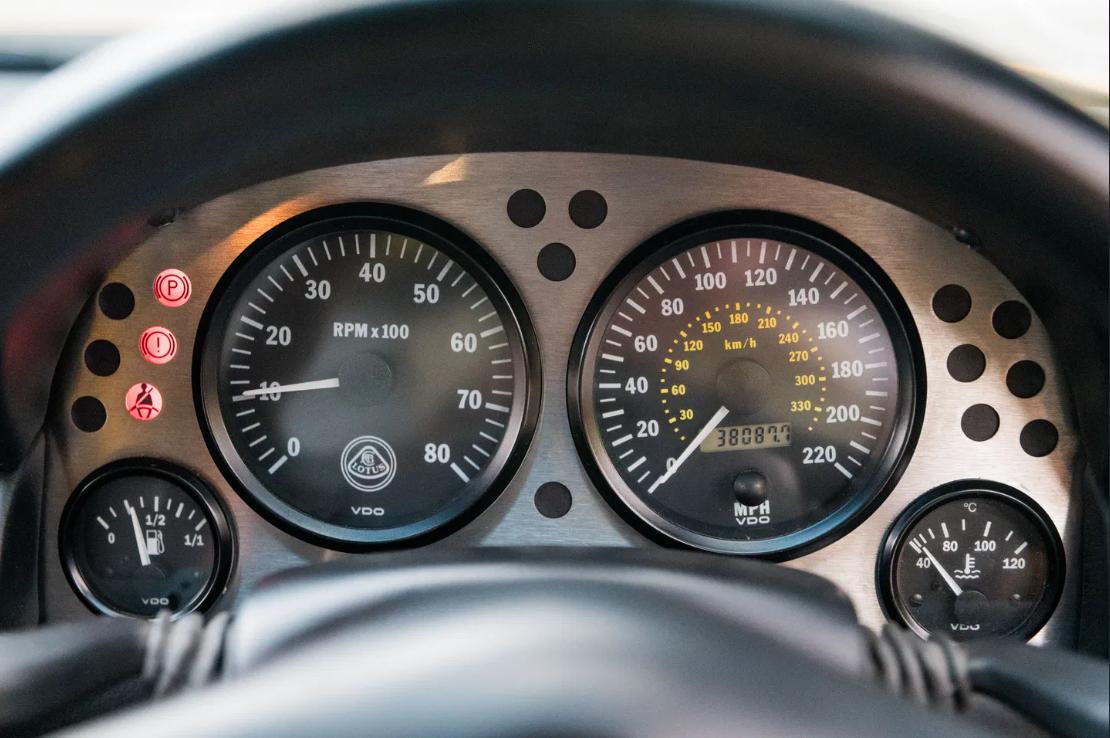
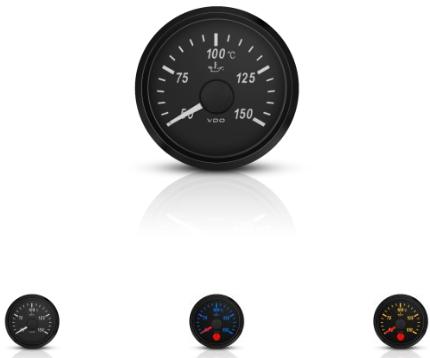
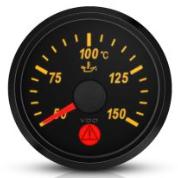
Both guages are attractive-looking, to me. But, dissappointing for other reasons.

Reason one, both VDO and Continental were of genuine German origin, once producing their products there. Appearantly, one bought out the other and are now selling these instruments as overpriced Chinese toys. Despite media complaints about high domestic unemployment, there is no option of obtaining these domesticly made.

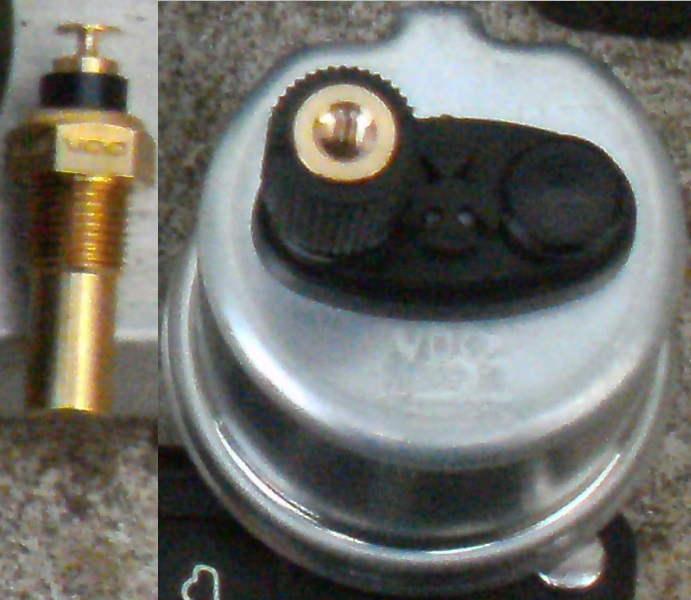
Reason two, these are sealed units like throw-aways. I’m assuming, illumination is done by LED. So, there may be no need to ever replace these diodes, if bulbs aren’t doing the lighting. If these stop illuminating, I would need to cut these guages open:

I can only hope for reliability and accuracy, if both of these function whatsoever.

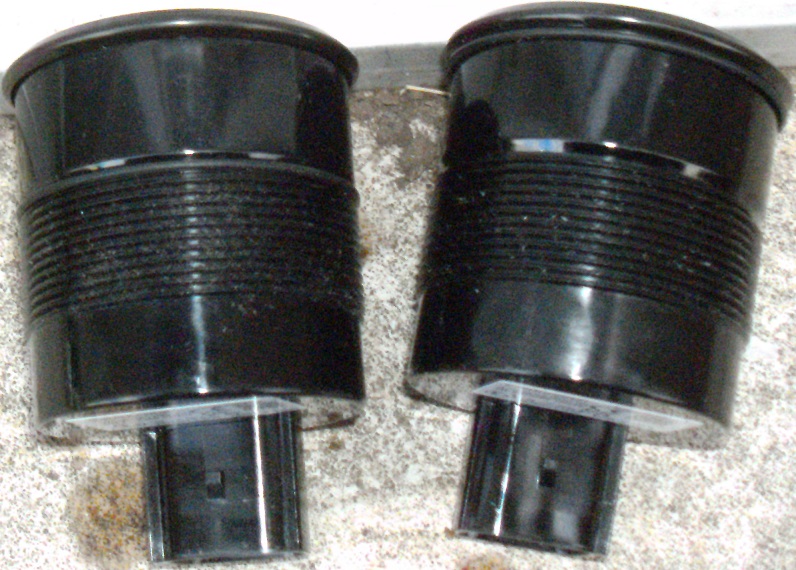
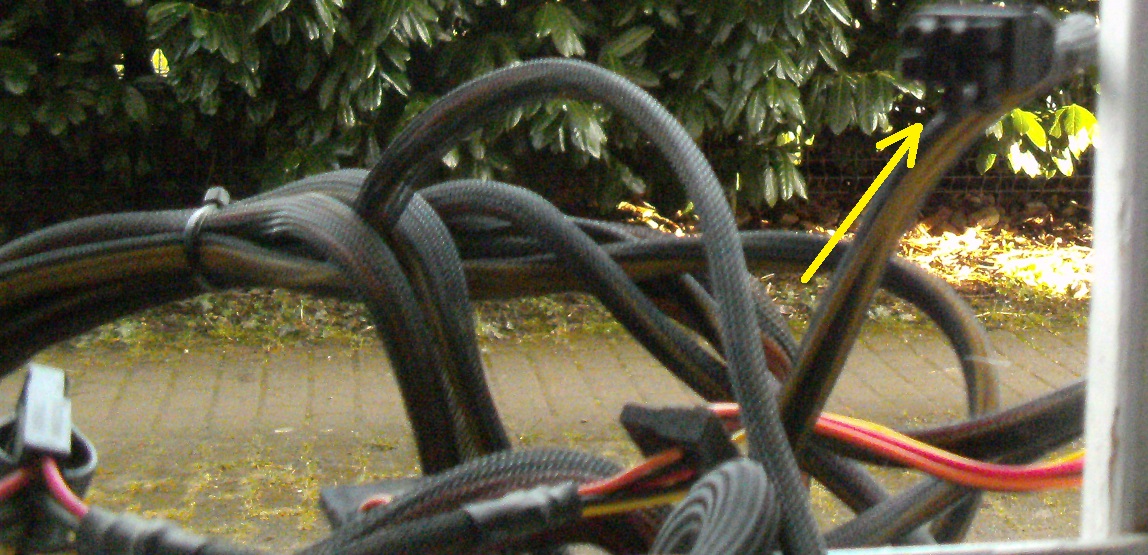
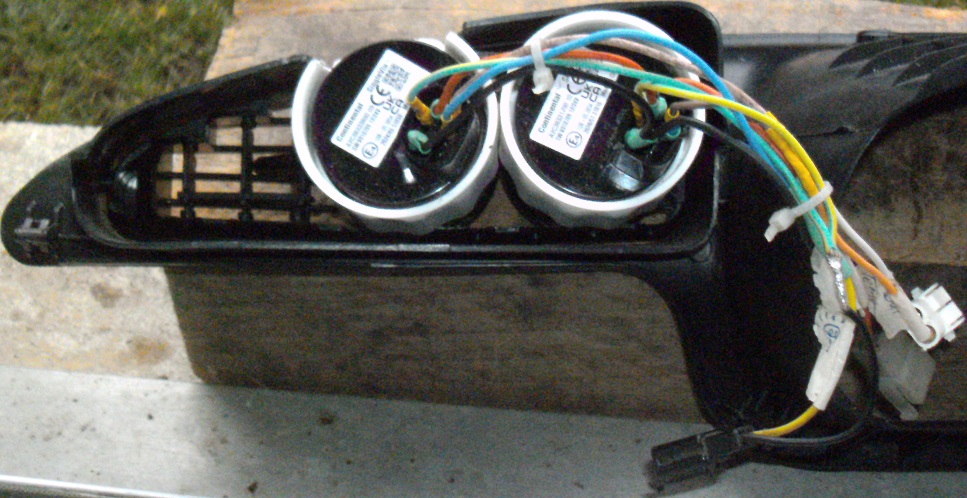
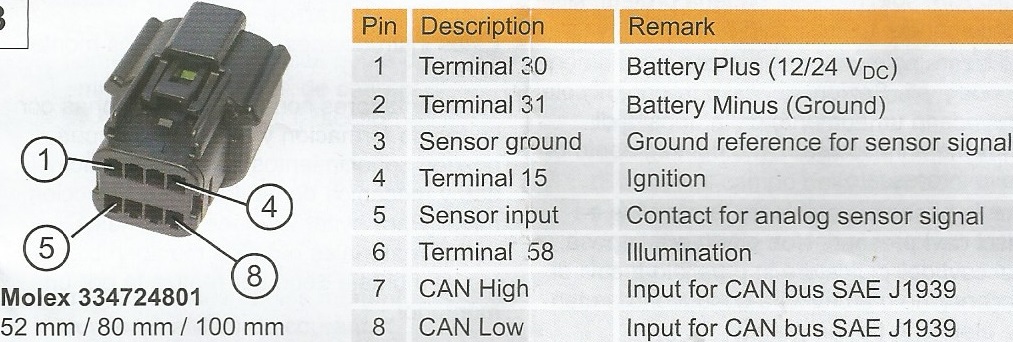
The electrical connections are smaller than I thought they would be. If I don’t have connectors these small in my collection, I could end up soldering wires directly onto them, hoping to not melt surrounding plastic:

Supposedly, several backlighting colors are available. With these guages sealed, I can’t imagine how a color change can get summoned, except only though one of the CAN bus connections somehow:

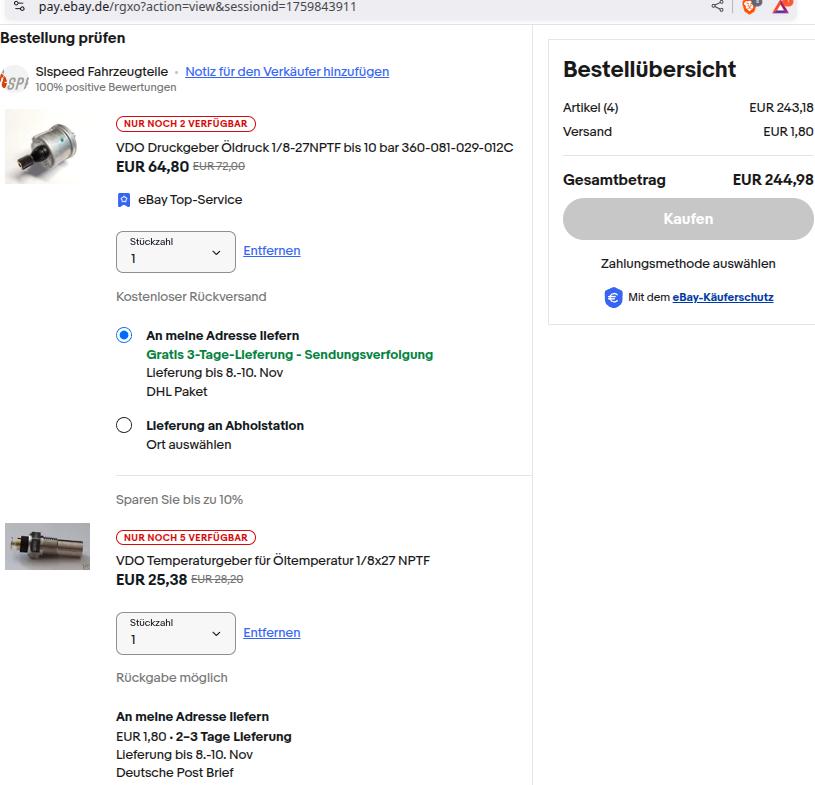
Elsewhere, these guages could be had cheaper. But where they were, buyers are held hostage, once they were made to pay for the included-in-the-package loom costing really much more than what’s there:

In other words, I saved 89,80€ on not purchasing both looms, of course paying somewhat more for the guage set without them. Still, the savings were worth it.

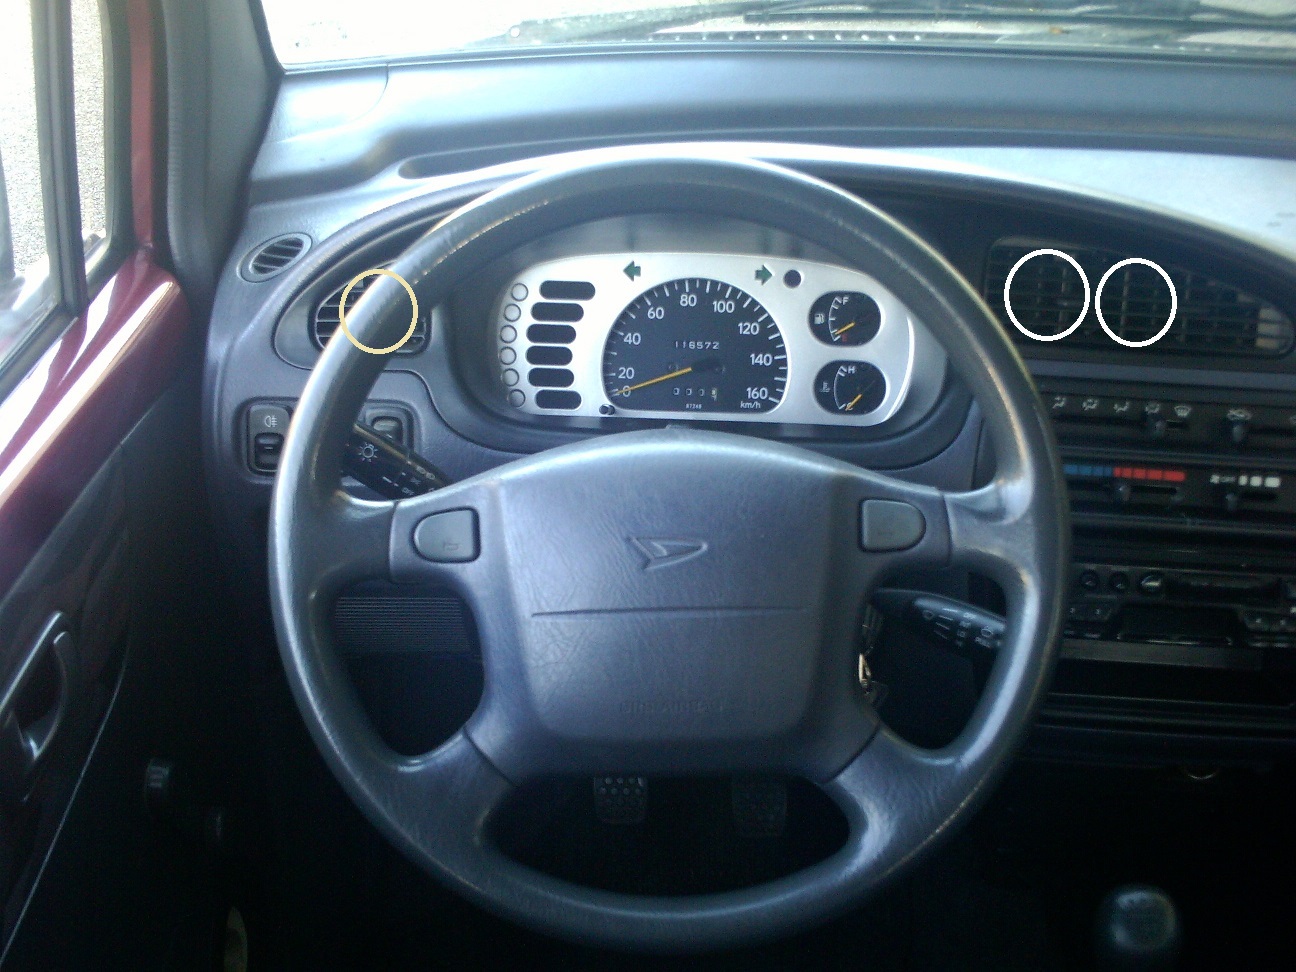
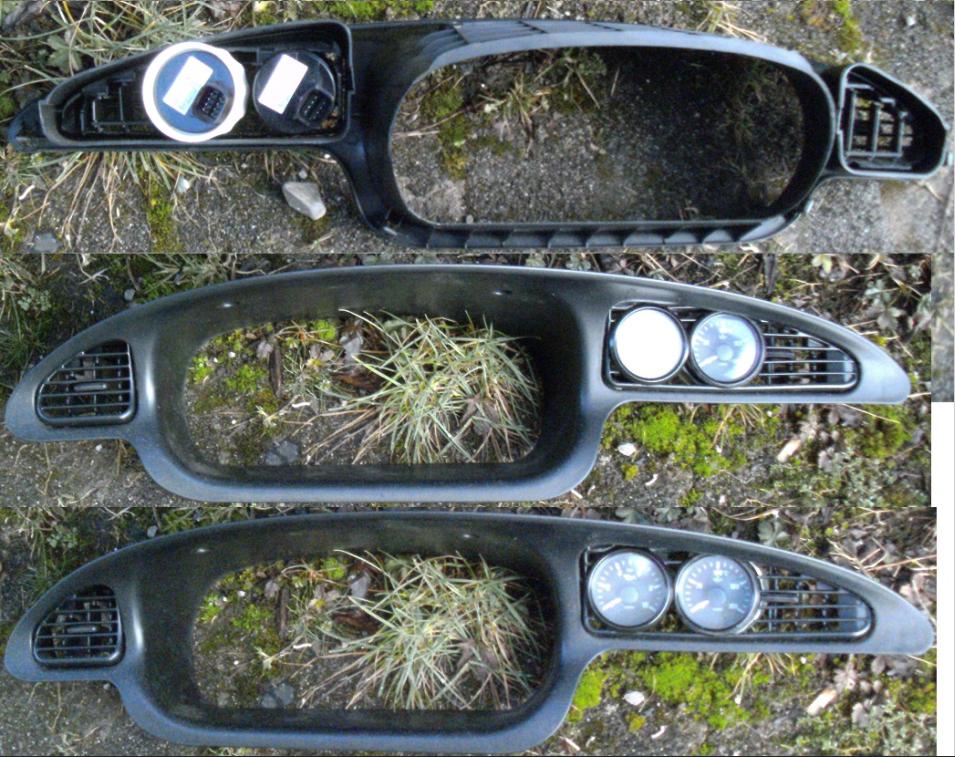
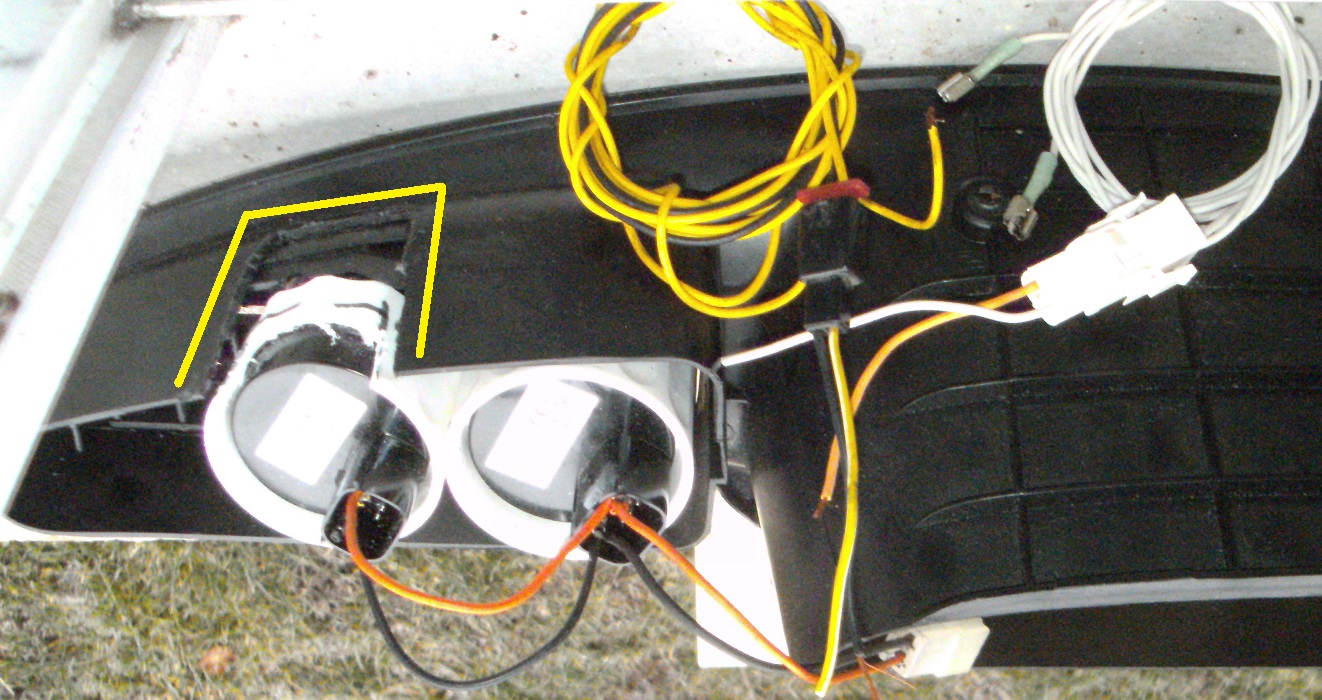
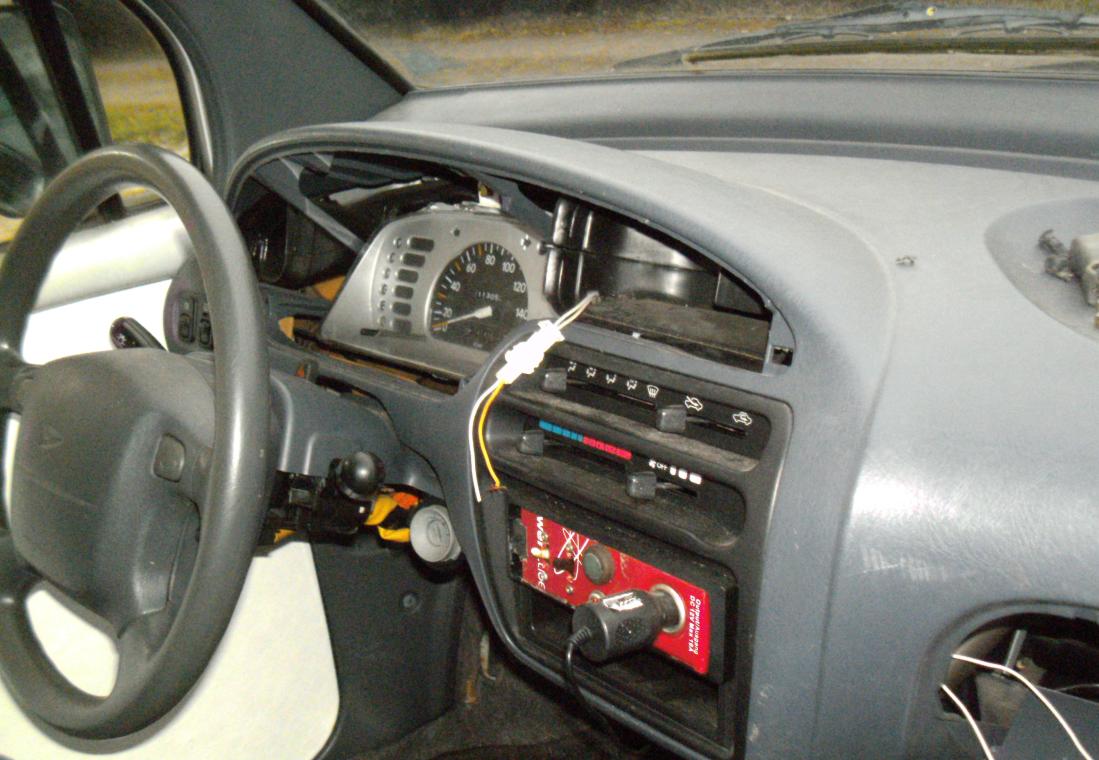
This is going to be even more fun than doing the wiring. Planned are cutting out the vents circled white. Cutting out both light yellow circled left and the circle closest to the cluster is to be evaluated, as an alternative to placing both of the guages together.

I don’t use these vents, anyway, since I don’t have air conditioning and all heat is blowing out either through the defroster or out the bottom of the unit. I open a sunroof, if I want to expell heat also:

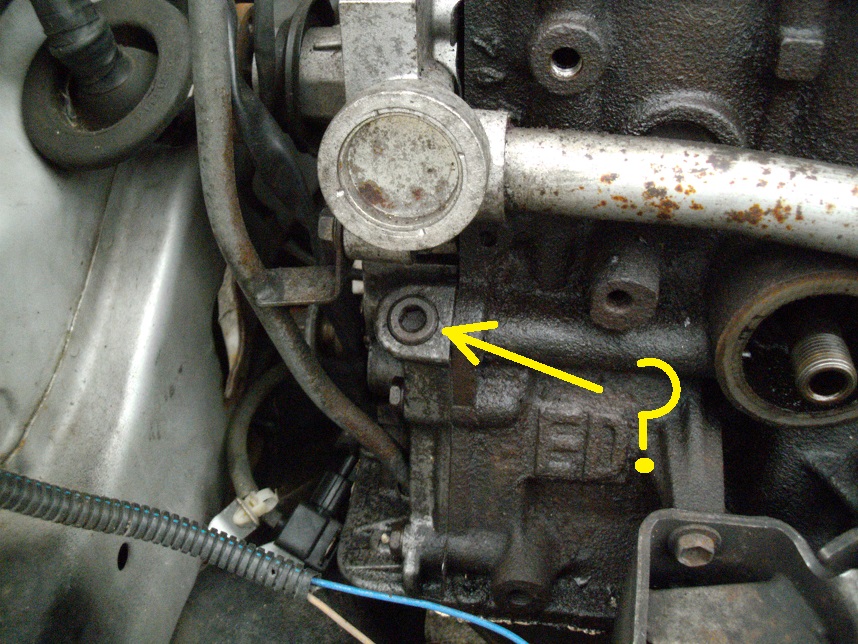
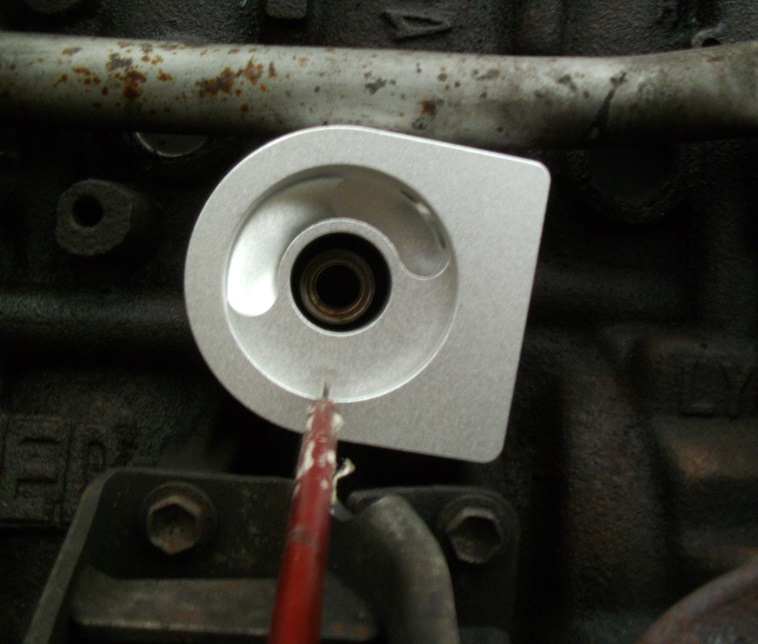
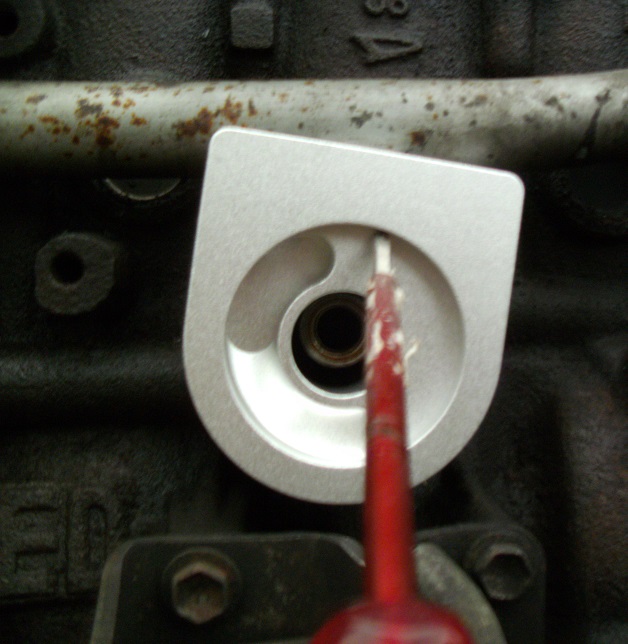
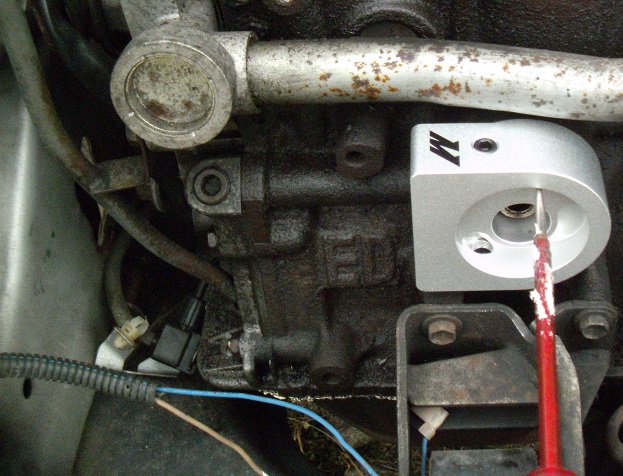
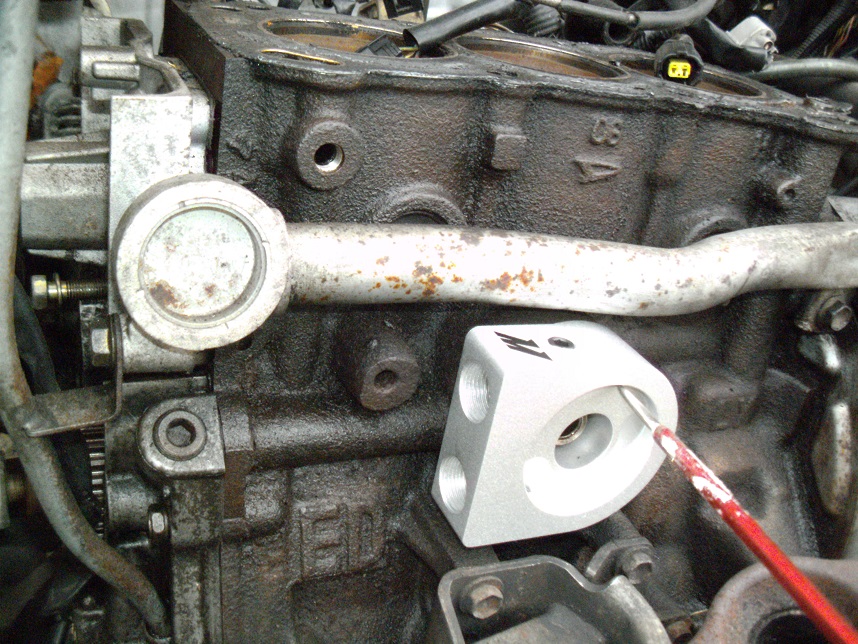
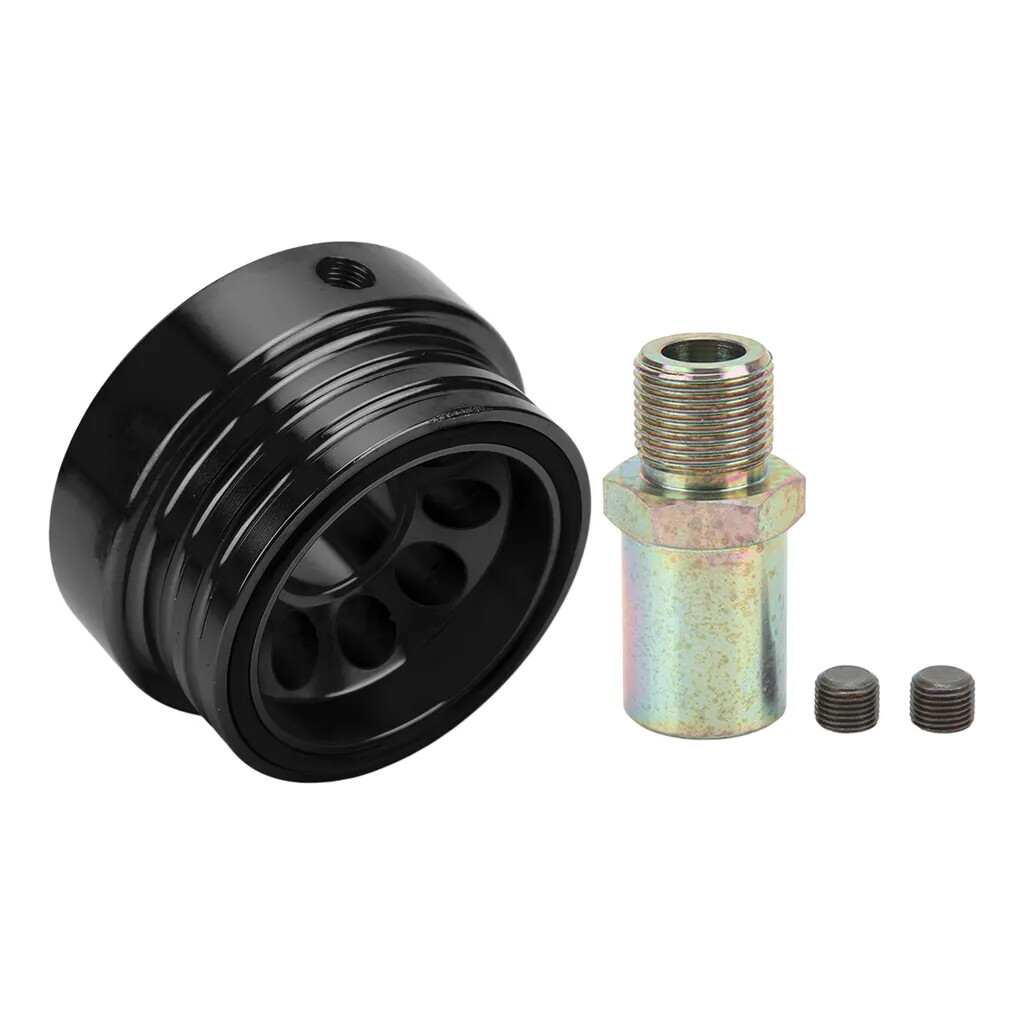
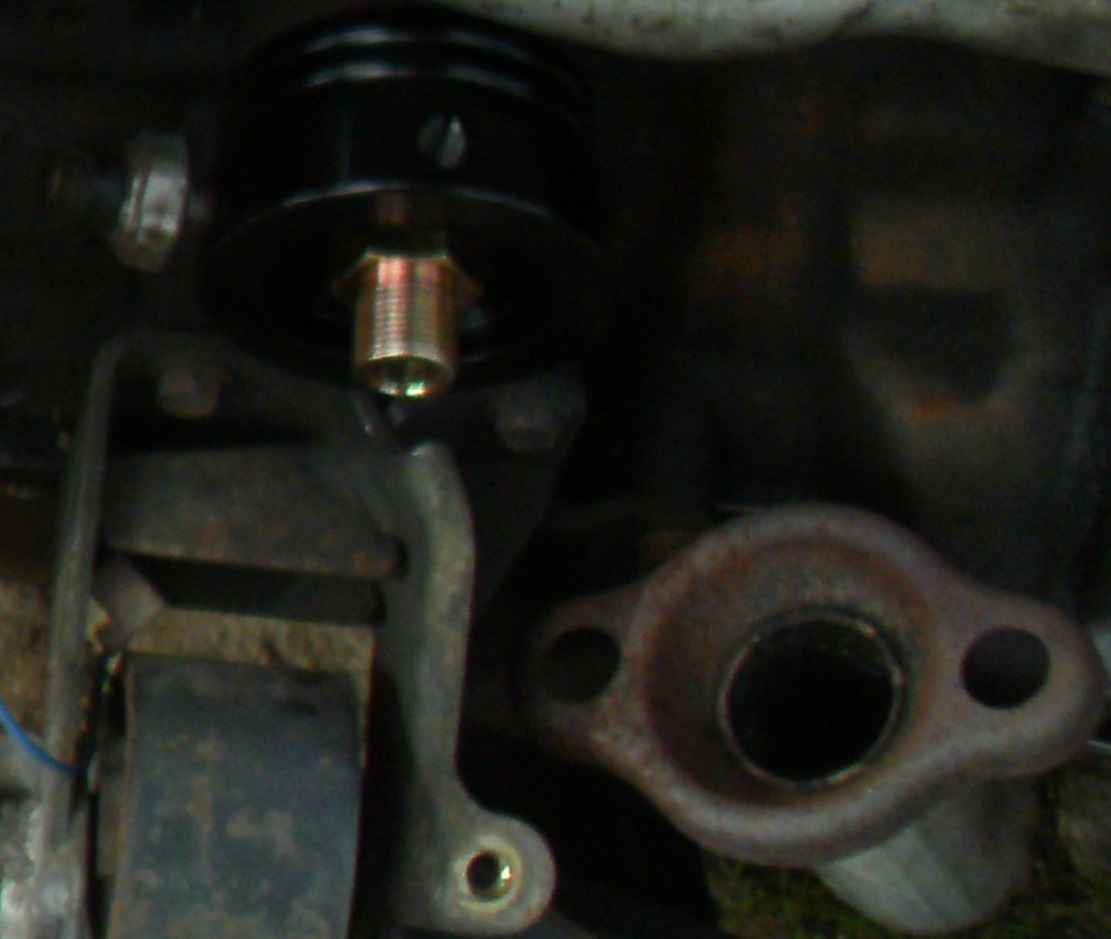
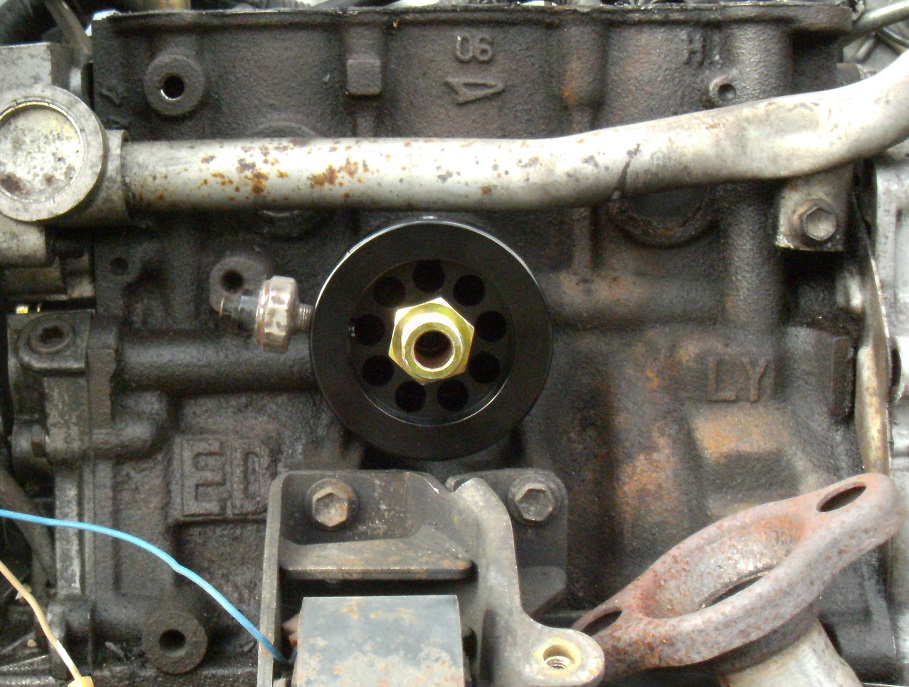
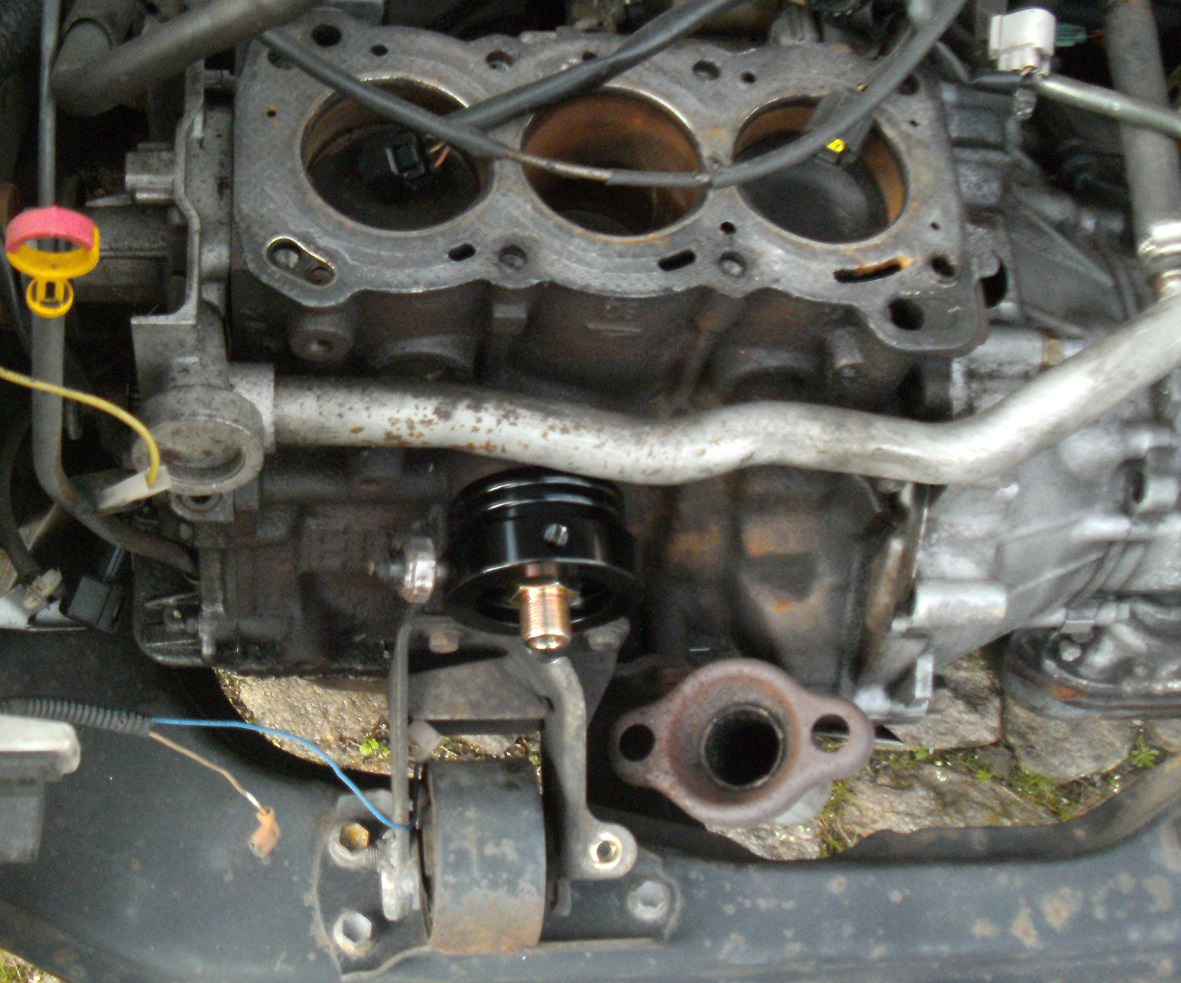
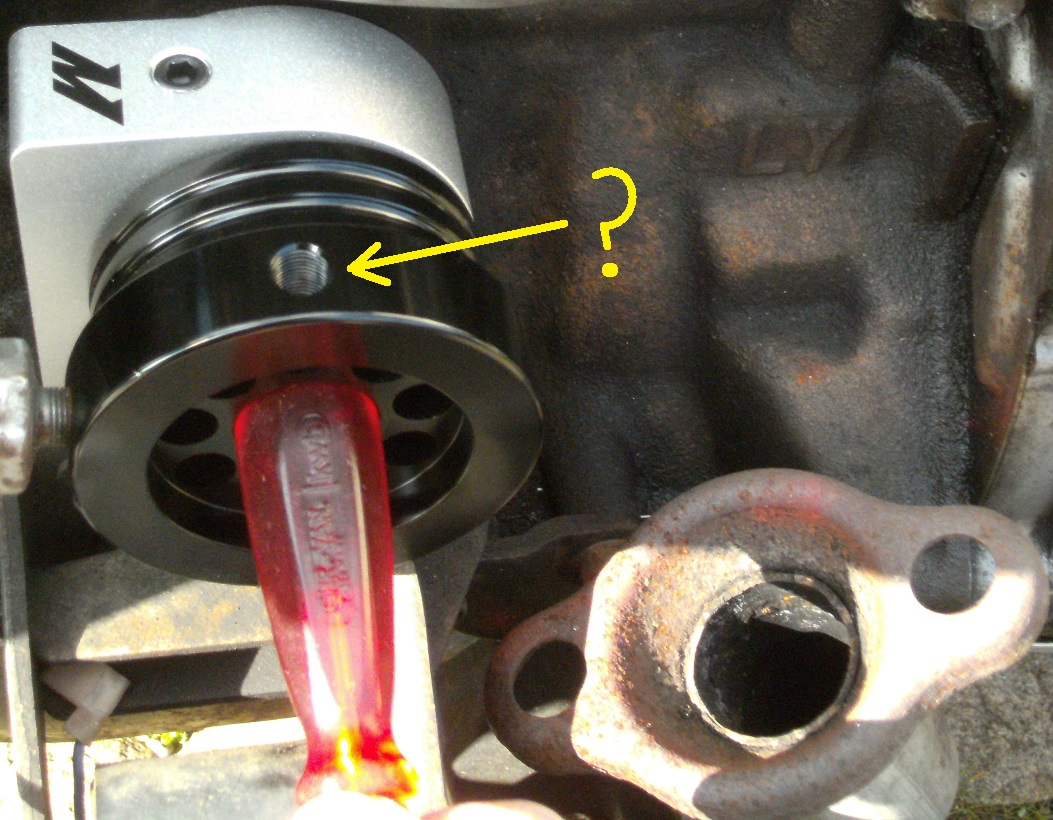
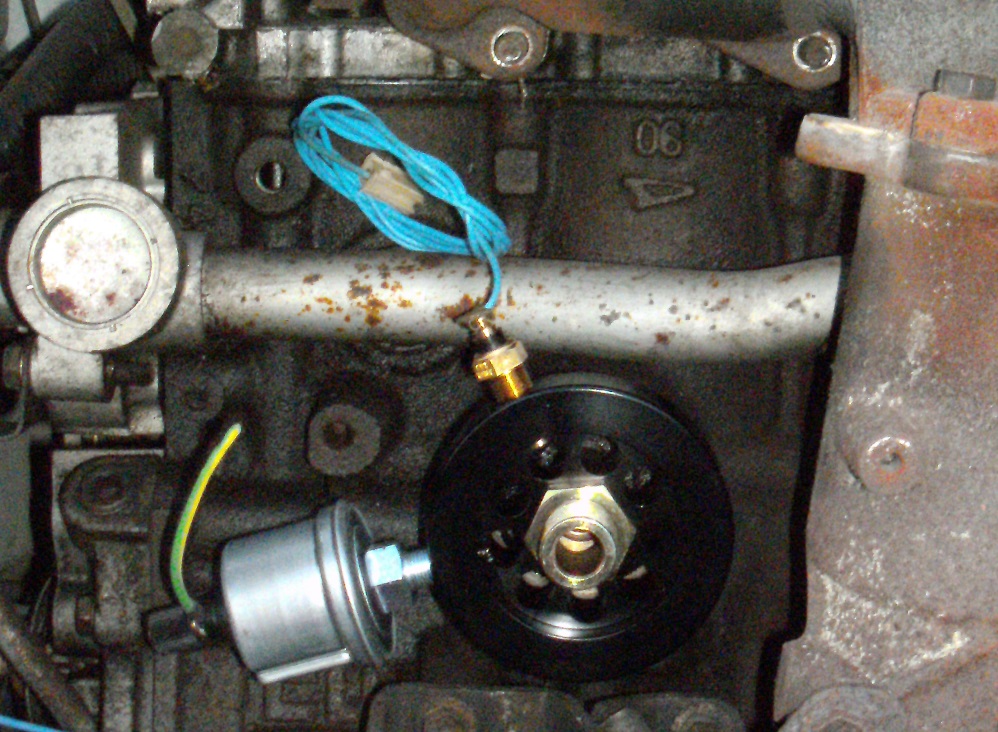
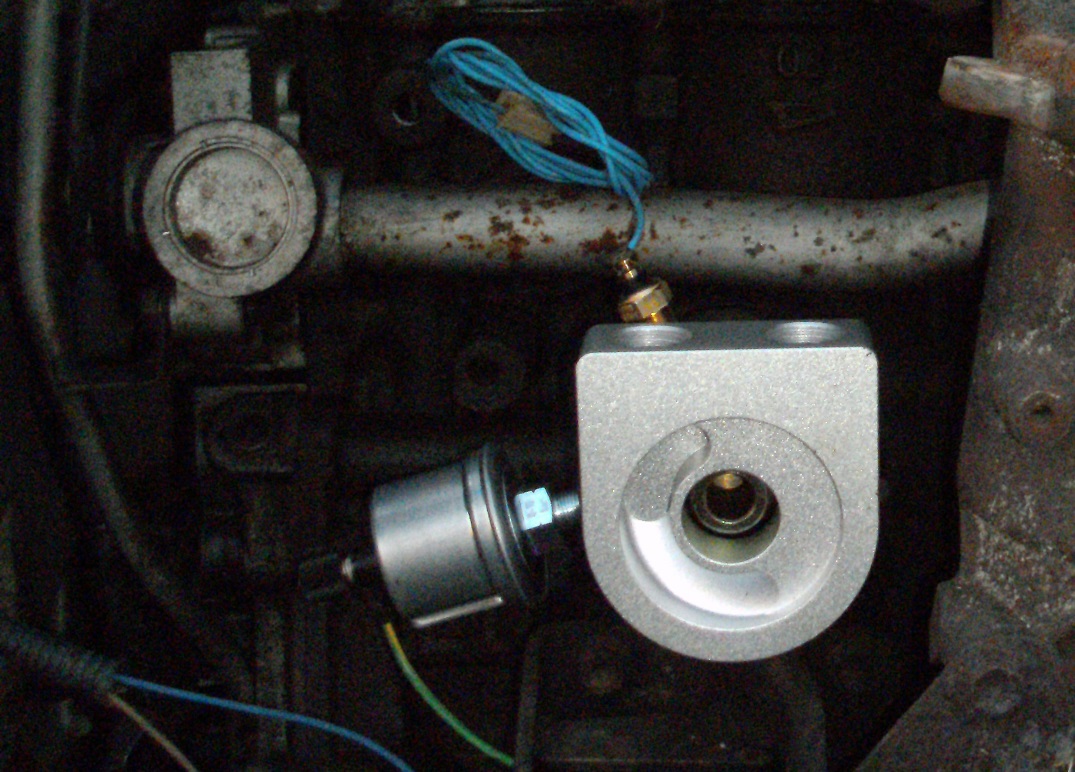
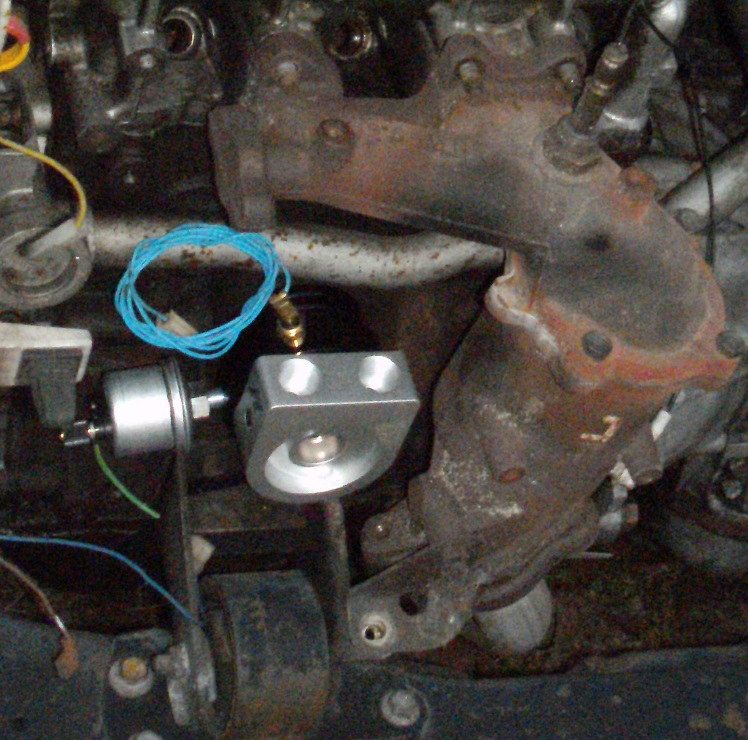
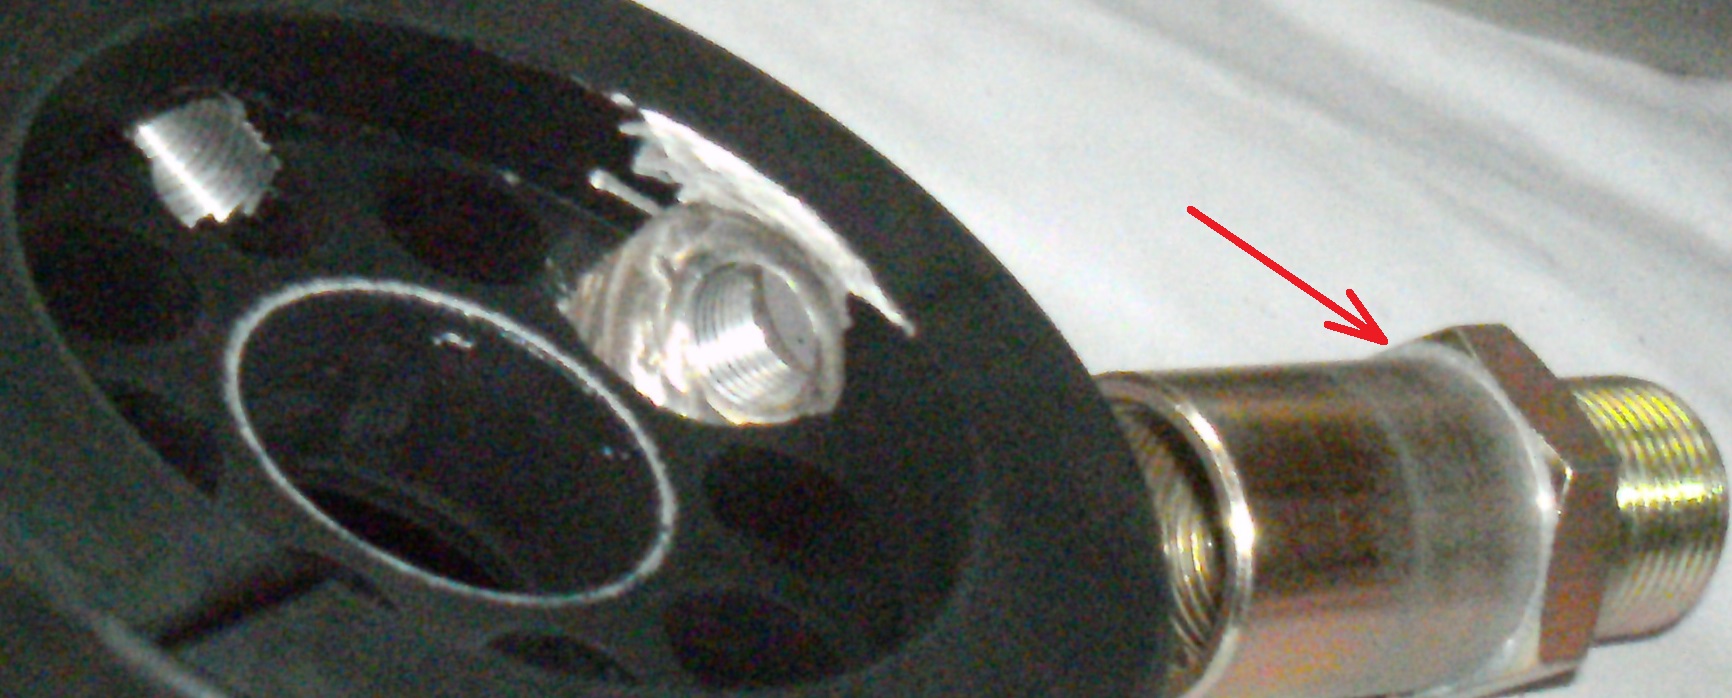
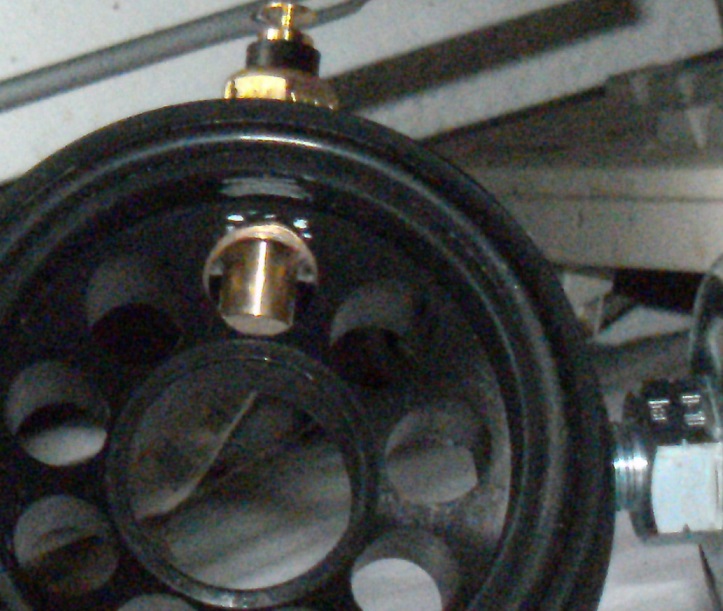
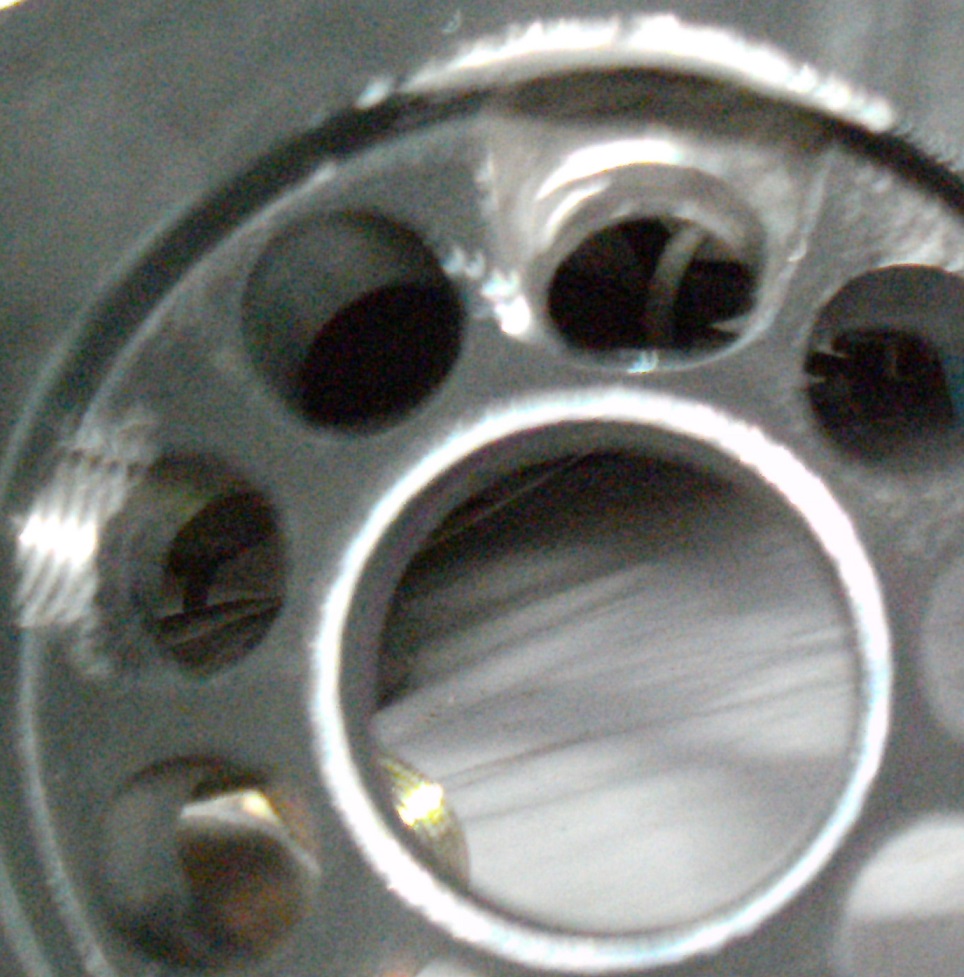
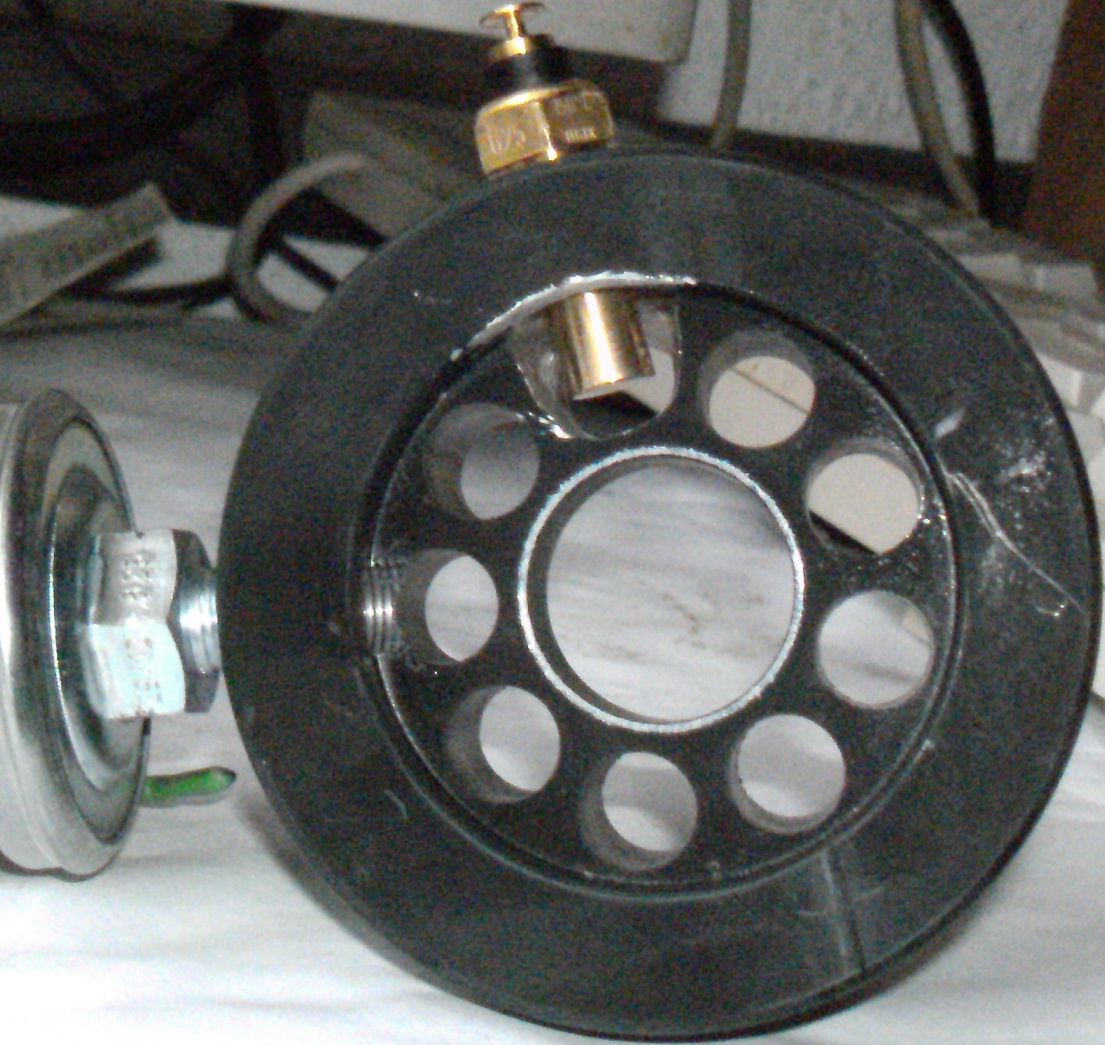
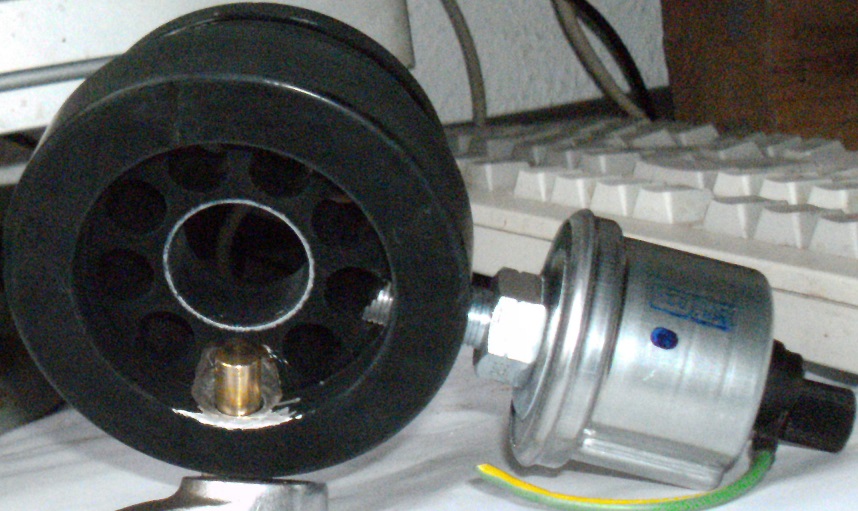
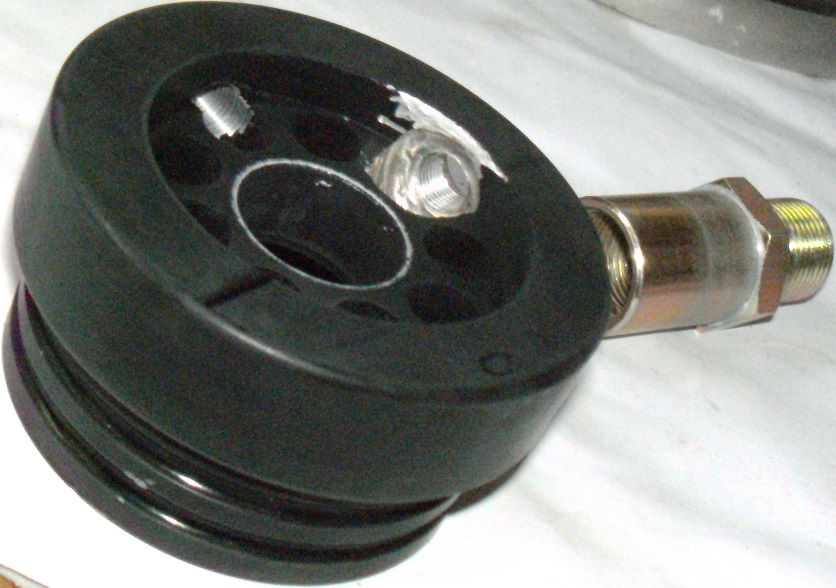
I mistakingly ordered the sensors’ threads in 1/8, whereas Daihatsu really does use 10 mm threads. The tapered-threaded original pressure switch gave a confusing impression. Now, I’ll be limitted to keeping the pressure switch in its original spot, unless I tap-in 1/8 threads which is the last thing I’d want to do, risking contaminating oil supply

1 Like

As it appears in the last image posted, the steering wheel was indeed blocking vision of the vent on the left. Placing the temperature guage there would have sufficed, since it’s the pressure guage which is more important to have readilly available.

So, what I did was to cut both holes on the right with a 50 mm hole saw (I didn’t have a 52 mm one available) and then perform the final trimming with a copy of a Dremel. I had just enough room and didn’t lose all of the vent’s ribbing.

While I have the bezel out, the vents will remain black, matching the guages, of course. I’m not sure, if I’ll eventually spray it wheel silver, while it’s out or not. Spraying it red wouldn’t seem to match with that grey background, in any case.

The lighting wasn’t optimal for filming the end result, given that glare ruins the image somewhat:

2 Likes

I went through my collection of wires, without success. I then saw one of these power supplies for personal computers that I’ve put aside, waiting for the day when I get my hands on a test motherboard. Trying out one of the plugs, in order to see if it’ll connect to my guages gave me a reason for salvaging this power supply.

Here, after I cut a plug into individual connector sockets:

A second avialable plug gave me the minimum needed, requiring 10 connections:

1 Like

I mounted the old head and manifold, as a mock-up for seeing if one or both sandwiches had room and if the new bits could get mounted on one or both sandwiches, without needing to tap the block for accepting 1/8 threads:

It looks like both sensors can get mounted far enough away from the catylist.

What I will need to do is to start tapping-in new threads, based on how many turns are required to screw-in the original oil pressure switch into the block and then keep tapping the sandwich plate to the point where the new devices screw into the plate at an equal amount of turns as the original switch turned into the block.

The original oil pressure switch screws into the black sandwich numerous turns, to the point where its threads almost disappear, causing me to wonder about the precision applied to this plate’s thread cutting. If it was indeed sloppy, then it was a good thing to order a plate that needed thread-tapping

The mock-up stacking of the silver plate on top of the black one proves that it wouldn’t pose problems, when an oil cooler gets mounted. In that case, I’m assigning my temprature guage to make that decision.

I’ll probably never know why Daihatsu designs their oil pans to hold so little oil. My Suzuki requires almost double the amount, despite having an aluminium block and head which dissipates heat quickly.

The only reason as to why the pans on these are so small has probably to do with heating up the oil to operating temperature as quick as possible, so that moisture gets fully released from the oil, preventing acid build-up, when the vehicle is driven between shorter distances?

Here’s a side view, confirming adequate room for both plates:

2 Likes

What I didn’t think to do was to look for domestic-made VDO guages, before deciding on those two toys.

The placement of those two toy guages reminded me of a vintage Opel sportscar produced in the late 60s to early 70s. The site still has all of them available, except for an oil temperature guage which wasn’t included:

https://www.opelgtparts.com/ersatzteile-neu/elektrik-instrumente/instrumente.html?___store=english&___from_store=default

Both Speedometer and tachometer would be interesting, if they would fit in my instrument pod. In which case, the warning lights would need to find another home somewhere. If the speedometer would be geared 1:1 with Japan’s Denso types, it would only be a matter of cable Frankensteining.

If the tachometer measures only one cylinder out of Opel’s four, it could measure Daihatsu 3s.

The entire cockpit bezel is even still available:

This is how far I got. One third of my loom is done and turned out to be a prototype, demonstrating the need for making the ends of the remaining two looms more narrow

To get the set of guages pointing downwards sufficiently, which is simply a matter of preference, all dispensable material needed to be removed.

I was able to find two totally different connection types. One was already permenently pre-assembled with pure copper wire which is to replace the more stiffer composite type used in the PC looms. I, therefore, clipped the composite wires off of their ends, before wrapping the pure copper replacement wires around each terminal for soldering, making these ends quite bulky. These two will be feeding battery + and ignition +. Later on, I’ll upload the wiring illustration provided by VDO -Continental.

My digital camera arbitrarilly decided to go into flash mode, causing this image to appear somewhat blurry

This taken out of service Nippondenso voltage regulator once dwelling in a Toyota Corolla was planned as the loom’s organ donor, until it became appearant that the opposite connector wasn’t available. If anybody has any use for this regulator, feel free to let me know

Because my dishwasher was full enough to run, I set my priorities on finishing modifying my sandwich plate.

I started off by removing either the paint finish or powder coating from where the extension pipe was to fasten the plate, in order to secure the earth (ground) contact required to run the guage set.

The alternative would have involved drilling and tapping the plate’s exterior for mounting a n earth cable. Electro-chemiocal corrosion would have more likely taken place in such a set-up. I’ve not yet seen corrosion take place between aluminium and dissimilar metals, when both were immersed in oil. It’ll be interesting to find out. Once both guages suddenly go out, that’ll be proof of discarding this theory.

I initially planned on using valve grind compound. But, couldn’t find it. Maybe, that was better, because any trace of it remaining to pollute the oil gallery is the last thing anyone would want. Not finding the compound was possibly a blessing in disguise. Instead, I buried the plate in sand and then started twisting the pipe against the plate, until a rough surface appeared:

Obviously most time-consuming and risky was the porting-out of the temperature sensor’s location. The tapping alone required repetitive cutting and even chasing the outter opening, using an 11 mm drill bit, in order to be able to locate the sensor further into the plate, exposing as much sensor surface to oil flow as possible.

Idealy, the best place for this sensor would have been in the block. That, however, was the last place I would have wanted to cut threads into, as long as the engine wasn’t disassembled for cleansing. Most important would be knowing at what temperature the oil’s at, when leaving the engine block. Not at entry:

The most stable Dremel bit used was one which was barrel-shaped. Porting with a globe-shaped porting bit was tricky and needed constant concentration on the porting and a firm grip on the tool itself. Not using a Dremel, I wasn’t used to this substitute’s chuck construction which tended to rub on the plate’s surface not intended to get damaged. Nevertheless, the damage looks more dramatic in the following image than it really is:

A made it a point to even get the pressure sender as far into the plate as possible, in order to reduce leverage forces on its stem, when vibration exerts its forces. This was probably an overcautious measure, given that these forces would have been much greater, if the filter assemble would have been mounted 90° from where it was.

Also noticeable is how dishwasher detergent roughens up a painted finish. This could only help dissipate heat better.

I’ll make it a point to see if any paint surface erosion has taken place, during the next oil change. If so, it would be best to remove all paint exposed to oil, while I’m down there replacing the filter:

What a journey butch! Best wishes!

1 Like

The guage loom is done. I’ll need daybreak, before photographing. What I do have available is where the loom enginewards begins. I drilled through the fresh air duct, as far back away from both guages as possible:

Attempting to screw on an oil filter onto the new sandwich extension pipe, the pipe’s diameter was simply too large. It measures at 20 mm x 1.5 mm, requiring selecting an alternative filter.

I going into town today, in order to pick up a Blueprint timing belt tensioner bearing to replace my rusted-out dodgy SKF bodge. The auto parts store changed owners and the new employees seem surprisingly friendly. Hopefully, friendly enough for matching up a substitute filter, without requesting a vehicle number. I’m going to try with one of the numbers in the following chart, as soon as I mock up the old cylinder head and extractor/catylist, measuring for subtitute filter clearance, so that i don’t get stuck with one which turns out to be too fat for the job:

I found it much more easy to find a suitable oil filter than to start looking for a pipe extension that would work with an originally-dimensioned filter. So, I went after a MANN W 7023 filter which is a replacement part for two popular Korean brands. They didn’t have any in stock. So, a BOSCH P 7142 was available, as an equivalent. Both have built-in check valves which prevent oil draining back out of them, after engine shut-down. A check valve is important for assuring that this dry sump-type system dosen’t delay oil pressure, during start-ups, longer than necessary,

There should be cross reference charts available for matching these filters with desired brands. If anybody is going to use this particular sandwich plate designed for Subarus, these filters are recommended, being as narrow as original filters, clearing both extractor/catylist and engine mount.

Note the height difference, between the two. I will make it a point to measure how much oil this conversion requires to reach the dipstick’s full mark

I’ve finally plugged-in the loom and left one tie wrap loose, so that if there’s any need to point these ends in any direction, I wouldn’t need to waste any wraps. It looks like I might eventually have to do some cutting on the duct, though: