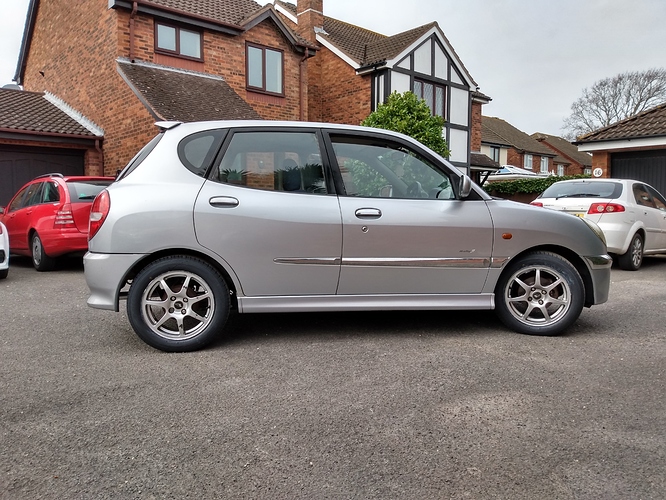
Ongoing project thread of Sirion Rally 2 M101

Hi All,

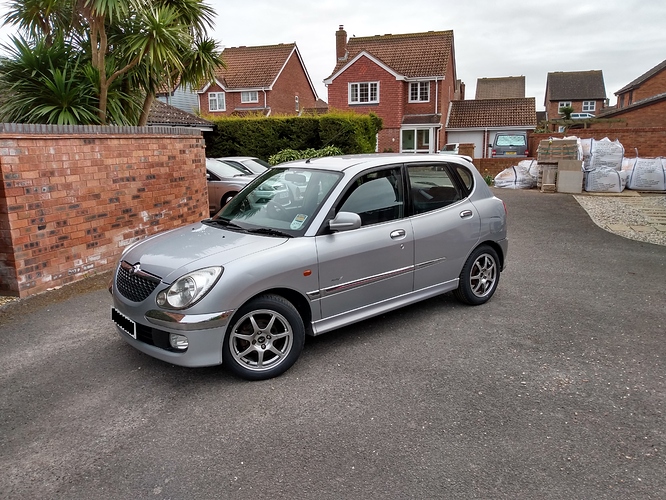
I wanted to document my resurrection of a UK market 2004 Sirion (Storia) M101 Rally II model. I bought this recently through another forum I run for £200, it had failed its MOT test on quite a few things, but I wanted a Covid 19 lockdown project to keep me occupied and this seemed perfect. Its by no means finished, but I wanted to document things so far.

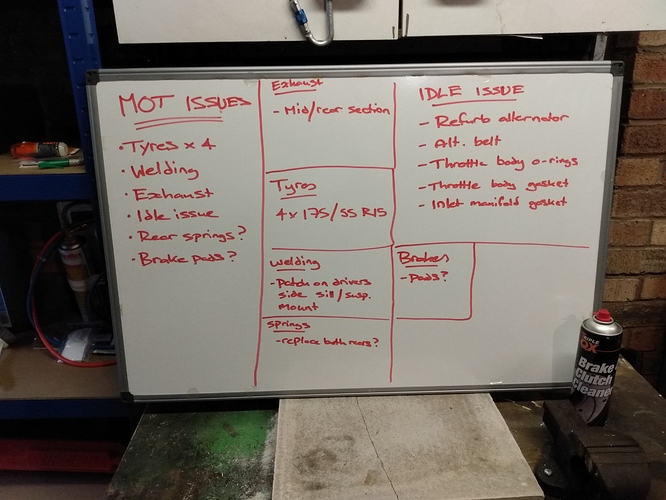
With the car lacking an MOT, I had it delivered to me by a friend who is a professional vehicle transporter for a very reasonable sum. The previous (failed) MOT test identified several issues:

  • Idle speed was really high, stuck at about 2000rpm once warmed up. This made taking an emissions reading impossible
  • The rear exhaust section had rusted through as it went over the back axle
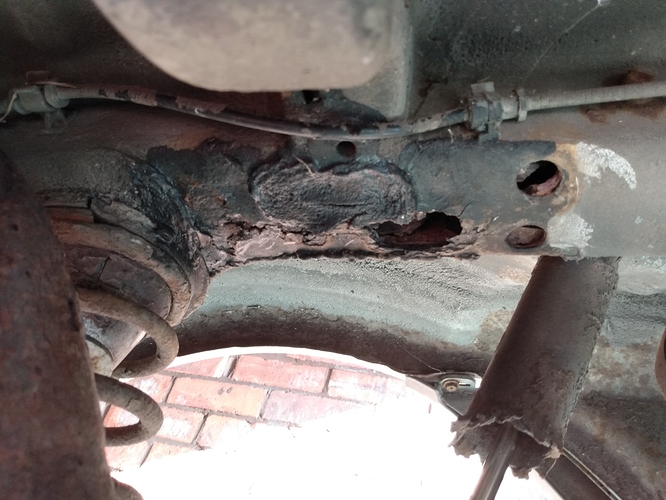
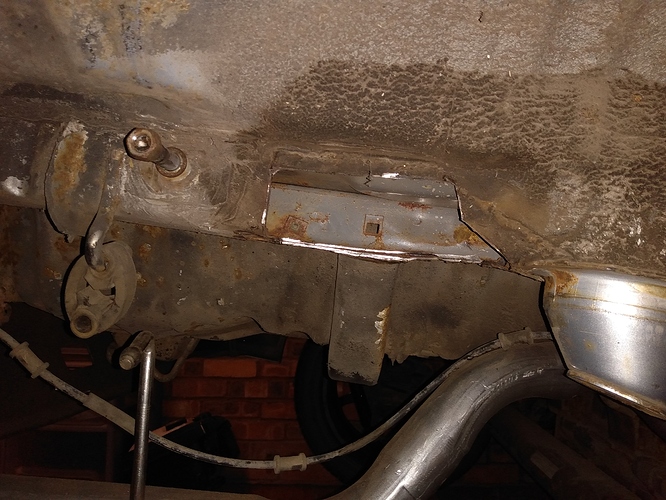
  • There was some pretty severe corrosion around the rear chassis rail sections which are within 30cm of both the rear seatbelt mounts and the rear suspension mounts
  • All 4 tyres were really old and cracked

The price was low enough that I could take a chance on it, it didn’t seem too far gone and this particular model, with the 110bhp variant of the K3-VE2 engine is really rare in the UK now, with only 30 left on the road.

Having got it home, I got it up on my scissor lift in the garage and had a good look at what I had to contend with. In addition to the bits I knew about, I could see the rear dampers were totally shot to bits, the headlights had a bad case of cataracts and it had the EML on for an as-yet unknown reason. Time to collate a list of all the things I needed to do to get it back on the road

I was a bit concerned about sourcing parts as Daihatsu pulled out of Europe in 2013, but turns out I didn’t need to worry! Plenty is available aftermarket and there is quite a bit shared with the contemporary Toyota Yaris, an automotive cockroach.

9 Likes

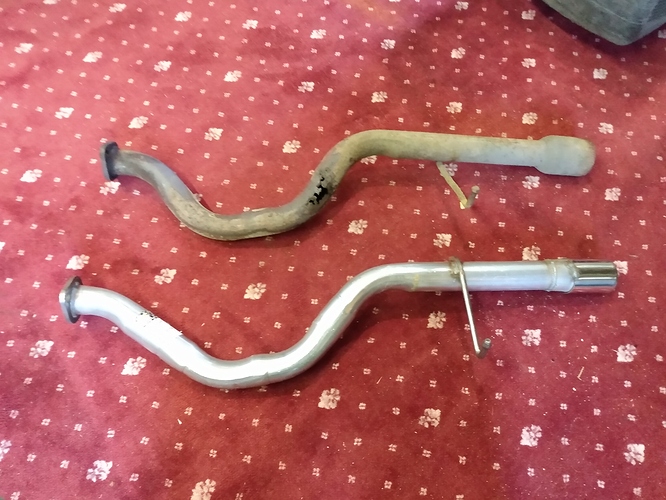
First up, I ordered some of the easier parts. I managed to source a rear exhaust section brand new for £28 delivered, a pair of rear dampers were £63 (I initially ordered the ones for the 4WD variant and had to return them apologetically).

I ordered a new gasket for the inlet manifold and throttle body in case the idle issue was due to an air leak. in preparation for this I started dismantling everything, removing the air intake, throttle body, inlet manifold and alternator as it was making coffee-grinder noises with the engine running. I am fortunate that I live close to an alternator reconditioning specialist who was able to replace the brushes, regulator, pulley and bearings in my alternator for £85, less than half the price of a new exchange unit. Refitting the alternator was not much fun, with very little room to route the belt correctly but I got there in the end!

With this refitted I was able to fit the new gasket to the inlet manifold, polish the mating surface of the engine block to make it as clean as possible and bolt it back up. Then refitting the throttle body to see if it was an air leak that was causing the idle to be so high.

Frustratingly, it was not this - the idle remained stubbornly high, sitting at 1500rpm from stone-cold and rising to 1800rpm when warm. Time for some diagnostics!

With the engine idling I plugged in my diagnostics reader. Its a very good system - an old, but good Delphi system which gave me lots of live data readouts. First of all I cleared all the historic fault codes to see what came back.

First of all, the O2 sensor readings were dud, showing the O2 sensors were not working properly. The pre-cat (S1) sensor was showing a voltage reading of zero, and a short-term fuel trim reading of zero. the post-cat sensor was giving a reading, so I decided to swap the two units over as they are identical. The fault moved, with S1 now giving a reading, but S2 being dead, so I ordered a new pattern lambda sensor. While I waited for it to arrive in the post, I got the multi-meter out to check I definitely had voltage at the loom side of the wiring plug, this all checked out so I was confident it was a dead sensor, not an upstream wiring issue.

When the new sensor arrived, I greased the thread lightly and screwed it into position S1 (precat) and left the working one in S2. Starting the car again and clearing the fault codes, I was relieved that the codes stayed away, I was seeing good voltage and short term fuel trim readings on both sensors now.

However, the idle remained very high. This called for some serious diagnostics - something that I kew very little about!

5 Likes

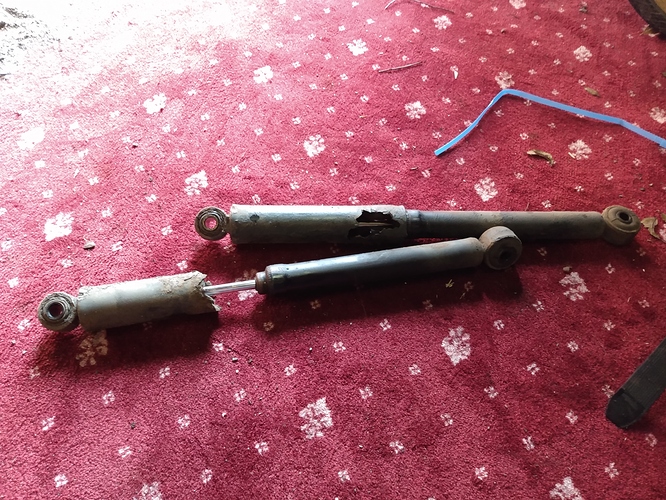
In the meantime, I had fitted the new dampers to the rear axle, these are super easy to deal with, it took 20 minutes from start to finish to unbolt the old perished ones and refit the new shiny ones. I had the car lifted off the ground on a scissor lift so had to use a big block of wood and my trolley jack to support the rear axle, as the weight is taken on the dampers and the axle hangs down once the damper is removed.

The old ones had definitely had their day!

I fitted a new pair of Atech dampers, we’ll have to see how these perform down the line.

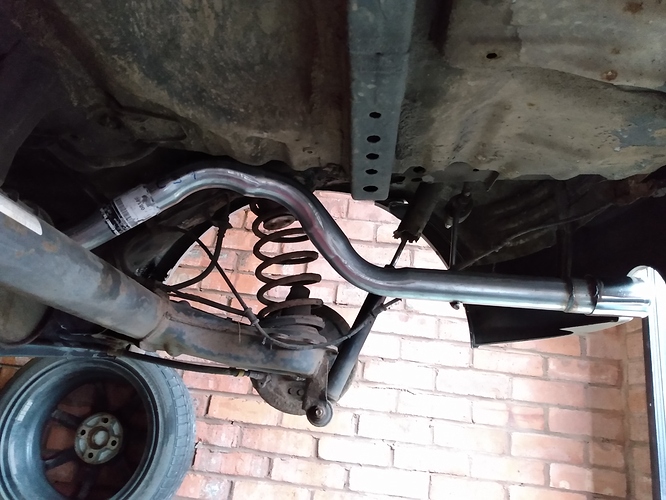
I also replaced the rear section of exhaust and the 51mm crush gasket too. The old exhaust was very rusted and for just £28 I had a new one sourced and I fitted it in 20 minutes.

Having a main impact driver made this job a LOT easier!

I had also bought another second hand throttle body in case my one was bad. On fitting this, I had even worse idle, sitting at 2100rpm from cold and rising to almost 2500rpm once warmed up. Even worse, once the coolant temp went above 75c the engine began surging, with res dropping to 1200rpm before revving back up to 1800rpm every 3 seconds. I had serious doubts about the state of the engine and/or ECU at this point, but wanted to persevere with my diagnostics to see exactly what was wrong.

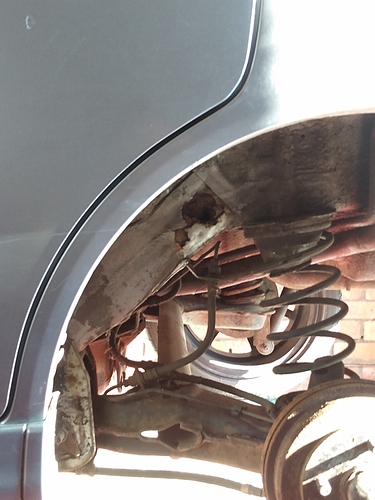
I also started having a serious look at the rust towards the back…

A gentle prod with a small hammer showed the ‘blister’ to be a bit worse than hoped.

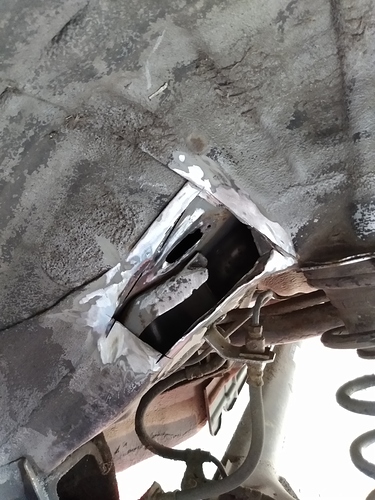
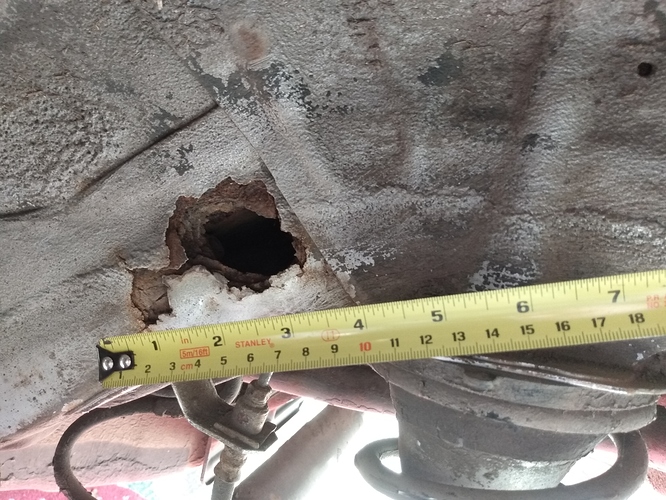
and cutting back to clean metal gave me quite a substantial hole!

and this is the good side!

4 Likes

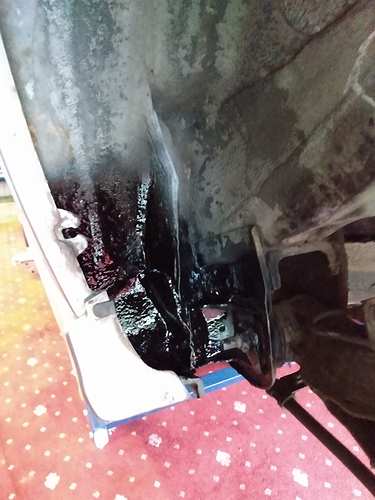
The last thing I did before diving in the deep end with diagnostics is to use a wire brush mounted in a grinder to clean out the leading edges of the inner arches at the back, these had been welded before and had surface rust. As its a mud trap I cleaned them out thoroughly, wire brushed them back, painted the entire area with Vactan rust converter, then hi-zinc primer, then matt black enamel paint to seal them properly. Its not that pretty, but will be all but invisible once the car is back on 4 wheels and will prevent the rust for years to come

I’ve found Vactan to be brilliant stuff and really easy to apply. it gets painted on like milk, goes purple in the presence of rust as it neutralises the rusted bits, and dries black. You can paint right over it, but I prefer to apply hi zinc primer on top, especially if its a non-visible section like this as you can slop it on without worrying about the finish then aerosol enamel over the top of that to give a really solid, durable finish. I’ve used it on much mor evisible areas too, like sills, arches and doors and you can still get good results but needs more care in the prep and between layers/coats.

7 Likes

I was last having issues with my engine also not idling. It was one of the vacuum line from the airbox leading towards the throttle boddy. Maybe it something, maybe its nothing :wink:

You really put allot of effort in this sirion. Really love that. This is already a really interesting buildthread!

4 Likes

I refitted the throttle body, cleared the fault codes relating to the o2 sensor, connected all the electrical connectors back up and started the car up. With the diagnostic computer plugged in, I got voltage and short term fuel trim readings from the front (S1) sensor which is progress.

The idle speed remained high, from stone cold it sat at 1200 rpm, rising to 1750rpm by the time the coolant had reached 90c. Once up to temperature the hunting started again, the revs jumping between 1250rpm and 1750rpm in ~3 second bursts.

I disconnected the MAP sensor with the engine running, triggering the EML on the dashboard and causing the revs to drop until the engine stalled. This showed that the MAP sensor was working.

Both O2 sensors were showing short term fuel trim readings, with S1 showing -20 from stone cold, slowly rising to 0, and S2 showing a fairly consistent reading of +24-26

The MAP sensor showed readings of approx 40 once up to temperature.

It was possible that the throttle stop has been fiddled with, though based on the paint on it, I don’t believe it has.

I wound in quite a bit of slack into the throttle cable to the throttle body to ensure that the cable wasn’t over-tight causing the throttle body butterfly to be held open. I had this before on another car and it took forever for me to work out this was the issue. I felt more than a little stupid when I finally noticed!

I then disconnected the battery overnight in case the ECU has ‘learned’ the wrong settings for the throttle body - apparently this is possible? The idle speed when below 75c is stable (though too high), then once it tips over 75c the hunting begins.

Looking at the diagnostic data, the O2 sensor data was now in the right range, and there were no O2 sensor related fault codes any more, not even pending ones. However - the MAP sensor readings were on the low side - for the K3-VE2 engine the MAP sensor reading should be between 63 and 72 kPa, when this sensor seems to only read between 32 and 40kPa.

3 Likes

With the O2 sensors and MAP sensor deemed to be in the correct ranges, my attention turned to the throttle body itself. I could see that the main throttle body butterfly was shut with the accelerator pedal in normal position, and pressing the accelerator pedal caused the revs to rise as expected. With the diagnostics plugged in, I was getting a reading from the throttle position sensor, indicating that it was working correctly too.

This left one remaining thing - the idle control valve.

These have a bad reputation in Sirion/Storias for seizing. If you google ‘fault ICV’ the symptoms described are remarkably similar to what I was seeing here, so the finger of suspicion slowly turned to the ICV. What was concerning was that by this point I had three (!) throttle bodies, all of which had the same issue, with idle stuck high. Surely even I wasn’t so unlucky to have identical problems with three separate parts?

I had a look for just the ICV housing - its a separate part of the throttle body, held on with 4 cross-head screws. once undone, there is a gasket that keeps the coolant that flows through the ICV separate from the air intake, because it would be BAD if that mixed!

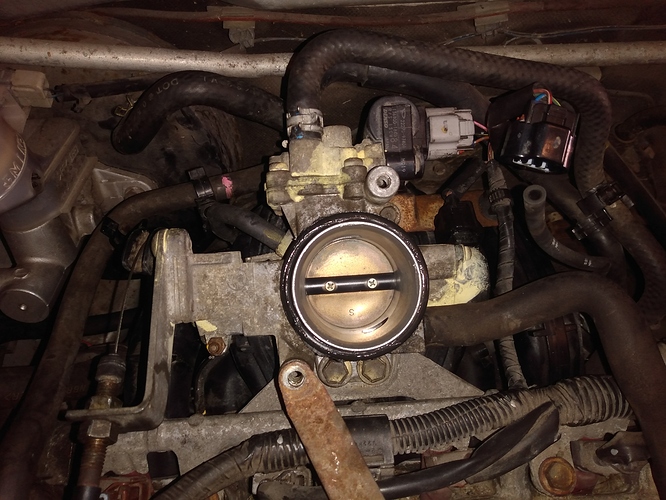
The ICV part of the throttle body is shown here

It is the thing with the grey plug and 2 coolant hoses running to it, directly above the barrel of the throttle body. Removing the hoses and multiplugs to the throttle body and then unbolting the TB from the inlet manifold allows me to remove the throttle body and get it on the bench to disassemble.

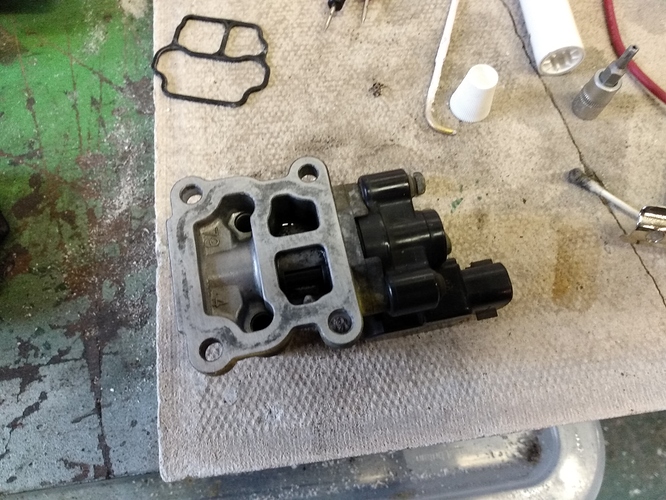
With 4 screws removed - they are tight, but will eventually yield - the ICV housing comes off

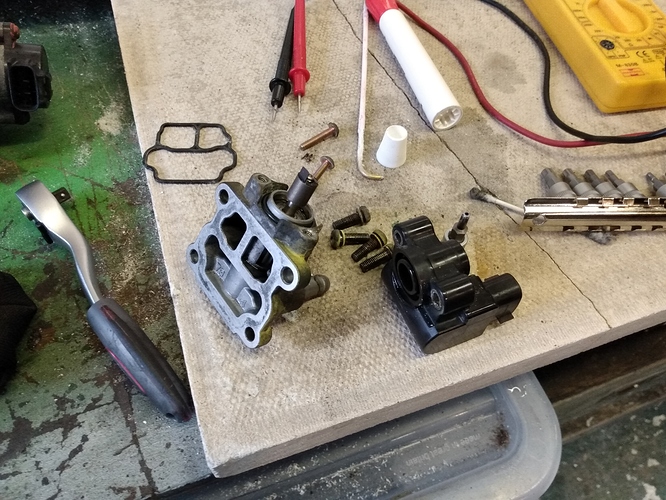
Then it gets fiddly. To get at the actual valve you need to remove the black stepper motor which is what the grey multiplug connects to, and which controls the ICV in normal operation. This is held on with 2x torx head screws, but these are not normal 6-spline torx bits, they are anti-tamper screws with 5 spline grooves. Finding 5-splined torx bits was a bit of a challenge but I eventually got a set and undid the wretched things, allowing me access to the innards of the ICV

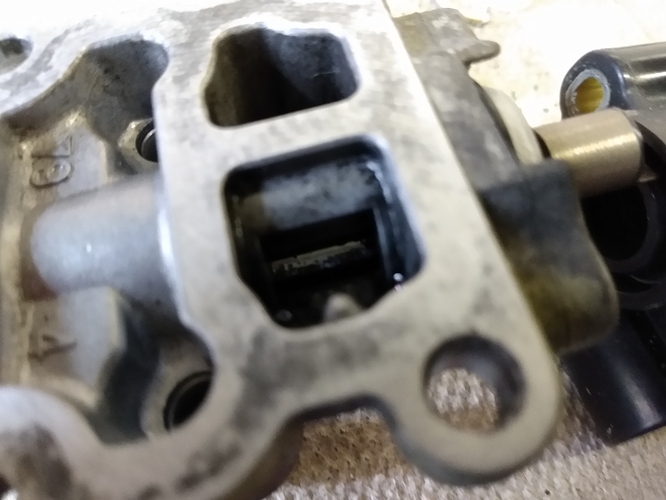
with the stepper motor removed (black bit) I could see there was a magnetic spindle that controlled the actual valve. I gently began twisting this between my thumb and index finger and it wasn’t moving at all - this should rotate 360 degrees with the stepper motor removed, so I squirted a small amount of plusgas down the bottom port (apologies for blurry image!)

then tried to twist the spindle again, I was rewarded with a small bit of movement, so gave it some more plusgas and twisting until with a small crack noise, the valve unstuck itself and would now rotate 360 degrees! This is what it should do in normal operation. What had happened with THREE (!) separate throttle bodies was the idle control valves has seized in position, the poor stepper motors weren’t powerful enough to unseize the ICV and so the valve itself was stuck wide open.

This caused the idle to be way too high, as too much air was able to bypass the main throttle body butterfly. The surging I was seeing before was the engine ECU cutting power to the injectors momentarily to try to bring the idle speed down, but as soon as power was restored the idle speed shot right back up.

I reassembled the throttle body with the stepper motor, newly unseized ICV and a fresh gasket (that looks kind like the trollface meme I think?), refitted the 4x cross-head screws and tightened it all back up. I bolts the throttle body onto the inlet manifold, reconnected the various hoses and multiplugs and turned the key…

and after a couple of minutes was rewarded with a beautiful 900rpm idle speed!

I repeated the process on the second throttle body, unseizing the valve with some plusgas and gentle twisting of the spindle. Its easy to do, but you need to have 5-splined torx bits which I’ve found to be rather difficult to source. I have a set now, so if anyone else has a similar issue let me know and either you can post me your throttle body or I can post the bits to get at the ICV and unstick it. Its not possible to do without removing the stepper motor though
5 Likes

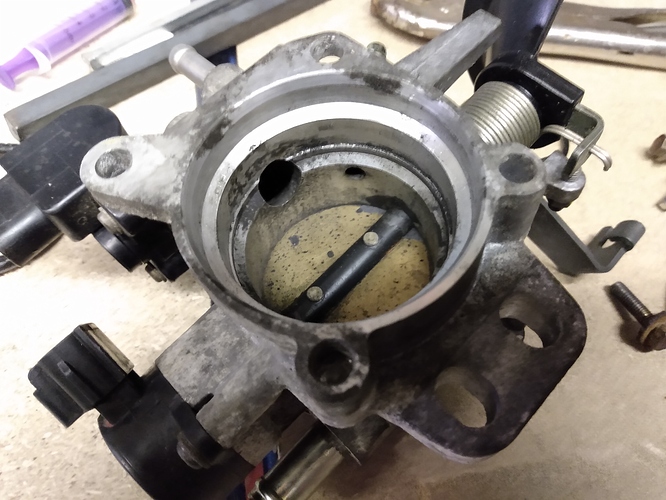
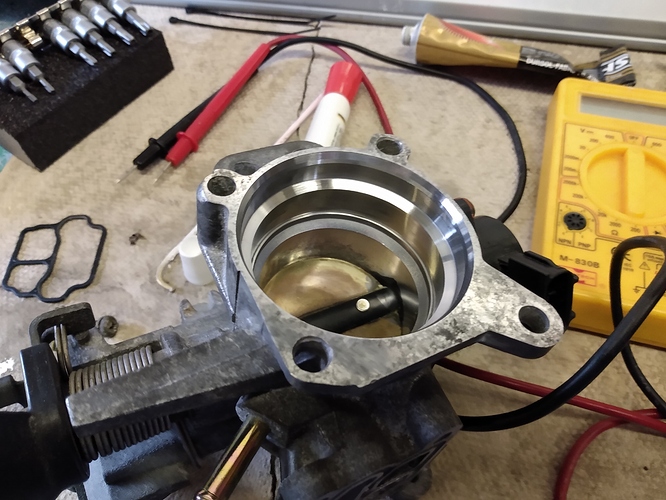
With the ICV freed on my second throttle body, I hatched a plan to improve things. The throttle body was quite grubby, and rather than just cleaning it roughly with a toothbrush and brake cleaner I carefully disassembled it, used mole grips to clamp the throttle plate/butterfly wide open and then used a clean rag and some Autosol polish to hand-polish it.

this is the ‘before’ picture

and after 20 minutes carefully polishing the throttle barrel, it looked a lot better

There is still more work to do on this, but I hope that by polishing the barrel I can improve the airflow and restore some lost horsies :smiley:

I also purchased a brand new ICV. They are available new from Australia but were looking like costing £450 (!!!), but a quick search of the part number on AliExpress turned them up for fifteen pounds delivered. At that price I’ll take a gamble on one!

I am going to fit the brand new part to my polished throttle body when it arrives to make a good-as-new throttle body assembly and fit that to see how it performs. I don’t imagine it will make a huge difference as the throttle body is only about 4" long, and forms a small part of the overall air intake system, but I like shiny things

6 Likes

Next stage is the welding, as per earlier in the thread, there is a 2" x 6" hole in the inner arch on the passenger side where I have cut away the rust to get back to clean metal. I also took the paint off around the edges with a flap disc in a grinder to give bright metal to weld to. I have a friend coming over this weekend to let in new metal, which will then be treated to Vactan, zinc primer and probably more black enamel for now.

Once done, I’ll drill a hole in the new metal and spray the cavity with Vactan and zinc primer before dousing the whole lot in Bilt-Hamber Dynax S50 cavity wax to hopefully arrest any further tinworm developments!

The other side is worse though.

This will require fairly major surgery! My current plan is to have the less bad passenger side welded up, then turn the car around to give better access to the drivers side. Once done, I can get the disc cutter onto the chassis rail and take all the rot out of this. area.

I really hope I can just cut the rot out from the chassis rail where the spring mount joins without having to cut the mount off, but we’ll have to see what happens when I get in there. Its an awkward area as there is a T-shaped chassis rail and the rear damper mounts just to the right of the photo too.

The cable that runs across the top isn’t anything important, its just the wiring for the rear fog lamp - a UK requirement. I can unplug this and tidy it well out the way. There will need to be some fabrication of a new chassis rail section from 2mm sheet steel I should think. I’ll give this all the Vactan/Zinc primer/Enamel/Dynax treatment as well to keep it in good shape for as long as possible

In the meantime I’m looking for a set of 4 brand new tyres, I’m leaning towards Yokohama A34LV tyres, there isn’t a lot of choice in the 175/50R15 size these cars need and I’ve had good experience with some of Yokohama’s tyres on my other cars in the past.

Once this is sorted - hopefully in a few weeks time - I can get the car put in for a test and get it road legal in time for the UK summer. My long term plan is to run it for the summer as a third car, then over next winter take it off the road when the salt comes out and give it all a major going over with underbody wax to protect it all for a long time. Most of the underside is actually in good condition considering its 17 years old this year, but I’d like to keep on top of things.

I’m toying with the idea of fitting a set of 35mm lowering springs to it, a set is only just over £100, but I want to see what its like on standard springs first. The existing springs have minor surface rust, but they are tiny so I’m concerned how bad the ride will be with 35mm less distance between my bum and the road!

Once its been MOT’d and is on the road I’m going to give it a thorough clean, clay-bar and hard wax to bring up the bodywork to a shine. Its only a small car so should only take a few hours.

SO that brings us up to date I think - thanks for reading and I’ll keep the thread updated with progress on the welding and tyre situation over the next few weeks. Fingers crossed!

6 Likes

A friend of mine came over today and dealt with a lot of the outstanding bodywork issues. I had previously taken this

back to this

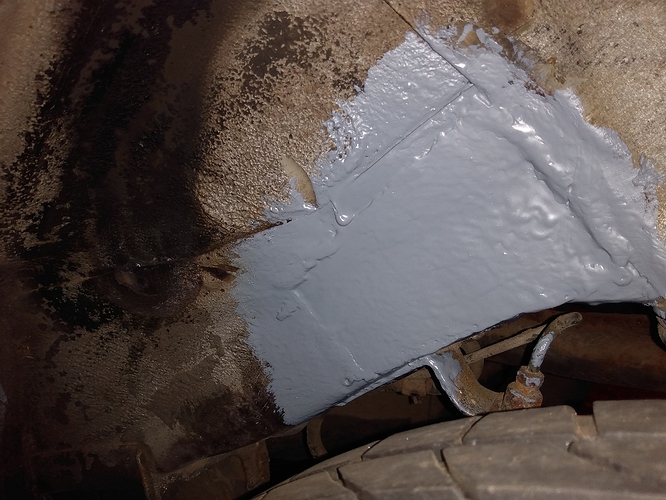
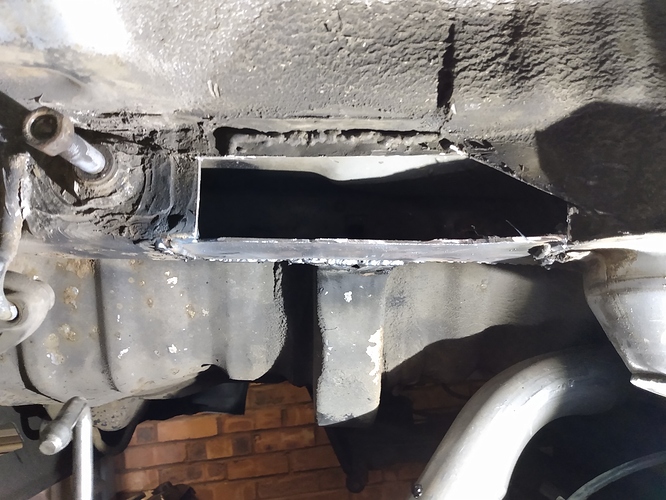
And today he came and fabricated and let in new metal to turn it into this

I’d zinc primered it by this point, but he did a brilliant job in cutting, welding and grinding back the new metal. I’ll be applying some matt black enamel over it in the next couple of days.

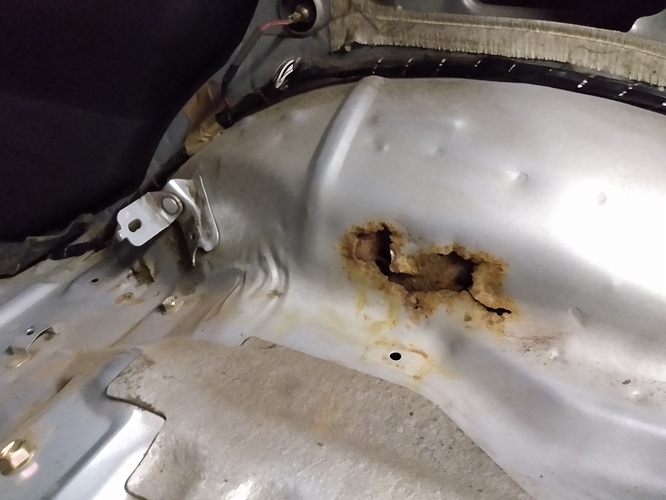
We also treated several scabby bits of the inner boot

Which were cut back ready for new metal next week. Finally, he took out the really grotty bit by the drivers side spring mount to bright metal

Again, in prep for letting in new metal next week. In the mean time I need to surface treat and paint the spring on this side.

I’ve also ordered 4x Toyo Proxes tyres for the car which should be delivered next week, and fitted I hope by the weekend. I can then book it in for a fresh MOT test and hopefully get it back on the road.

This is the stuff I am really unable to do myself - so having a highly competent welder/fabricator available has been a godsend!

6 Likes

Some further progress on this today, I got up early and replaced the throttle body with the polished one, which I had fitted the new ICV to last night. I refitted all the hoses and intake housing so it should all be OK now idle-wise.

My friend came over this afternoon and finished off the welding. Here is a pic of the reconstruction he did on the worst bit - the drivers side chassis box-section in the rear wheelarch

We were mega lucky with this, the rot extended further than we’d hoped, but didn’t go very far under the spring mount - which you can see on the right hand side. As a result, we could just fabricate a section of new metal to go under the spring mount and weld it in. We decided to do this in 2 pieces - a horizontal that you can see here, and a vertical that we let in afterwards - because it allowed us to zinc primer in the box section to prevent it from rusting out again, at least not for a while!

The outside then got ground back and zinc primered as well, getting 2 coats before I enamel it tomorrow once the primer has fully dried.

With this done, we moved into the boot where more welding was needed. Sections of the tops of the wheel arches had rusted through the top layer of steel (there are three layers if thin metal here) on both sides - the drivers side worse than the passenger side. The top layer of metal was carefully cut out, the middle section given a thorough coating of vactan and then new metal shaped and welded in. There was similar issues on both rear seatbelt anchor points - I suspect the rear belts both got very wet at some point and have been left against the metal, inducing corrosion. These were extremely carefully cut away with the grinder to take just the top layer of metal out, the strengthening plates beneath were judged to be solid, so were also vactan’d before new metal was shaped and welded in, the zinc primered on top.

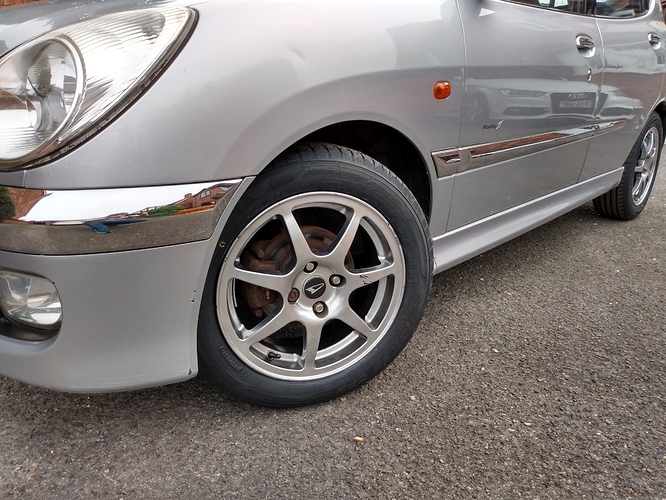
While my friend was doing the hard work (!) I took the wheels and my new Toyo Proxes CF2 tyres to my local fitters to replace the very old and cracked Bridgestones that were on the wheels. I opted to go up ever so slightly from 175/55R15 tyres to 175/60R15s as there was a lot more choice in that size, and the prices were radically lower - 4x Toyo Proxes were £160 in that size, vs £270 for 4 Bridgestones in the smaller size. The rolling circumference of the tyres is only 4% different so my speedometer will only be a very small amount out. The tyres fit fine in the arches too which is a big relief! I also took advantage of the fact we had needed to remove one rear spring to access the area that needed to be cut out and welded in order to wire brush all the remaining powder coating off it, vactan it and brush paint it with black enamel paint to tidy it up. I ought to do the other side spring too, potentially this weekend, or maybe after the MOT. Its not dangerous but looks a lot nicer!

I need to wait for the primer to dry, then enamel it all before refitting the boot liners and rear seat back and squab. It’ll then be ready for its MOT test which I hope to book in next week. I’ve addressed all the issues that it failed its inspection on last October and fixed a lot of additional things that we found along the way. There are a few more its of corrosion I will need to keep an eye on, but they are solid enough for now, and are in areas that are going to be fiddly to get at, like behind the fuel filler neck and near the brake line mounting brackets.

Once we have it tested, I will give it a thorough clean, clay and wax and get a rattle can of paint made up to fix some of the cosmetic issues, then will get some decent pics to show off my car!

Thanks for reading

8 Likes

Small update today, I refitted the interior - the back seat backrest & squab, the boot liners and spare wheel. I then spent a happy hour with the vacuum cleaner giving the interior a thorough clean, followed by interior shampoo.

I then turned my attention to the outside - a wash with car shampoo, followed by a claying to remove the stuck on muck and tar spots and then finally a wax polishing all over. My fingers are crippled from all this but the car looks pretty good I think

Now safely tucked up in the garage ready for its MOT test on Thursday. Fingers crossed!

7 Likes

I do love a clean car :heart_eyes:

1 Like

Got an MOT pass today! Its back on the road again! (please note this is not an April fools :smiley: )

Waiting for the garage to call me but I can see its got a ticket for another year. On the way there I found it’ll do 70mph in 2nd gear too :flushed:

7 Likes

well done :+1:

Took the Sirion out for a short run tonight to enjoy it, and made a little video of part of the drive.

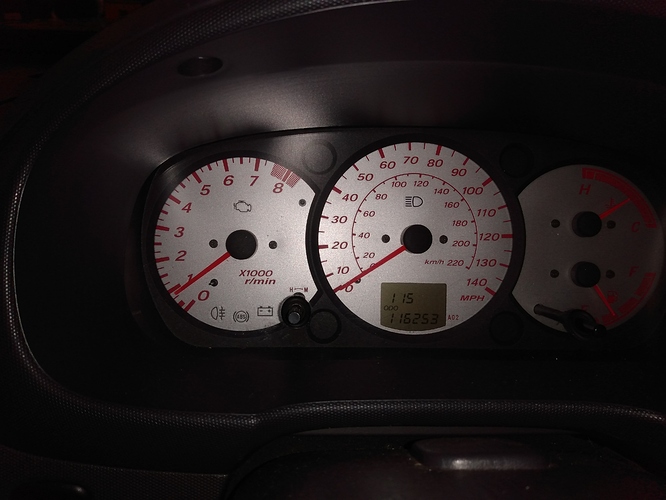
This is only taking it out to 6500rpm in 2nd gear, there is still 1000rpm to go! It got a bit bumpy so I backed off a bit - looking for another, smoother bit of road to really test out the 20 - 60mph time. Above 4000rpm it comes on cam and really flies.

Turns out I do need a new post-cat O2 sensor though :slight_smile:

3 Likes

I can agree with this I have an N/A YRV and the cam really does come alive at 4k rpm plus. Mine is usually granny driven everywhere as it is a daily but I gave it a boot full the other day doing a test on some rebuilt rear shocks and man it goes a hell of a lot better than I thought.

The Rally 2 cam really increases this kick at 4k, and really does feel like it wants to rev all the way to the redline, although power drops quickly just before the rev cut. But a hell of a fun engine with the rally cam in it.

3 Likes

did you have to change the bucket’s etc when you put the rally cam or cams in?

Changing buckets would be the best way, but there is not many sizes available to do it. The way Daihatsu UK did it and the way I had it done was to get some shims made up, and then those were machined down to what was needed for each bucket.

2 Likes