Oh of course, Germany! I always forget.
Big wang gang


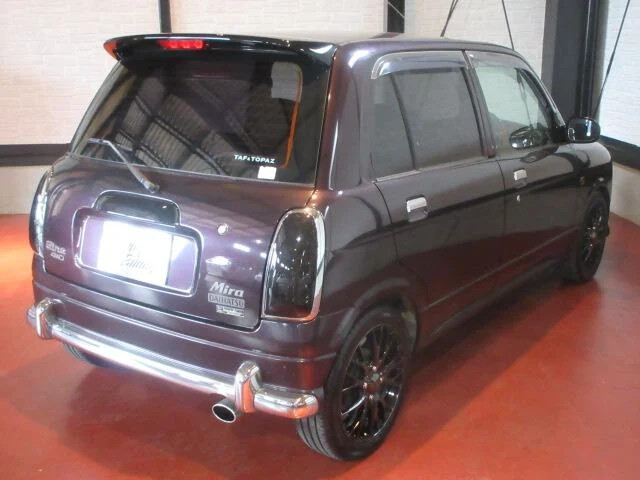
Picked up a TR wing, not in the best condition but I had to slap it on either way. Will probably repaint it later if I feel like it. I’m just missing the brake light, which will not be easy to find for sure.
White mustachio

I also slapped on the white plate garnish that I’ve had for a while. It’s so much better than the black plastic piece. Can’t wait to give it some paint.
4 Likes
Feeling blue
Almost time to sell the blue Cuore which has been named Cookie by the next owner! I’ve become quite attached to this little car. I love the way it drives with the power steering and automatic transmission combo. Quite the cruiser. But it also got the nyengs.

I slapped on a facelift front bumper and a normal rear bumper. Swapped the MX-5 wheels on and stole some interior bits of it. I’ll post some pics of those interior bits once they are installed in Ko ![]() . Can’t wait to put on the TR rear bumper!
. Can’t wait to put on the TR rear bumper!

11 Likes
First of all, we reached 200k!

Smooth shifting
Changing the rubber and plastic parts on the shifter mechanism seems to have been one of the cheapest but most effective upgrades. The old parts were very worn. Selecting gears feels smooth with just the right amount of healthy resistance. It’s like you “click” it into gear. It feels amazing.


Sadly the lower bushing seems to be out of stock about everywhere so I still have some play on the lever while in gear. This is gonna be resolved by making a custom (and stiff) bushing.
Poorple
A colour that wasn’t actually delivered here in The Netherlands; Wine Red Metallic (R30). We got a rattle can mixed in that colour to test it out and see it in real life. Even though the test spray isn’t great quality (yay orange peel) the colour looks so good! The photo doesn’t do it justice. It’s very flake-ey and there’s this colour shift from red to purple in certain light conditions.

Will I spray paint the car? Yes, at some point. Is it gonna be this colour? Probably will be.
Rusty Crusty
Not as bad as I expected, but not fixed just yet. Grinded down most of the rust and removed the sound padding. The welder we had available burned right through the metal on the lowest settings so we could not patch it up yet. I’m gonna clean it out real good and spray a temporary protective layer in the meantime.

Still friends
Since the blue Cuore went to a friend, Ko and Cookie still see each other on a regular basis ![]()

4 Likes
wow man you have been busy. I like the poorple. For some reason I’m one of the strange people that like the effect of orange peel.
3 Likes
I’m about to do the bushes on my selector shaft too. When you say the lower bushes, do you mean the ones near the gearbox? Because I just got some.
Shifter side:

Gearbox side:

3 Likes
[quote=“marc0tjevp, post:64, topic:6067”] …The welder we had available burned right through the metal on the lowest settings so we could not patch it up yet… [/quote]I once lost my job at an Alfa garage in Sweden, because wherever I attempted to patch the spare tyre well with poprivets (this is how the boss wanted it “repaired”), the metal was too thin. I then chased the rusty sheetmetal with an acetylene torch, in order to find sheetmetal of which was thick enough to patch whatsoever. The ensuing hole in the boot became too large, thereafter. But, there was no way around it. If I would have done it his way, the spare tyre would have fallen onto the roadway. I had a witness in the shop who verified my attempt at repair. But, instead of listening to reason, the boss continued on with his hysterical rage rant.
The quickest and most effective way of finding sheetmetal of original thickness is to use this oldschool method. The sheetmetal will, of course, warp and sparks will fly from the rusty metal popping. But, you will definitely end up determining the border of damage, without spending valuable time experimenting with cutting off metal using power tools
1 Like
I replaced the following parts that are hightlighted green:

OEM numbers:
90043-86119 2X
96711-19011 2X
90043-85169 1X
90043-86105 2X
96711-19014 2X
96151-03200 1X
33597-87702 1X
33519-87705 1X
What I highlighted orange is what I did not replace, I ordered them but they couldn’t be sent by Amayama. Sadly there’s still plenty of play on that connection. This diagram is from a Duet and the connection seems to be somewhat different as mine doesn’t have a bolt and nut, but a pin you’ll have to grind off or something…
5 Likes
Lots of rust was removed although we couldn’t weld it up just yet. As a temporary measure so the car doesn’t rot away with all that exposed metal: primer. Honestly came out better than I expected. The sound dampening was also removed, but that didn’t really make a difference in terms of noise…

While I’m here let’s swap the dash ![]()

And replace it with the flocked dash! It works great with the purple interior bits!

The carpet got a nice scrub and vac as well

AC prep
While I got the dash out I replaced the empty housing for one with an evaporator ![]()

High pressure line in

To the condenser

And both lines to the compressor

So now it’s a matter of installing the brackets and compressor in combination with the right belt.
6 Likes
Yea, it’s a pin you have to grind on my l251 too, then the orange you highlighted is the bolt and nut that replaces the bit you have to grind out. Sorry I must’ve got the last bits from Amayama
2 Likes
I see, that’s good to know! I’ll just make something myself, no worries ![]()
3 Likes
I ordered the same pats but for a M3 sirion. They still managed to send the wrong parts and the parts that did fit broke during installments -_- the nut and bolt solution I made does make the shifting feel better!
Oof that sucks. Good to know those parts are still the same on the M3. Even without the bolt/nut it feels great! So I can only wonder how much better it would be if I finished the job haha.
I think the main play is directly under need the gearstick from what i could see. Don’t really know how it works down there since i didn’t want to be under the car longer than I absolutely needed to be. Kinda a sketchy set up

I do need to invest in some sort of way the get the car higher of the ground…
1 Like
This gives me anxiety haha.
A proper jack and some jackstands should do. And perhaps a piece of wood for under those stands with that floor!
1 Like
That’s the problem with a lowered car… I had to make small ramps to even get this jack under the car and it won’t even lift the wheels of the ground.
1 Like
Extra low jacks ftw! They have a pretty good value one at Datona.nl ![]()
1 Like


TR Rear bumpah

Time to start prep on the TR rear bumper. First thing I want sorted is the cutout for the fog light. I don’t want it, it’s ugly. Clearly the rear fog light was a bit of an afterthought when shipping this car to Europe.
I decided to give fiberglass a try since the hole is quite big.

I started with a big sheet on the rear of the bumper. It was a bit hard to get it straight. Maybe I’ll use some masking tape next time to keep it flush while it hardens.

I added a few more sheets to make it nice and strong. I also used some of the filler to get rid of the bolt holes.

Filled it all up.

And started sanding it down. What I missed before is that the underside of the cutout is warped. so I’ll have to sand it down quite a bit. So I’ll continue when I can do that with a powered sander.
Maybe not the best way to go about it, but certainly fun and new.
5 Likes
great work on it so far mate
1 Like