As an aside, with the 4 into 1, where would you fit the cat? I assume you’d use an aftermarket 2" cat with welded flanges and bolt it up, is the 4-1 a lot shorter than the original one? The reason I ask is you’d need to plug in the post-cat o2 sensor which normally fits on the very front of the centre pipe, just after it turns 90 degrees at the bottom of the OEM downpipe, would a 4" long, 2" diameter sports cat fit between the end of the stainless manifold and the flange of the centre pipe? Or would you need to get creative with wiring extensions and things?
I’ve found a very similar looking stainless manifold from Max Racing in Malaysia and its only £90 (plus shipping…) bit this piqued my interest regarding placement of the cat in a bespoke system like this
The 4 into 1 is a replacement part for the Daihatsu OE cat manifold. You will need to extend the wires to the post cat sensor on a new 2" system.
The cost of the 4 into 1. I did get it from Max Racing and yes now I think about it, it was around £150 delivered (which is what I told my wife). I would normally nock a £100 off parts when she asks how much they were!
A good result - the auto electrician came today and within an hour we’d gone through and found the issue - a bad ground from the igniter/coils to the rocker cover.
I say ‘we’ because I actually managed to help! With the ignition on and the electrician in the footwell I heard a clicking noise which i initially though was a relay, on closer inspection though it was coming from the igniter and on even closer inspection is seemed to be the earth strap. I removed it and cleaned it up with sandpaper before attaching it to the rocker cover directly instead of via a crusty-looking bracket, the electrician then said ‘the ABS and oil light have gone out’ so he tried the ignition and it burst into life.
What a relief!
I built the intake back up, secured the battery, fitted the radiator and fan, the coolant pipes and refilled the rad with coolant. Next up I need to refit the front bumper, wire in the fog lights, fit the front wheels and then take it down off the lift and for a run to see if it works ok.
Moral of the story is ‘always check your grounds’!
Got the last bits back together, off the lift and went for a gentle drive to check it all works - which I’m happy to say it does!
I didn’t go far, or fast but other than some rubbing noises from the brake backplates on the discs which I fixed by bending them back when I got home, it all seems to be working as expected.
The clutch bite is massively improved, with the bite point moving from almost the very top of travel to about an inch off the floor. The judder has gone completely and the changes seem smoother - whether thats just from the new clutch, or the new gearbox oil as well I’m not sure but it seems good.
I’ve bitten the bullet and ordered a 16mm rear ARB kit for my Sirion, or at least a kit that I believe is compatible - an Ultra Racing AR16-406 - from Malaysia.
I’m awaiting a tracking number for it tomorrow and hopefully will come in under £150 GBP once I’ve paid VAT on it coming into the UK.
Fitting should be easy, the rear beam is already drilled for the mounting kit, so its a bolt-on part.
I think/hope this is the same part that @nvergaraa fitted to his track M100 Sirion, granted he went all out with the chassis braces which I won’t be doing (!) as it still a road car, but his knowledge combined with input from the original Rally 2 project from @Rallynrace regarding the huge improvement a 16mm rear ARB provided the test mule made my mind up for me.
If/when it arrives, its a bolt-on job which should be really easy, and may help to address some of the scrabbling/loss of traction I get when really booting the car about on damp roads.
I went the AR18-407 from Ultra Racing, designed for the Myvi.
This one in particular was not quite right for the Sirion M1 series rear beam (in Australia) and so i needed a ratchet strap to bend the “ends” of the bar inwards. In very basic terms it looked more like \ ___ / and I needed it to look more like | ___ |
I did message Nicolas, and he mentioned they needed locking pliers to aid in getting the bar to fit. So I would think the 16mm may have a similar issue. Unless the one you’ve purchased is designed for the same torsion beam.
It did ‘bolt on’ from the perspective of the mounts fitting to the rear torsion beam etc.
Another point was the aftermarket exhaust I had fouled on that ARB, so that needed a slightly cut and re-weld to avoid it. Depending on what exhaust you have that may not be a problem. (Mainly as my exhaust has a small cannon muffler behind the rear torsion beam, as opposed to the factory pipe which has all its mufflers infront of the rear torsion beam).
Large improvement on turn-in and reducing understeer, so you should be happy with the outcome.
Thanks @TPG - yes I saw that it needed a bit of adjustment to make fit, but your explanation helps a lot! Did you bend it to make the ‘legs’ straight, then bolt it up to the car with the legs still under tension? or bend it so the legs sat straight even with them not tensioned?
The bar is designed for the Myvi, though other sources say its also compatible with the M1 series ‘out of the box’ so we’ll see!
I’m still using the standard exhaust so I think/hope that it won’t foul on that when fitted. There is a muffler rearwards of the torsion beam, but its quite a bit further back and higher up so ought to clear it ok.
I’ll update once it arrives and I’ve wrestled it onto the car
I bent the corners in under tension of a ratchet strap, bolted up and then released the tension. So “bent” might not be the correct term, just “flexed”.
The ARB will have sufficient flex to return to its original shape if you just put it under tension and then release it. I presume you’d need to heat the corners of the ARB to properly bend it into shape. But that may also have metallurgy-ramifications, ie weakening those areas. In any case, I didn’t have those tools, but I did have a ratchet strap and it worked fine!
Just try to do it safely! It was under a lot of tension and whenever anything is under tension, there’s the risk it will release uncontrolled and if it does then there’s a risk of getting injured.
Yeah, understood! My plan would be to loosely bolt up one side to the rear beam to prevent it escaping then do as you’ve suggested and tension it up with ratchet straps before bolting the other side in and tightening it all up. I’ll post up a how-to guide for anyone else looking to do the same while I’m at it.
Can anyone give me instructions on adjusting a sirion m1 clutch? With the new clutch in, the bite point is very low, it begins to engage about 2" off the floor. I’d like to bring the bite point up a bit, as I understand having it too tight (as I think it is currently?) is bad for the clutch? I don’t want to have to replace it again!
Edit - done a bit more reading, and it seems like I just need to give it more time bed in, I’ve driven about 7 miles since changing it so might need to give it a week or two of driving about for it to settle.
The best way to set your clutch is to move the clutch fork by hand, until you feel the bearing hitting the pressure plate. Then you adjust the cable to that point, but make sure there’s still some room between the bearing and pressure plate. When the cable is fitted, you still want to be able to move the fork by hand, and feel the bearing hitting the plate. You should be able to hear the metal on metal contact. If not, it’s probably too tight.
At this point, the ‘engagement point’ is at its highest. By loosening the cable, you can lower that point to your liking. Just keep in mind that a millimeter adjustment on the cable, will result in a greater adjustment on the pedal. Seems like you already found your ‘happy spot’, but this is how I did it!
Regarding the rear sway bar, Ive noticed here in Germany most of the M3 Sirions have a rear sway bar from factory, it looks compatible with the M1 rear end. Might be something to consider in the future
It’s got to be worth trying. It should be fairly cheap from a breaker/dismantler.
If it is similar to the original, it does make a big difference to the handling on an M1.
I drove the Sirion to work yesterday for its first proper run-down since the clutch change, the bite point was a bit weird, biting very low and with load of dead pedal at the top of the travel. It worked fine, but didn’t feel right.
I took the air intake gubbinz off earlier and wound the adjuster out to take a lot of slack out of the cable which has massively improved matters. The clutch now bites mid way up the pedal travel and there is only about 1" of travel at the very top where its just taking up the slack. I don’t want to adjust it too tight so that will do for now. I now know what to do so can adjust it up as required.
I took it out for a short run round the block and its much easier to live with now.
Next on the list is to have a good look at the exhaust manifold replacement job, for that, the radiator needs to come off which is a good thing because since taking the engine out, the car takes ages to get up to temperature. Once its up to temp its OK, and stays in the middle of the guage but I’m not sure if the thermostat is stuck either fully or partially open, or if I have an airlock somewhere. The heaters are nice and warm and the coolant level seems OK, but its not quite right I don’t think. I’ll not bother fiddling about with that until I have everything I need for the exhaust manifold job though. Does anyone know if there is a bleed point anywhere in the cooling system?
After that, the last thing on the list (for now) is to get the rear beam bushes replaced with the PU ones I have here. I might look at getting that booked in for later in the winter as its really a garage job to do.
I’m also looking at getting some underbody wax to protect the panels, probably Bilt-hamber Dynax UB as I am pleased with the S50 I put in the chassis rails and its pretty easy to apply with the big aerosol cans. I’ll need to give the underside a really good clean, let it dry right out then apply the wax though.
I don’t think (or hope) so. As far as I know, the radiator is the highest point in the cooling system and should push all the air out when bleeding the system. You can improve this by placing a funnel on top of the radiator. This way, when you fill up the system with coolant, you can let coolant sit in the funnel as well. By doing this, you increase the highest point in the system, making sure all the air gets out. Watch the ChrisFix video he did about flushing the cooling system, and you should be alright.
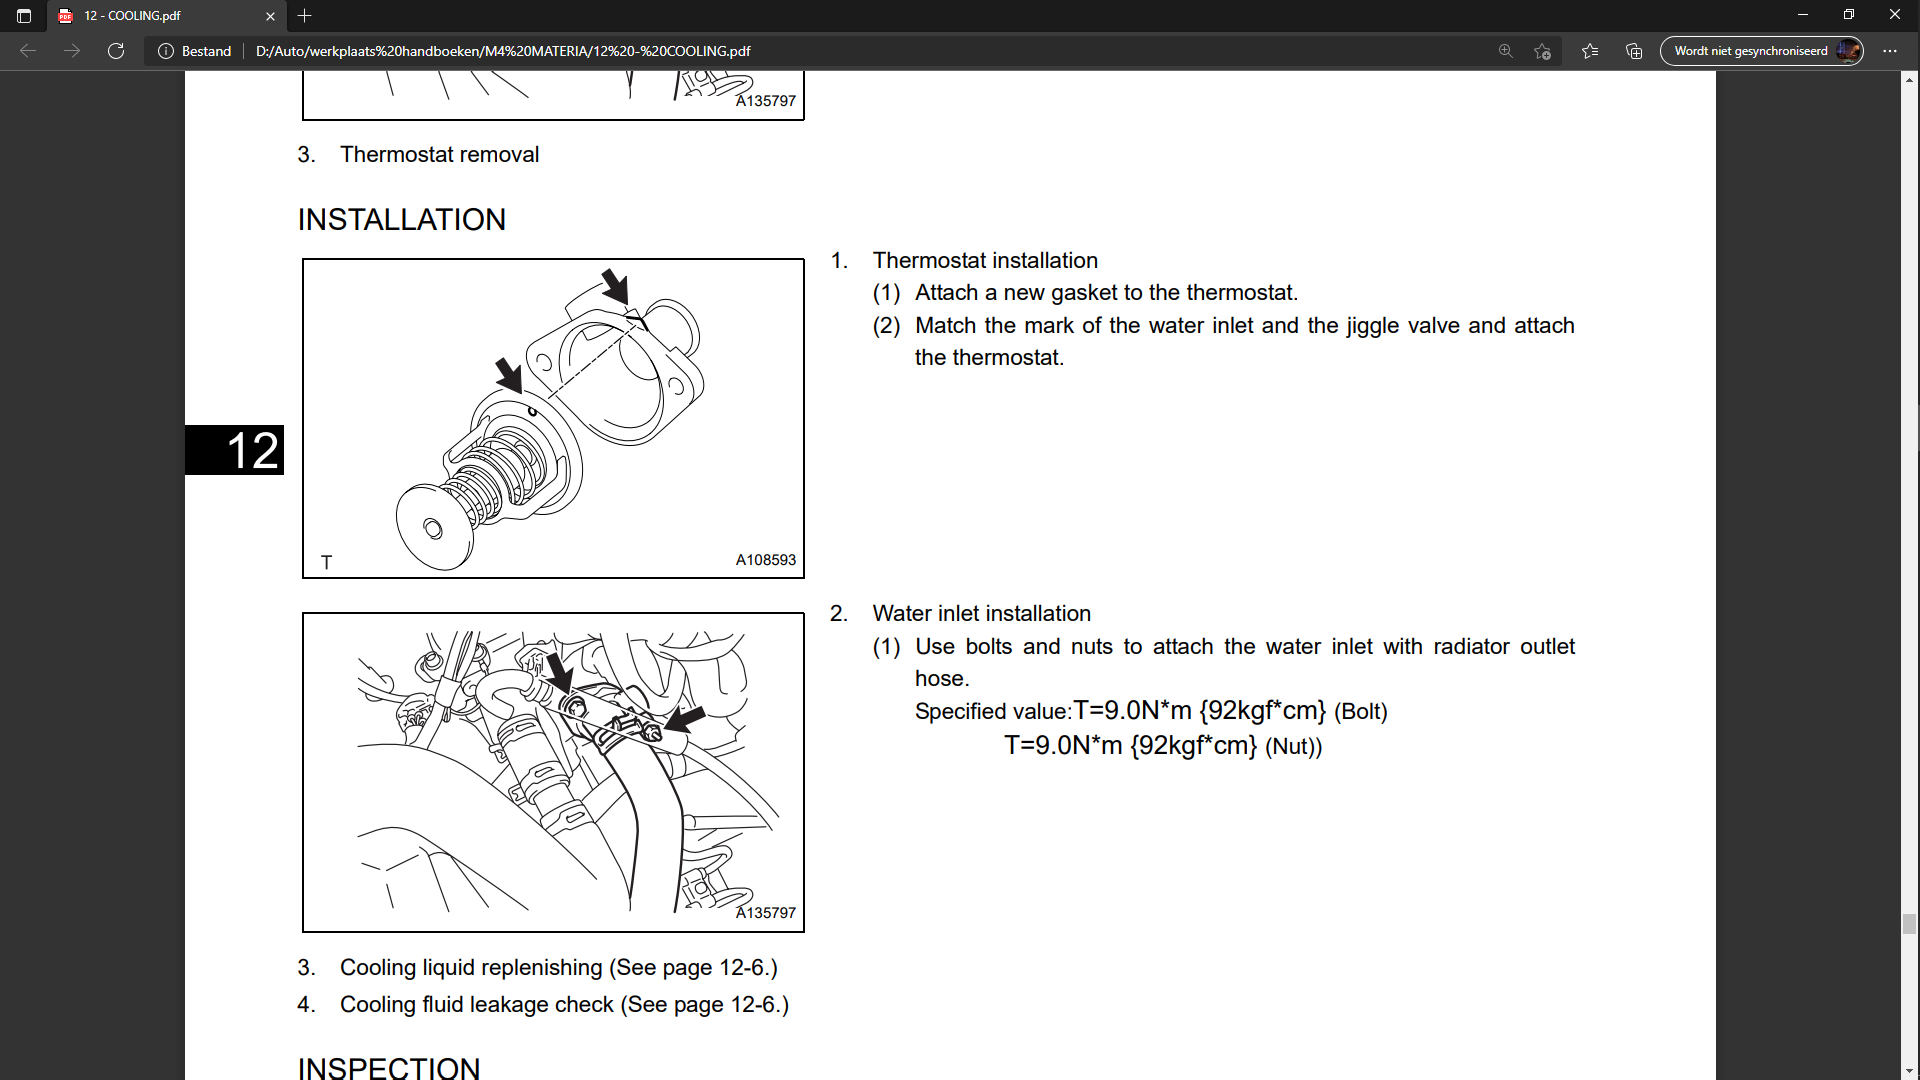
Your problem really sounds like a thermostat issue, so I’d start by doing that since it’s an easy and cheap fix to do. Make sure the ‘jiggle valve’ is pointing upwards when you install the thermostat! You can change the thermostat quite easily, you just have to take out the intake (like you did when you adjusted the clutch) and drain the coolant, before taking off the water inlet. Although I do understand you want to do all things at once. Good luck!