Ongoing project thread of Sirion Rally 2 M101

Thanks - yes that confirms that the way I had it was correct and its an exhaust issue.

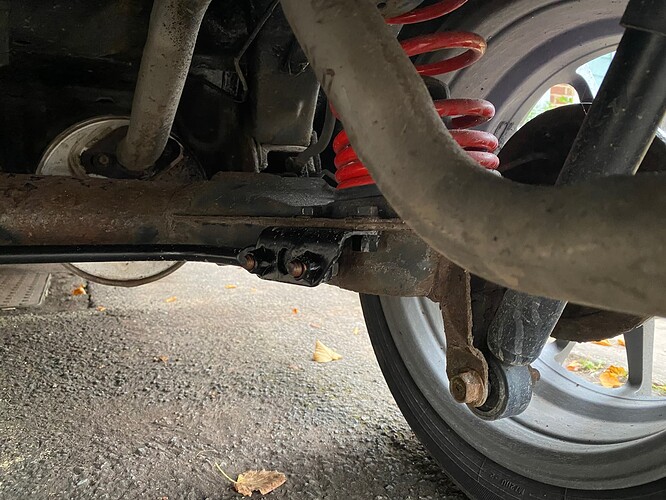
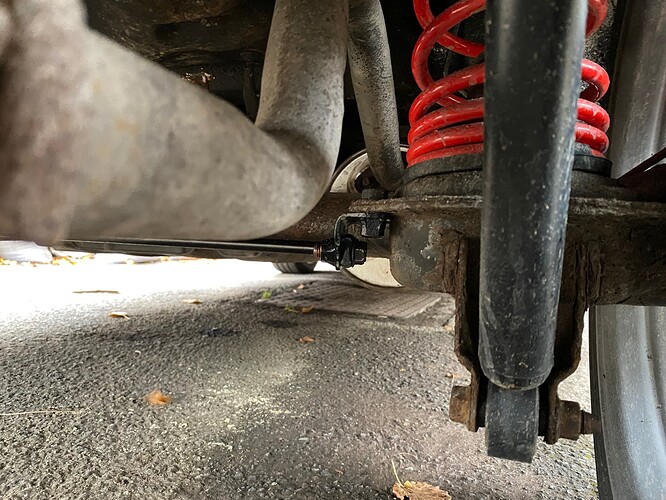
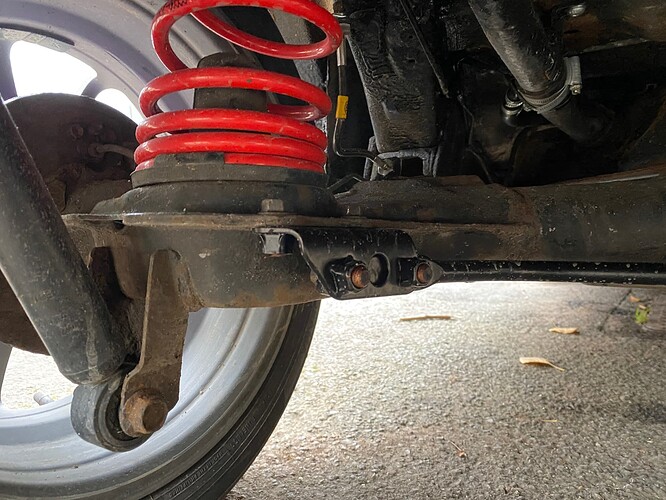
I’m going to refit the ARB today and take the exhaust rear section off and do some measuring to make sure the parts will fit and clear the ARB correctly - its not a big job but I’d rather make sure its definitely going to fit. I need to work out what is best, 2x 45 degree elbows or possibly make it a more aggressive turn with 1x 60 degree elbow and 1x 30 degree elbow to join to the section that goes over the rear beam.

That is very odd!
The ARB dimensions must be slightly different from the original.
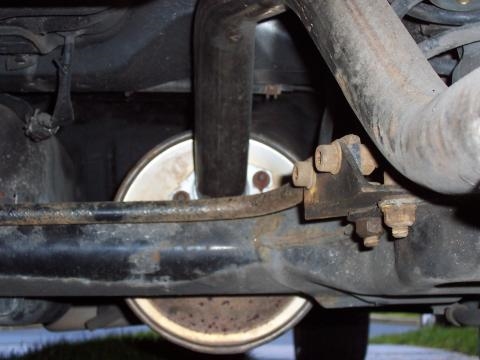
See below an old photo of Rally 2 ARB.

Sirion Rally 2 Rear Anti Roll Bar

2 Likes

ah yes I see what you mean, and yes it would clear the exhaust better like that - on the ARB I have the ‘arms’ are too long and the long centre section interferes with the rear beam too much.

1 Like

minor update. I’ve ‘performance modified’ the existing exhaust with a BFH where it contacts the corner of the ARB bracket which has improved things significantly on a test drive. Over really big bumps it still contacts the exhaust, but the ‘regular’ potholes and bumps round here now don’t cause it to contact so its much quieter.

I’ve been trying to work out what parts I needed to modify this to move the swan neck section rearwards and just went round and round in circles until I hit on a different idea. I bought another rear exhaust section from ebay, brand new for £19.99 delivered - and had it sent to my brother’s house.

if he cuts the pipe at the two red marks, flips it 180 degrees and then welds it back together it should work perfectly - it will lengthen the middle raised section where it goes over the rear axle, and shortens the tailpipe, pushing the swan neck further back to give more clearance.

s-l500

Looking at all the possible pipe sections I might have needed, plus clamps was coming in at about £50, this solution is under £20.

5 Likes

I got some photos today of how the Copen ARB fits the L700 beam, but I’m now curios if the the beam on the Sirion is actually wider than the L700 beam after what @TPG has mentioned above?


Thank you - yes that confirms that the Copen ARB has shorter ‘arms’ and can be underslung, keeping it out the way of the exhaust.

Worth noting for any other forum members, the Ultra Racing AR16-406 and (presumably) the AR19-406 does fit the rear axle of a L700/M100 Sirion, but you will need to modify a standard exhaust for it to clear the brackets. The brackets fit on top of the rear beam holes with the bolts threading through from below.

I’d be very interested if anyone buys an AR19-381 from Ultra Racing to see how long the ‘arms’ are vs the AR16-406

1 Like

Sirion beam is much wider. I’ve had an M100 and L700 side by side.

The next job looms, I need to replace the exhaust manifold/manicat and gasket as its blowing under cylinder 3. I have a new-to-me manicat thanks to @Rallynrace but would like to know if anyone knows what bolts I need? Having removed the grille insert from the front bumper, undone the radiator support bar and detached the heat shield it looks to me like there are 3x mounting bolts, with 12mm heads and 2x nuts mounted on studs (I presume) on the extreme outer holes.

A quick search suggests I want 12mm head, 16mm flanged, 20mm long 8.8 tensile bolts for the inner 3 and then probably 12mm M6 nuts for the other two - copper flashed ones potentially.

Is anyone able to help and check my maths?

No rush, having got this far I am going to spend a week dousing the bolt heads and nuts in penetrating oil twice daily to try and encourage them to give up their death-grip without snapping and shearing off flush with the block…

1 Like

Ignore the above, managed to get the 3x manifold bolts and 2x manifold nuts ordered from Toyota for £12 all in. I politely declined the gasket at £72 + VAT (!)

I’m going to go and see about having the mating face of the manifold skimmed on Monday just to make sure it mounts correctly, it’ll only be a few pounds from my local engineering shop I should imagine

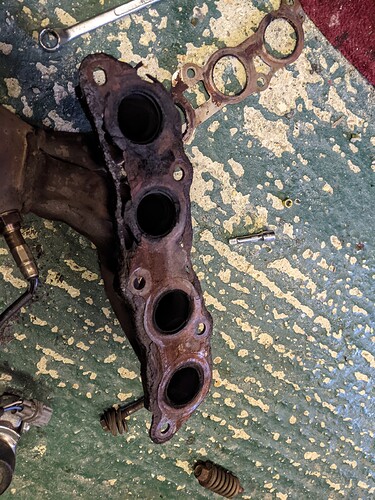
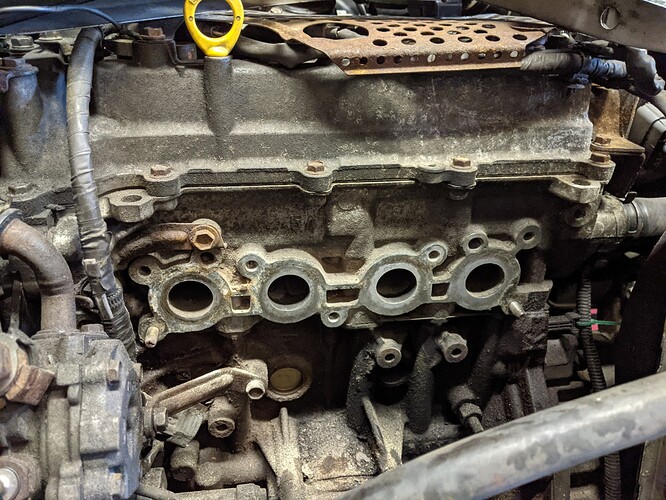
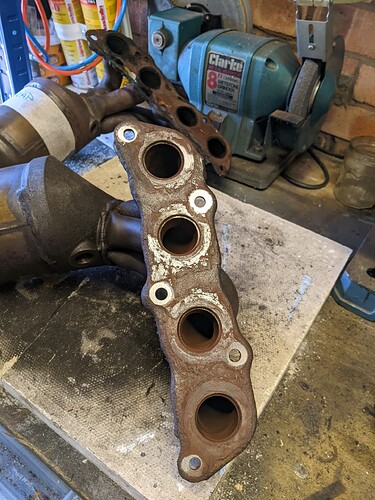
in an astonishing turn of events, all of the exhaust manifold bolts came off without snapping and having removed the front bumper and radiator support bar I was able to ease the old manifold out. It was definitely toast, the mating face had just crumbled below exhaust ports for cylinders 3 & 4

So this is destined for the bin, possibly being sold for the metals inside - though it seems to lack any form of part number.

Anyway, gasket and new bolts on order for both the manifold > cylinderhead and manifold > centre section of exhaust, I could recycle the old ones but for a modest price I got a set with everything I needed in it. With the manifold and gasket removed, I cleaned up the mating face of the cylinderhead

How forensically clean does this need to be? after taking this pic I cleaned it up more with a wire brush, stanley blade and a fine sanding block, does the entire flat metal surface need to be cleaned back to bright metal?

I need to do two things, firstly remove the rather stuck lambda sensor from the replacement manifold, this has been left soaking in some plusgas and I’ll try heating it up a bit over the weekend to free it off; then once its free I can take the manifold to an engineering shop to skim the mating face which is a bit untidy but nowhere near as bad as the old one. I’ll also vacuum off the front of the block while its all apart. Possibly tonight.

4 Likes

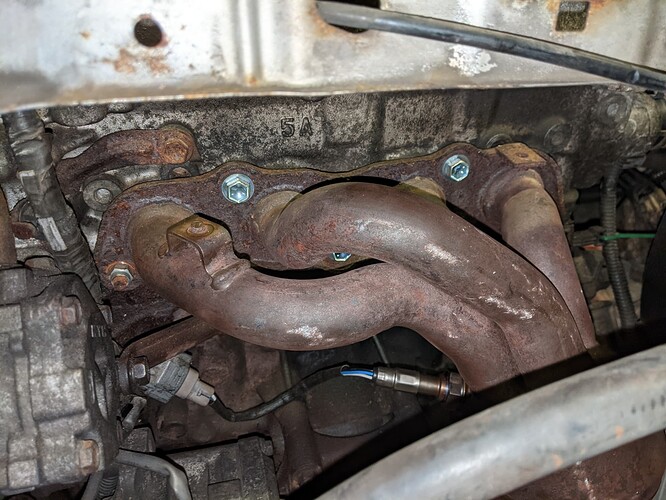
The last parts I needed arrived today so I set about reassembling everything. With the front bumper and radiator support bar removed it was quite an easy job. I had cleaned up the mating face of the cylinderhead with an aluminium oxide sanding block so it was smooth, located the new gasket on the two studs on the bottom edges, below cylinders 1 & 4 and then turned my attention to the manifold.

I’d taken it to my local engineering shop and they had cleaned up the mating face on their belt sander, I asked about having it skimmed, but they were concerned that the material wasn’t very thick, and also that it would be hard to clamp into position without making up a jig so I tidied it up and this was what it looked like

There were some dips around the pipes, but I hope that the gasket would sort them out. Next I tidied up the threads of the two captive nuts with a tap and some light oil, one was Ok but the other was a bit crusty.

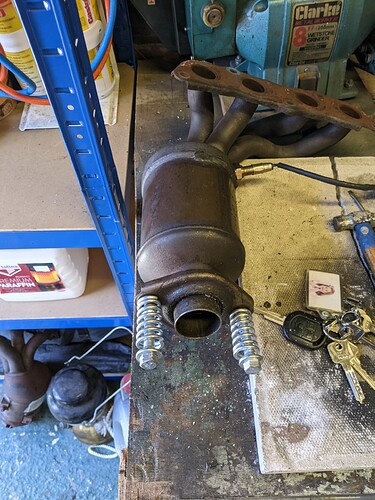
I would the new spring bolts into place to make sure they fitted correctly. All good here. Next I fitted the new conical crush gasket which was a right old carry-on. I had to nip around the edges to get it to fit over the tail end of the manifold, then tap it into position with a small hammer. its quite a lot bigger than the old (crushed) crush gasket, which would come back to cause problems later.

With this done, I could wiggle the new manifold into position and loosely fit the nuts and bolts holding it to the cylinderhead. I used new nuts & bolts from Toyota for this to be on the safe side.

I refitted the lambda sensor connector then started to fight with fitting the centre section of exhaust to the manifold. As the crush gasket was uncrushed, this was a right old war, the gasket was too big, so I couldn’t get the threads of the spring bolts to engage with the threads of the captive nuts in the manifold. I eventually managed to use a small g-clamp to pull the flanges together enough to get the threads to engage and tightened them up, though I’m not happy with the right hand side one and will likely remove and refit it tomorrow with a washer to make it pull in straighter. Maybe it’ll crush down better when its been heated up a bit?

I started the car up to see if it leaked and was pleased to hear it less noisy with no visible or smell-able combustion gasses at the engine end. I couldn’t let it run very long as I was in the garage with the doors closed but initial impressions are good.

I also took the opportunity to top up the gearbox oil. I’d put about 2 litres into the box when we’d refitted the driveshafts a few weeks back, but it wasn’t full to the fill point so I syringed in about another 250ml until it began flowing back out, taking it up to the ~2.3 litres it should have.

I’ll take it for a run tomorrow to see how it behaves and if the smell of exhaust has gone when stopped in traffic.

4 Likes

Hopefully that’s cured it.

1 Like

Took the car for a 40 minute run today and it seems to be all good now, no blowing at the manifold > head join and even the mainfold tail > centre exhaust joint seems to be OK. I’m not entirely happy with how its seated on the wire crush gasket but it seems OK for now.

I was slightly :flushed: :flushed: :flushed: concerned when I stopped at the first roundabout, about 3 minutes into my journey and a moderate amount of white smoke puffed out of the front grille, but this rapidly vanished once the car had warmed up. I suspect it was the light oil I’d used on the conical wire gasket to get it to slide onto the tail of the manifold, or possibly whatever they coat the cylinderhead > manifold gasket in to stop it rusting in storage? Anyway, by the time I’d got home after 40 minutes there was no smoke coming out of anywhere untoward. I popped the bonnet and let it idle for a bit while I watched closely but all seems fine.

So thats another job sorted out. I’ll only be able to use the car sparingly over the next few months as I’m not hugely keen to take it out on wet, salted roads. The council will start sending the gritters out before much longer I suspect. I aim to keen the car exercised as much as I can, but will try and limit its use to dry days.

4 Likes

Massive thanks to @Blyatsu for this!

Ever since I’d removed the engine to replace the clutch, the Sirion had run cold. I assumed that all the wiggling about and drying out had caused the thermostat to jam open, but chanced upon this thread which gave me an idea

In my haste to reassemble everything, I had plumbed the top and bottom radiator hoses in backwards on my car too.

I Undid them and re-routed the smaller diameter hose off the t-piece (which was all muddled up with the main loom and clutch cable) and the refilled the system with new coolant. I didn’t have a chance to take it for a drive last night but will go out later this afternoon and see if it gets up to temp properly now.

It might still be the thermostat, but I’m hopeful that its just that I’m an idiot and don’t take enough pictures of dismantling things to refer back to when I’m putting it back together again.

I do have a £20 Gates thermostat here that I can fit if needed, but hopefully its sorted.

1 Like

I’m glad you were able to fix it! Or at least fit the hoses the right way haha. It shows how helpful someone else’s mistake can actually be :wink:

2 Likes

Took it for a run yesterday and it got up to temp within 2 miles, considering it was about 2 celcius here and with windchill factored in loads miles better. It also kept temp even with the heater on and at motorway speeds so I’m calling that FIXT.

Thanks again for your help, it’s very easily done!

2 Likes

That is great news! Nothing like a K3VE2 getting up to temp :sunglasses:. I’m glad I was able to help!

1 Like

After my wife’s car developed a misfire I couldn’t trace and got scrapped, the Daihatsu has been pressed into daily service for her, this isn’t ideal as there is a lot of salt on the roads this time of year but needs must.

I’ve also ordered the gear linkage bushes and o-rings for the car as the gearchange has quite a bit of slop in it, weirdly it gets easier the more you rev, 5000rpm gearchanges are lovely and precise, but pootling about and changing up at 2500rpm can be a bit of a pig.

I aim to get out and replace them this sunday, all being well.

I also got the modified exhaust from my brother - I needed a standard one cut, lengthened where it rises over the rear axle, and then welded. Unfortunately with just a vague specification (provided by me…) it still fouled on the ARB bracket on the driver side rear so he’s taken it back and will chop and modify it again and post it back next week. For now I have the old one on there which does clonk a bit over potholes as it whacks the bracket.

I’m still saving up my pocket money for a cat-back custom stainless exhaust, but thats going to be £500 or so.

3 Likes

Just musing here, but does anyone know anywhere to buy Rally II decals at all?

The reason I ask is that I’m pondering a full respray as there are several areas of paint that are badly keyed/scratched and it being metallic its a total git to DIY respray with rattle cans (i’ve tried, it looks awful).

I suspect I’d struggle to get the 18 year old decals off, but would be more interested if anyone knows where to get replacements? I’ve found Rally IV ones, but not Rally II ones.

Since buying the Daihatsu Sirion Rally 2 last year, I’ve been working through a snagging list of issues in order of priority. Most of the big work is done, but there are still lots of smaller issues which are outstanding.

Today’s task was to look seriously at the linkage between gearstick and gearbox. The gearchange in the Sirion is good if you’re hoofing it along, changes above 5000rpm (it has a 7800rpm redline, should you wish to use it) are actually very slick, but pootling about it can be irritatingly difficult to change up and down ratios. Sometimes trying to select first or reverse can be impossible without going into another gear first and its generally a bit like stirring porridge - not befitting of a HALO MODEL SPORTS CAR I think you’ll all agree!

Thanks to brilliant content from @Blyatsu HERE I was able to order all of the bushes, bolts and o-rings for the job from Genuine Japanese Car Part Imports - Amayama, itself a goldmine of parts knowledge and exploded diagrams for all things Toyota. I bought everything I needed and had it delivered from Japan (they also have a warehouse in UAE, but didn’t stock all the parts I needed there) in under 2 weeks, and cost under £25 for everything.

The exploded diagram for the Sirion helped enormously, and having studied it and gathered the required parts I set to with the job in my garage this afternoon. The luxury of a garage has helped enormously with this job, because despite it being 6 celcius outside today, blowing a gale and chucking it down with rain, I was able to do the work in the dry and relative warm of inside!

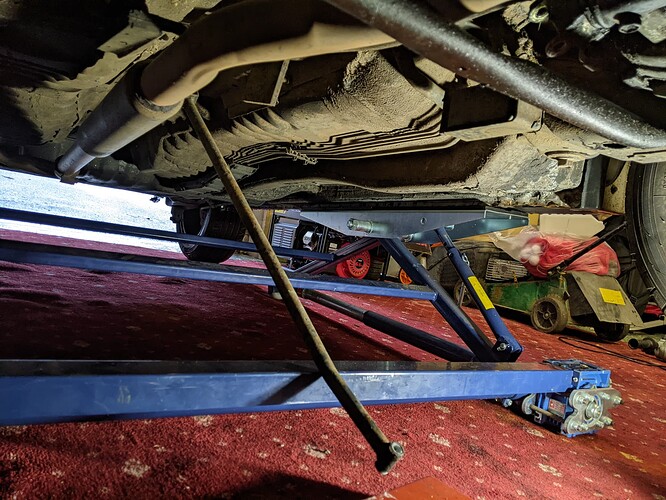
I got the car up on my scissor lift, with the boot weighted down with two 25kg bags of sand. This is necessary because the car is very short, and most of the weight is in the engine bay, so you need to counterbalance this with ballast in the boot. with the car up on the lift I could slide under the front and start work. The linkage between the gearstick and gearbox is basically two metal rods about a metre long, which have tubular sections at the end, which locate using bolts into the gearbox and gearstick. The bolts fit through plastic bushings with rubber o-rings to ensure a precise movement and protect from metal-on-metal action.

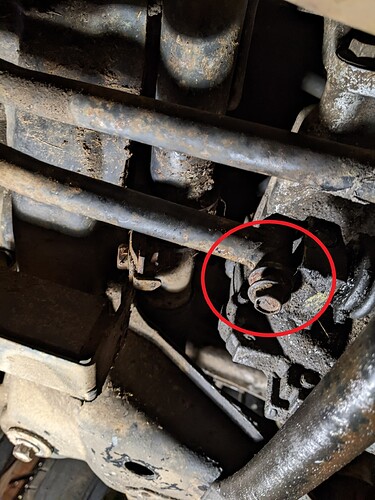
The first task was to ensure that the bracket was securely tightened to the gearbox at the front (gearbox) end, then undo the flange bolt from the captive nut and wiggle the tubular section of the gear linkage out from the retainer. This is held in with a 12mm head flange bolt

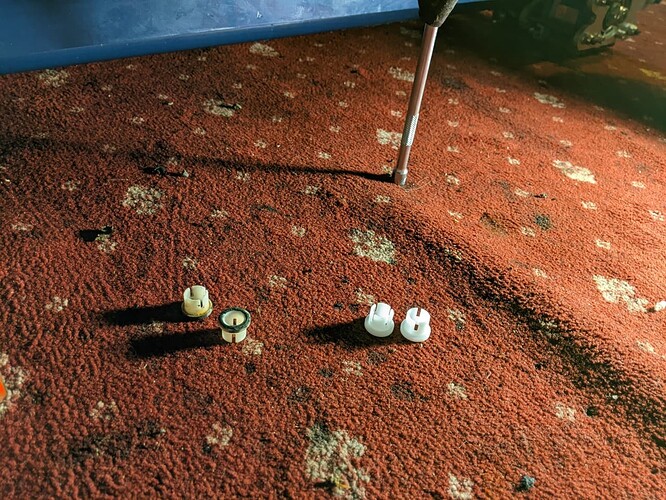
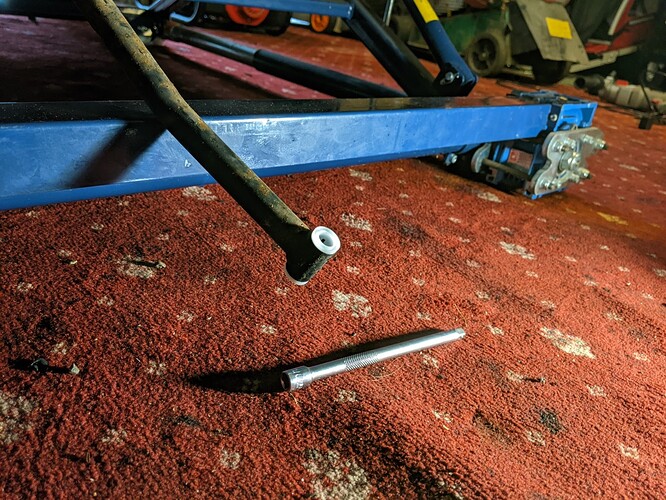
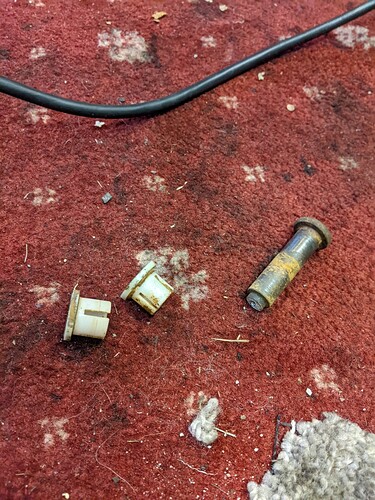
with this removed and the linkage rod flopped down, I could use a metal rod to push/drift out the two plastic bushings. These were probably original, being very faded and the o-rings having failed in several places. In this pic, the old ones are on the left and new ones are on the right

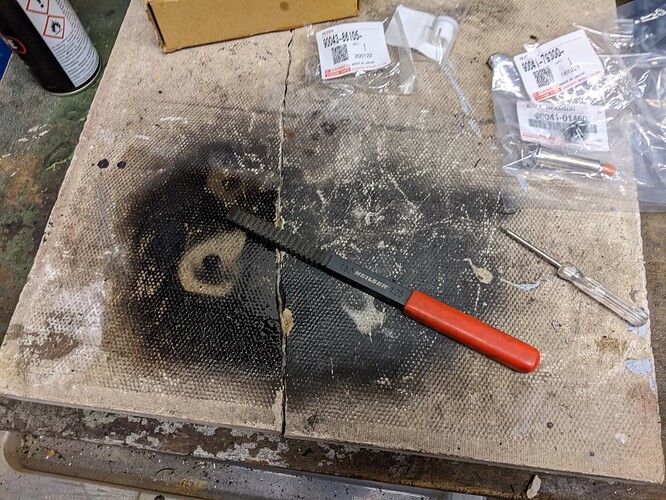
The bushings are really easy to fit, being press-fit into the tubular section. Before fitting I used a needle file to clean rust and muck from the inside of the tubular section for good measure

With the new bushings pressed in, I fitted the o-rings to the recessed section top and bottom. As I was going to be reusing the flanged bolt here, I took the time to clean up the thread with a thread file, and clean the smooth section with some light oil before refitting it. The bolt is exposed so there is no real point trying too hard to clean it up externally, but since it was apart anyway it seemed worth doing.

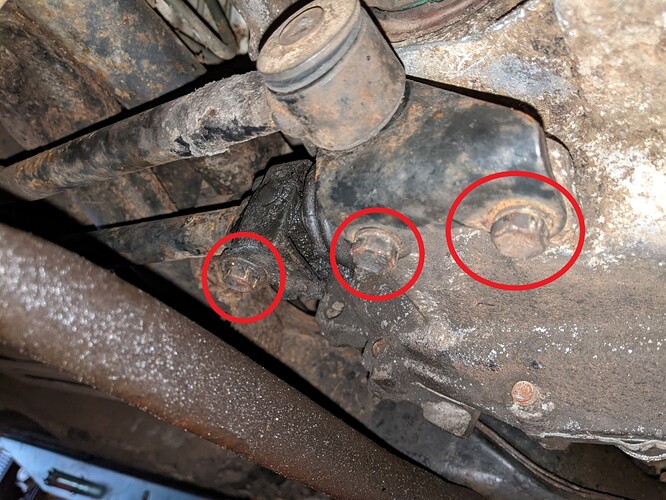
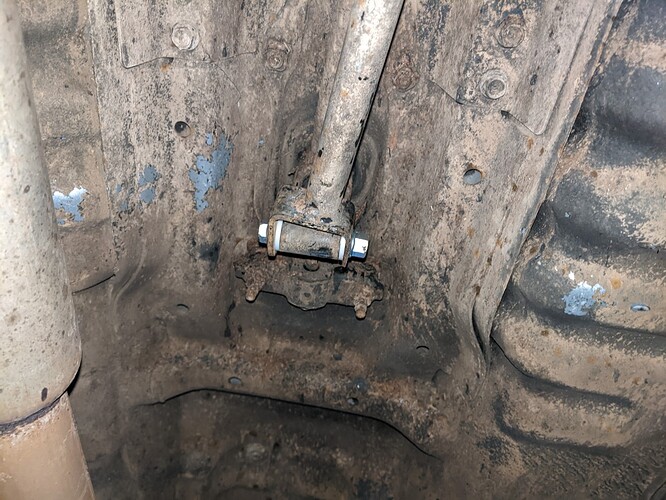
With the bushings and o-rings in position, I slotted the end of the linkage rod into the bracket where it connects to the gearbox, and slid the bolt in from below, using a small 1/4" ratchet with 12mm socket to do the bolt up tight into the captive nut in the top. I made sure to do up the two bracket bolts too, circled on the right hand side of this image. The leftmost bolt is the one which joins the linkage to the gearbox

It looks a bit crusty, but is actually well greased and looking alright for 17 years exposure to road salt and general muck.

With this end done, it was time to wriggle further under the car to get at the gearstick end. This was trickier for several reasons, firstly the lift sort of got in the way of what I was trying to do, secondly, the tubular section on the gearstick end was held in with a factory pressing which you had to grind off and thirdly the gearstick, once released from the linkage was free to move in all directions!

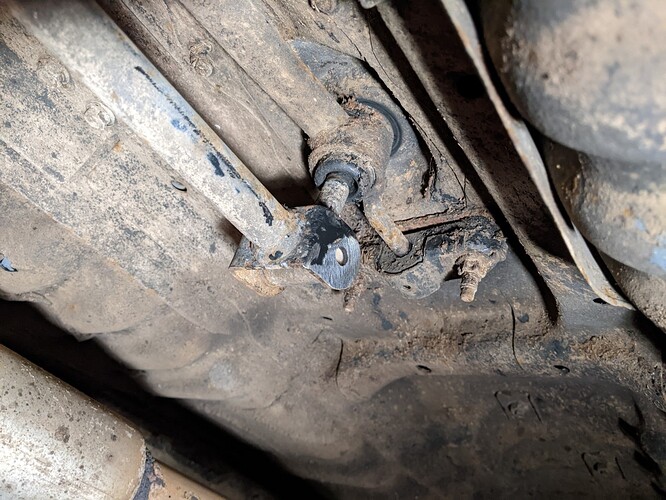
The first task was to grind the head off the H shaped retainer. I didn’t get a ‘before’ photo but this is a horrible job, requiring holding an angle grinder at full reach, upside down, to carefully grind off the head of the metal retainer without grinding through the linkage bar. You’re almost blind doing this, with grinding sparks going everywhere. Eye protection is CRUCIAL with this! This is the ‘after’ picture to give you an idea of what you’re working with

I took some metal off the linkage bar, but not much. With the head ground off, you can use a hammer and punch to drift out the remains of the retainer and swing the linkage bar down and out of the way

Again, you can see the plastic bushings and remains of the o-rings here, in the tubular section on the bottom of the gearstick. I drifted these out with a bit of metal rod and cleaned up the void with a needle file. With all this off, you can see the factory retainer on the right of this picture

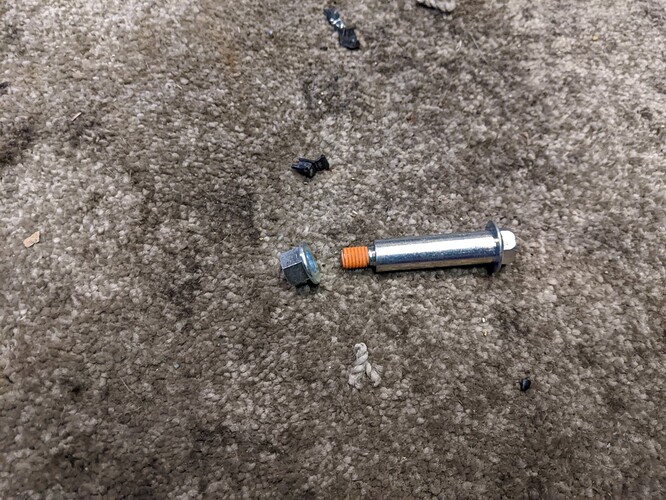
The head I ground off was on the bottom end and looked very similar to the top, in that it was a stepped section that would keep everything together. The bushings were well past their best on this end too. The kit of parts I ordered came with a nut & bolt to replace the retainer - an altogether better idea!

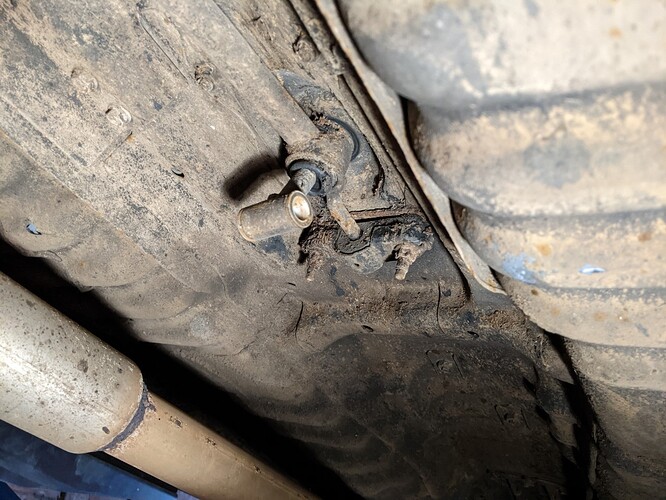
It comes with threadlock pre-applied and is stainless steel for longevity. I did the same here, fitting the new bushings, o-rings and sliding the linkage rod into place then tapping the bolt through, this time horizontally

then tightened up the nut and its job done. It looks a bit wonky in the last picture, but this is just due to the angle of the phone when I took the pic.

I put all my toys away and took the car out for a run to check all was well - what a transformation! The gear selection is mow much easier and more precise, even at low speeds & lower revs. All gears engage cleanly and the ‘crunch’ I often got going from 1st to 2nd gear is gone. The only issue I have is that in the 3rd → 4th gear plane the gearchange feels a bit too stiff, I think this is because I overtightened the nut & bolt on the bottom of the gearstick, next time I’m under the car I’ll slacken this off by 1/8th of a turn and see if that makes it move more easily.

Overall a fiddly job, but one which has helped a huge amount and well worth doing! It hardly required any tools too, the only things I needed were a small socket set or a 12mm spanner and either a hacksaw or a grinder to get the cast retainer off the gearstick end. I’m baffled why this wasn’t a nut & bolt from the factory, especially as the gearbox end is exactly this, but what do I know?
6 Likes